导读:为了保证我们微服务的安全性,本章主要内容是使用Oauth2.0给我们微服务加上安全校验。
概念
为了保证服务的安全性,往往都会在接口调用时做权限校验。在分布式架构中我们会把复杂的业务拆成多个微服务,这样不得不在所有服务中都实现这样的权限校验逻辑,这样就会有很多代码和功能冗余。所以在微服务架构中一般会独立出一个单独的认证授权服务,供其他所有服务调用。
在SpringCloud体系中,我们只对网关层开放外网访问权限,其他后端微服务做网络隔离,所有外部请求必须要通过网关才能访问到后端服务。在网关层对请求进行转发时先校验用户权限,判断用户是否有权限访问。
我们一般使用Oauth2.0来实现对所有后端服务的统一认证授权。这期内容不讲Oauth2.0协议,只讲实现过程。如果大家对Oauth2.0不是很了解,可以翻看我之前的博客。
Oauth2认证服务
建立认证服务Auth-Service
    <dependencies>
    	<dependency>
    		<groupId>org.springframework.boot</groupId>
    		<artifactId>spring-boot-starter-web</artifactId>
    	</dependency>
    	<dependency>
    		<groupId>com.alibaba.cloud</groupId>
    		<artifactId>spring-cloud-starter-alibaba-nacos-discovery</artifactId>
    	</dependency>
    	<dependency>
    		<groupId>org.springframework.cloud</groupId>
    		<artifactId>spring-cloud-starter-oauth2</artifactId>
    	</dependency>
    	<!--database-->
    	<dependency>
    		<groupId>mysql</groupId>
    		<artifactId>mysql-connector-java</artifactId>
    	</dependency>
    	<dependency>
    		<groupId>com.baomidou</groupId>
    		<artifactId>mybatis-plus-boot-starter</artifactId>
    	</dependency>
    	<dependency>
    		<groupId>com.jianzh5.cloud</groupId>
    		<artifactId>cloud-common</artifactId>
    	</dependency>
    </dependencies>
引入mysql主要是我们需要将oauth2.0的客户端信息以及token认证存入数据库。
建立相关数据表
主要是导入oauth2相关数据表以及用户表,在实际开发过程中用户权限这一套应该是基于RBAC进行设计,这里为了方便演示我就直接只做一个用户表。
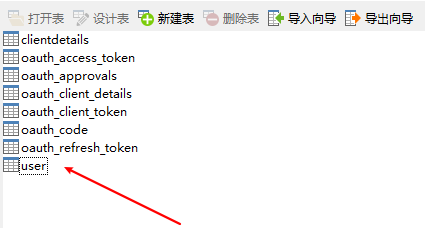
(oauth2.0相关表结构大家可以在网上找,如果找不到可以联系我)

给用户表添加数据:
INSERT INTO `user` VALUES ('1', '$2a$10$gExKdT3nkoFKfW1cFlqQUuFji3azHG.W4Pe3/WxHKANg3TpkSJRfW', 'zhangjian', 'ADMIN');
注意:在spring-security 5.x版本必须要注入密码实现器,我们使用了 BCryptPasswordEncoder 加密器,所以需要这里也需要对密码进行加密
添加client信息,使用 oauth_client_details 表:
INSERT INTO `oauth_client_details` VALUES ('app', 'app', '$2a$10$fG7ou8CNxDESVFLIM7LrneDmIpwbrxGM2W6.coGPddfQPyZxiqXE6', 'web', 'implicit,client_credentials,authorization_code,refresh_token,password', 'http://www.baidu.com', 'ROLE_USER', null, null, null, null);
同理也需要对client_secret字段进行加密
application.yml配置文件
    spring:
      main:
        allow-bean-definition-overriding: true
      application:
        name: auth-service
      cloud:
        nacos:
          discovery:
            server-addr: xx.xx.xx.xx:8848/
      datasource:
        type: com.zaxxer.hikari.HikariDataSource
        url: jdbc:mysql://xx.xx.xx.xx:3306/oauth2_config?characterEncoding=utf8&zeroDateTimeBehavior=convertToNull&useSSL=false
        username: root
        password: xxxxxx
        driver-class-name: com.mysql.jdbc.Driver

    server:
      port: 5000

    mybatis-plus:
      mapper-locations: classpath:/mapper/*Mapper.xml
自定义认证服务器
只需要继承 AuthorizationServerConfigurerAdapter 并在开始处加上@EnableAuthorizationServer 注解即可
    /**
     * <p>
     * <code>AuthorizationServerConfig</code>
     * </p>
     * Description:
     * 授权/认证服务器配置
     * @author javadaily
     * @date 2020/2/26 16:26
     */
    @Configuration
    @EnableAuthorizationServer
    public class AuthorizationServerConfig extends AuthorizationServerConfigurerAdapter {
        @Autowired
        private UserDetailServiceImpl userDetailService;

        // 认证管理器
        @Autowired
        private AuthenticationManager authenticationManager;

        @Autowired
        private DataSource dataSource;

        /**
         * access_token存储器
         * 这里存储在数据库,大家可以结合自己的业务场景考虑将access_token存入数据库还是redis
         */
        @Bean
        public TokenStore tokenStore() {
            return new JdbcTokenStore(dataSource);
        }

        /**
         * 从数据库读取clientDetails相关配置
         * 有InMemoryClientDetailsService 和 JdbcClientDetailsService 两种方式选择
         */
        @Bean
        public ClientDetailsService clientDetails() {
            return new JdbcClientDetailsService(dataSource);
        }

        /**
         * 注入密码加密实现器
         */
        @Bean
        public PasswordEncoder passwordEncoder(){
            return new BCryptPasswordEncoder();
        }

        /**
         * 认证服务器Endpoints配置
         */
        @Override
        public void configure(AuthorizationServerEndpointsConfigurer endpoints) throws Exception {
            //如果需要使用refresh_token模式则需要注入userDetailService
            endpoints.userDetailsService(userDetailService);
            endpoints.authenticationManager(this.authenticationManager);
            endpoints.tokenStore(tokenStore());
        }

        /**
         * 认证服务器相关接口权限管理
         */
        @Override
        public void configure(AuthorizationServerSecurityConfigurer security) throws Exception {
            security.allowFormAuthenticationForClients() //如果使用表单认证则需要加上
                    .tokenKeyAccess("permitAll()")
                    .checkTokenAccess("isAuthenticated()");
        }

        /**
         * client存储方式,此处使用jdbc存储
         */
        @Override
        public void configure(ClientDetailsServiceConfigurer clients) throws Exception {
            clients.withClientDetails(clientDetails());
        }
    }
自定义web安全配置类
    /**
     * <p>
     * <code>WebSecurityConfig</code>
     * </p>
     * Description:
     * 自定义web安全配置类
     * @author javadaily
     * @date 2020/2/26 16:35
     */
    @Configuration
    @EnableWebSecurity
    @EnableGlobalMethodSecurity(prePostEnabled = true)
    public class WebSecurityConfig extends WebSecurityConfigurerAdapter {

        @Override
        @Bean
        public UserDetailsService userDetailsService(){
            return new UserDetailServiceImpl();
        }

        @Bean
        public PasswordEncoder passwordEncoder(){
            return new BCryptPasswordEncoder();
        }


        /**
         * 认证管理
         * @return 认证管理对象
         * @throws Exception 认证异常信息
         */
        @Override
        @Bean
        public AuthenticationManager authenticationManagerBean() throws Exception {
            return super.authenticationManagerBean();
        }

        @Override
        protected void configure(AuthenticationManagerBuilder auth) throws Exception {
            auth.userDetailsService(userDetailsService())
                    .passwordEncoder(passwordEncoder());

        }

        /**
         * http安全配置
         * @param http http安全对象
         * @throws Exception http安全异常信息
         */
        @Override
        protected void configure(HttpSecurity http) throws Exception {
            http.authorizeRequests()
                    .anyRequest().authenticated()
                    .and().httpBasic()
                    .and().cors()
                    .and().csrf().disable();
        }

        @Override
        public void configure(WebSecurity web) throws Exception {
            web.ignoring().antMatchers(
                    "/error",
                    "/static/**",
                    "/v2/api-docs/**",
                    "/swagger-resources/**",
                    "/webjars/**",
                    "/favicon.ico"
                );
        }
    }
自定义用户实现
    @Service
    public class UserDetailServiceImpl implements UserDetailsService {

        @Autowired
        private UserMapper userMapper;

        @Override
        public UserDetails loadUserByUsername(String userName) throws UsernameNotFoundException {
            //获取本地用户
            User user = userMapper.selectByUserName(userName);
            if(user != null){
                //返回oauth2的用户
                return new org.springframework.security.core.userdetails.User(
                        user.getUsername(),
                        user.getPassword(),
                        AuthorityUtils.createAuthorityList(user.getRole())) ;
            }else{
                throw  new UsernameNotFoundException("用户["+userName+"]不存在");
            }
        }
    }
实现 UserDetailsService 接口并实现 loadUserByUsername 方法,这一部分大家根据自己的技术框架实现,Dao层我就不贴出来了。
对外提供获取当前用户接口
    @RestController
    @RequestMapping("user")
    public class UserController {
        @Autowired
        public UserMapper userMapper;


        @GetMapping("getByName")
        public User getByName(){
            return userMapper.selectByUserName("zhangjian");
        }

        /**
         * 获取授权的用户信息
         * @param principal 当前用户
         * @return 授权信息
         */
        @GetMapping("current/get")
        public Principal user(Principal principal){
            return principal;
        }
    }
资源服务器
Oauth2.0的认证服务器也资源服务器,我们在启动类上加入 @EnableResourceServer 注解即可
    @SpringBootApplication
    //对外开启暴露获取token的API接口
    @EnableResourceServer
    @EnableDiscoveryClient
    public class AuthServerApplication {
        public static void main(String[] args) {
            SpringApplication.run(AuthServerApplication.class, args);
        }
    }
后端微服务改造
后端所有微服务都是资源服务器,所以我们需要对其进行改造,下面以account-service为例说明改造过程
- 添加oauth2.0依赖
    <dependency>
    	<groupId>org.springframework.cloud</groupId>
    	<artifactId>spring-cloud-starter-oauth2</artifactId>
    </dependency>
- 配置资源服务器
    @Configuration
    @EnableResourceServer
    public class ResourceServerConfig extends ResourceServerConfigurerAdapter {
        @Override
        public void configure(HttpSecurity http) throws Exception {
            http
                    .authorizeRequests()
                    .requestMatchers(EndpointRequest.toAnyEndpoint()).permitAll()
                    .antMatchers(
             "/v2/api-docs/**",
                        "/swagger-resources/**",
                        "/swagger-ui.html",
                        "/webjars/**"
                        ).permitAll()
                    .anyRequest().authenticated()
                    .and()
                    //统一自定义异常
                    .exceptionHandling()
                    .and()
                    .csrf().disable();
        }
    }
- 修改配置文件,配置身份获取地址
    security:
      oauth2:
        resource:
          user-info-uri: http://localhost:5000/user/current/get
          id: account-service
测试
-
我们直接访问account-service接口,会提示需要需要认证授权

-
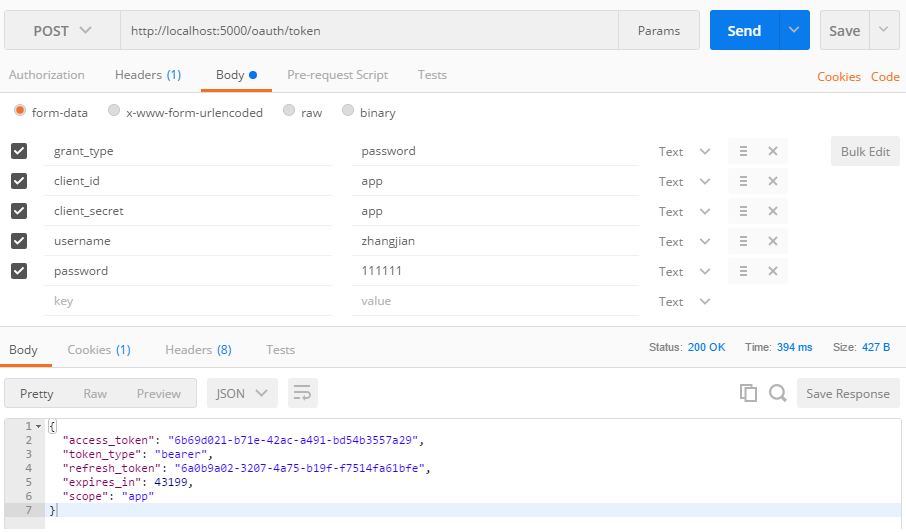
通过密码模式从认证服务器获取access_token
-
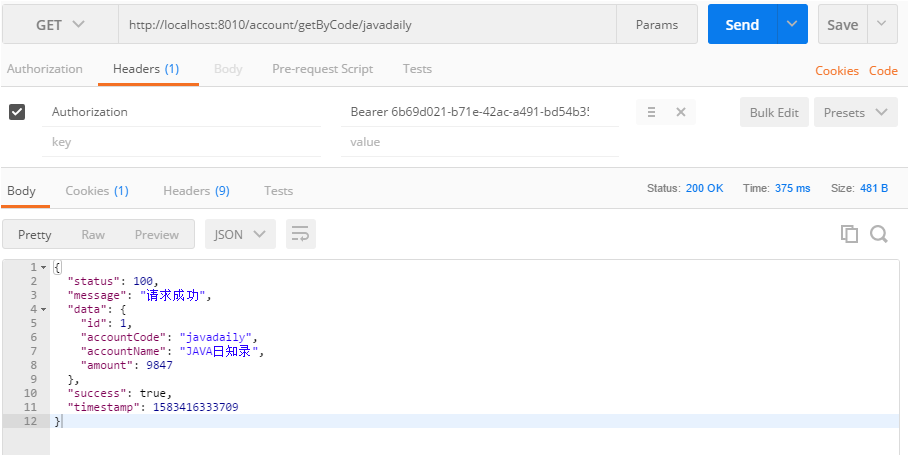
在请求头上带上access_token重新访问account-service接口,接口正常响应
-
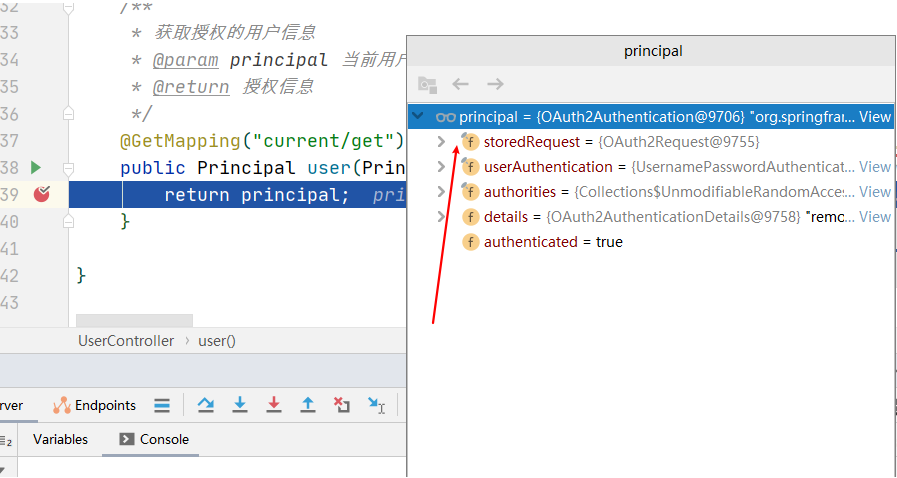
通过debug模式发现每次访问后端服务时都会去认证资源器获取当前用户
-
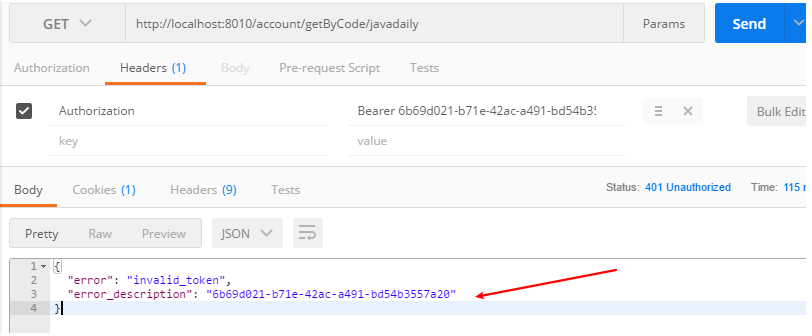
输入错误的access_token进行访问,提示access_token失效
总结
通过以上几步我们将后端服务加上了认证服务,必须要先进行认证才能正常访问后端服务。整个实现过程还是比较复杂的,建议大家都实践一下,理解其中相关配置的作用,也方便更深入理解Oauth2协议。
Java 面试宝典是大明哥全力打造的 Java 精品面试题,它是一份靠谱、强大、详细、经典的 Java 后端面试宝典。它不仅仅只是一道道面试题,而是一套完整的 Java 知识体系,一套你 Java 知识点的扫盲贴。
它的内容包括:
- 大厂真题:Java 面试宝典里面的题目都是最近几年的高频的大厂面试真题。
- 原创内容:Java 面试宝典内容全部都是大明哥原创,内容全面且通俗易懂,回答部分可以直接作为面试回答内容。
- 持续更新:一次购买,永久有效。大明哥会持续更新 3+ 年,累计更新 1000+,宝典会不断迭代更新,保证最新、最全面。
- 覆盖全面:本宝典累计更新 1000+,从 Java 入门到 Java 架构的高频面试题,实现 360° 全覆盖。
- 不止面试:内容包含面试题解析、内容详解、知识扩展,它不仅仅只是一份面试题,更是一套完整的 Java 知识体系。
- 宝典详情:https://www.yuque.com/chenssy/sike-java/xvlo920axlp7sf4k
- 宝典总览:https://www.yuque.com/chenssy/sike-java/yogsehzntzgp4ly1
- 宝典进展:https://www.yuque.com/chenssy/sike-java/en9ned7loo47z5aw
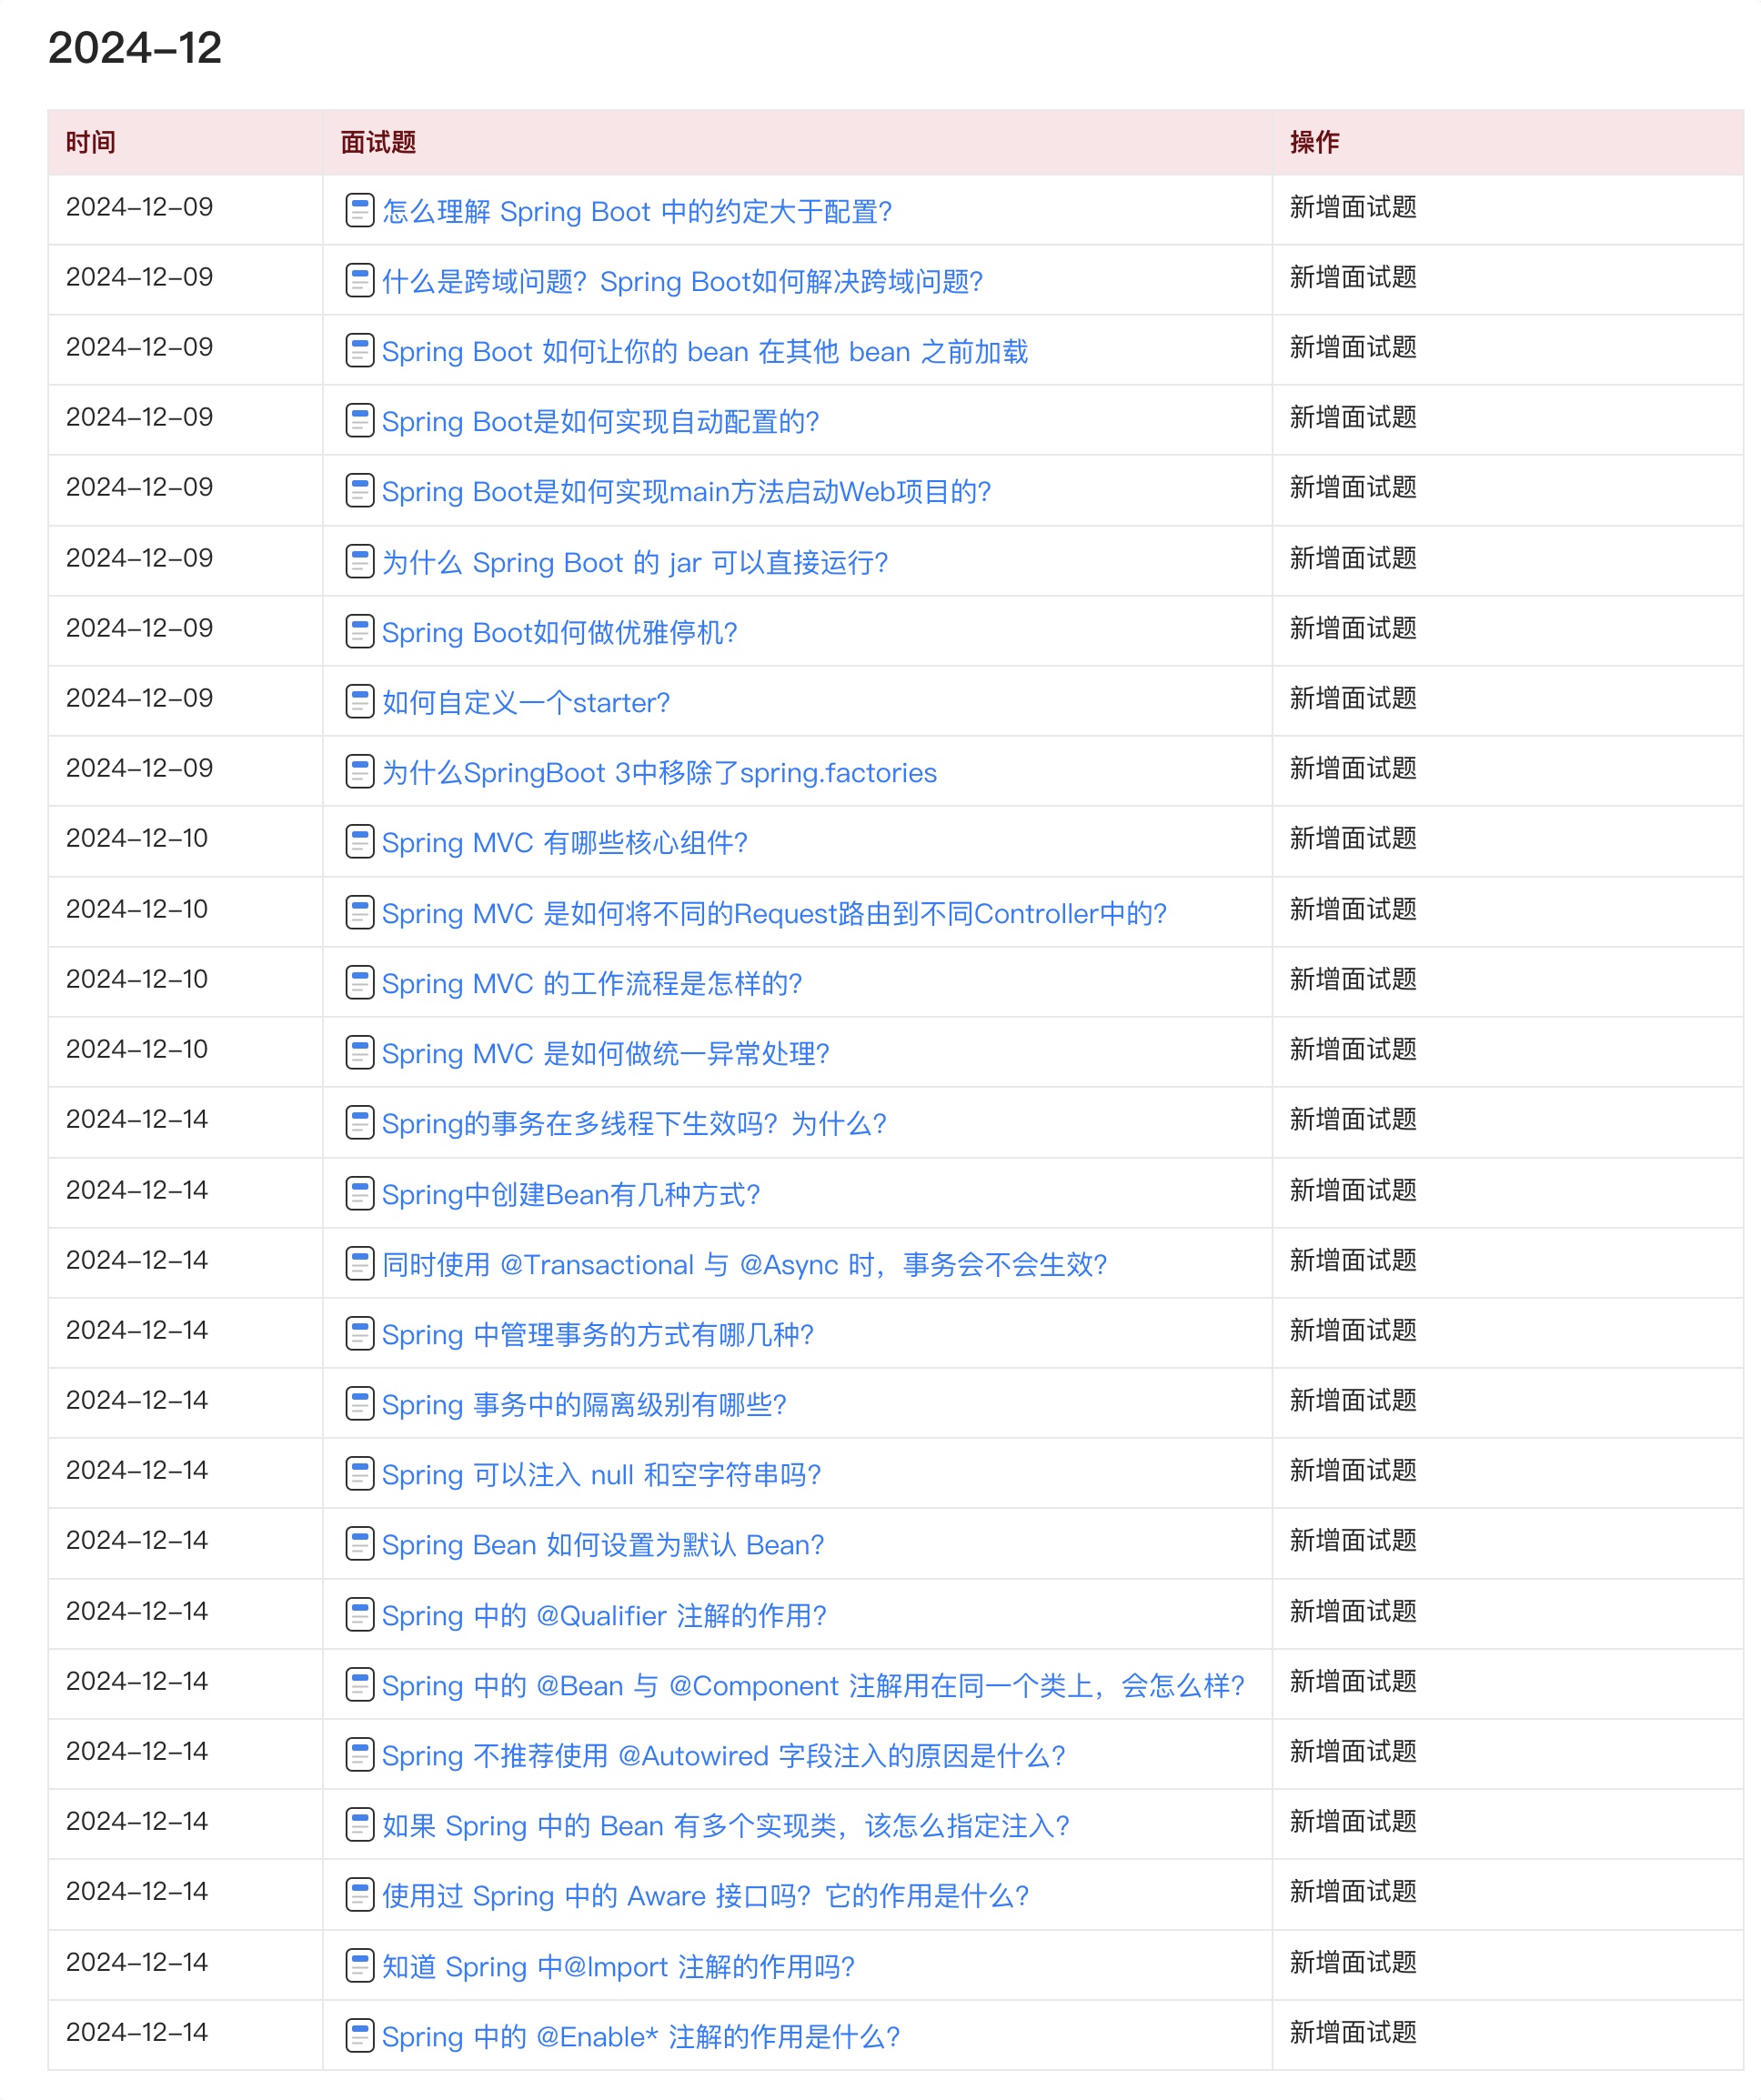
目前 Java 面试宝典累计更新 400+ 道,总字数 42w+。大明哥还在持续更新中,下图是大明哥在 2024-12 月份的更新情况:
想了解详情的小伙伴,扫描下面二维码加大明哥微信【daming091】咨询

同时,大明哥也整理一套目前市面最常见的热点面试题。微信搜[大明哥聊 Java]或扫描下方二维码关注大明哥的原创公众号[大明哥聊 Java] ,回复【面试题】 即可免费领取。
