本章,我将基于Spring Cloud—— Edgware.SR3 搭建一个Eureka Demo应用,演示下Eureka的基本使用。我这里没有使用Spring Cloud的最新版本,而是使用了Edgware.SR3,其对应的Netflix Eureka版本是1.7.2。但这不会影响后面我对Eureka核心原理的讲解,事实上,源码的阅读应该从最初的Skeleton版本开始。
另外说明一下,Spring Cloud Eureka Server和Client仅仅是对Netflix Eureka进行了封装,加了一些注解,对Spring Boot进行支持。所以阅读Eureka源码,应该先从 Netflix Eureka 开始,看完后再把Spring Cloud Eureka Server和Client两个项目的源码给看一下就可以了。
Netflix Eureka源码: https://github.com/Netflix/eureka;
Spring Cloud源码:https://github.com/spring-cloud/spring-cloud-netflix。
一、Eureka Server集群
本节,我将构建一个由2节点组成的Eureka Server集群,然后注册两个应用服务:ServiceA和ServiceB。
首先,我们构建Eureka Server集群,需要新建一个Spring Boot应用,引入相关的Maven POM依赖:
    <project xmlns="http://maven.apache.org/POM/4.0.0" xmlns:xsi="http://www.w3.org/2001/XMLSchema-instance"
          xsi:schemaLocation="http://maven.apache.org/POM/4.0.0 http://maven.apache.org/xsd/maven-4.0.0.xsd">
          <modelVersion>4.0.0</modelVersion>

          <groupId>com.tpvlog</groupId>
          <artifactId>eureka-server</artifactId>
          <version>0.0.1-SNAPSHOT</version>
          <packaging>jar</packaging>

          <name>eureka-server</name>

        <!--Spring Boot依赖-->
        <parent>
            <groupId>org.springframework.boot</groupId>
            <artifactId>spring-boot-starter-parent</artifactId>
            <version>1.5.13.RELEASE</version>
        </parent>

          <properties>
            <project.build.sourceEncoding>UTF-8</project.build.sourceEncoding>
          </properties>

        <!--Spring Cloud依赖-->
        <dependencyManagement>
            <dependencies>
                <dependency>
                    <groupId>org.springframework.cloud</groupId>
                    <artifactId>spring-cloud-dependencies</artifactId>
                    <version>Edgware.SR3</version>
                    <type>pom</type>
                    <scope>import</scope>
                </dependency>
            </dependencies>
        </dependencyManagement>

        <!--Eureka依赖-->
          <dependencies>
            <dependency>
                <groupId>org.springframework.cloud</groupId>
                <artifactId>spring-cloud-starter-config</artifactId>
            </dependency>
            <!--Eureka Client依赖-->
            <dependency>
                <groupId>org.springframework.cloud</groupId>
                <artifactId>spring-cloud-starter-eureka</artifactId>
            </dependency>
            <!--Eureka Server依赖-->
            <dependency>
                <groupId>org.springframework.cloud</groupId>
                <artifactId>spring-cloud-starter-eureka-server</artifactId>
            </dependency>
        </dependencies>
    </project>
注意上面,我同时引入了spring-cloud-starter-eureka这个依赖,因为在集群部署下,每个Eureka Server都是其它Server的客户端,用来进行集群间的数据复制。
接着,是Spring Boot的启动类,注意这里使用了@EnableEurekaServer注解,标识这是一个EurekaServer:
    /**
     * eureka注册中心
     *
     * @author ressmix
     */
    @SpringBootApplication
    @EnableEurekaServer
    public class EurekaServer {
        public static void main(String[] args) {
            SpringApplication.run(EurekaServer.class, args);
        }
    }
接着是Spring Boot的配置类——application.yml:
    spring:
      application:
        name: EurekaServer1
    server:
      port: 8761
    eureka:
      # Eureka实例配置
      instance:
        # 配置通过主机名方式注册
        hostname: EurekaServer1
      # Eureka Client配置
      client:
        serviceUrl:
          # 作为client向EurekaServer2进行注册
          defaultZone: http://EurekaServer2:8762/eureka/
EurekaServer1这个Server节点将启动在8761端口提供服务。同时,EurekaServer1自身也作为Eureka Client,向EurekaServer2这个Server节点注册自己,因为Eureka Server集群中的每个节点,对于其它节点来说就是一个客户端,需要同步数据。
按照同样的方式,我们再新建一个Spring Boot应用作为EurekaServer2,唯一区别是application.yml配置不同:
    spring:
      application:
        name: EurekaServer2
    server:
      port: 8762
    eureka:
      # Eureka Server配置
      instance:
        # 配置通过主机名方式注册
        hostname: EurekaServer2
      # Eureka Client配置
      client:
        serviceUrl:
          # 作为client向EurekaServer1进行注册
          defaultZone: http://EurekaServer1:8761/eureka/
注意,记得在测试机器中的hosts文件里加上域名和IP的映射配置,我是直接在本机测试,所以加上如下两条配置:
127.0.0.1 EurekaServer1
127.0.0.1 EurekaServer2
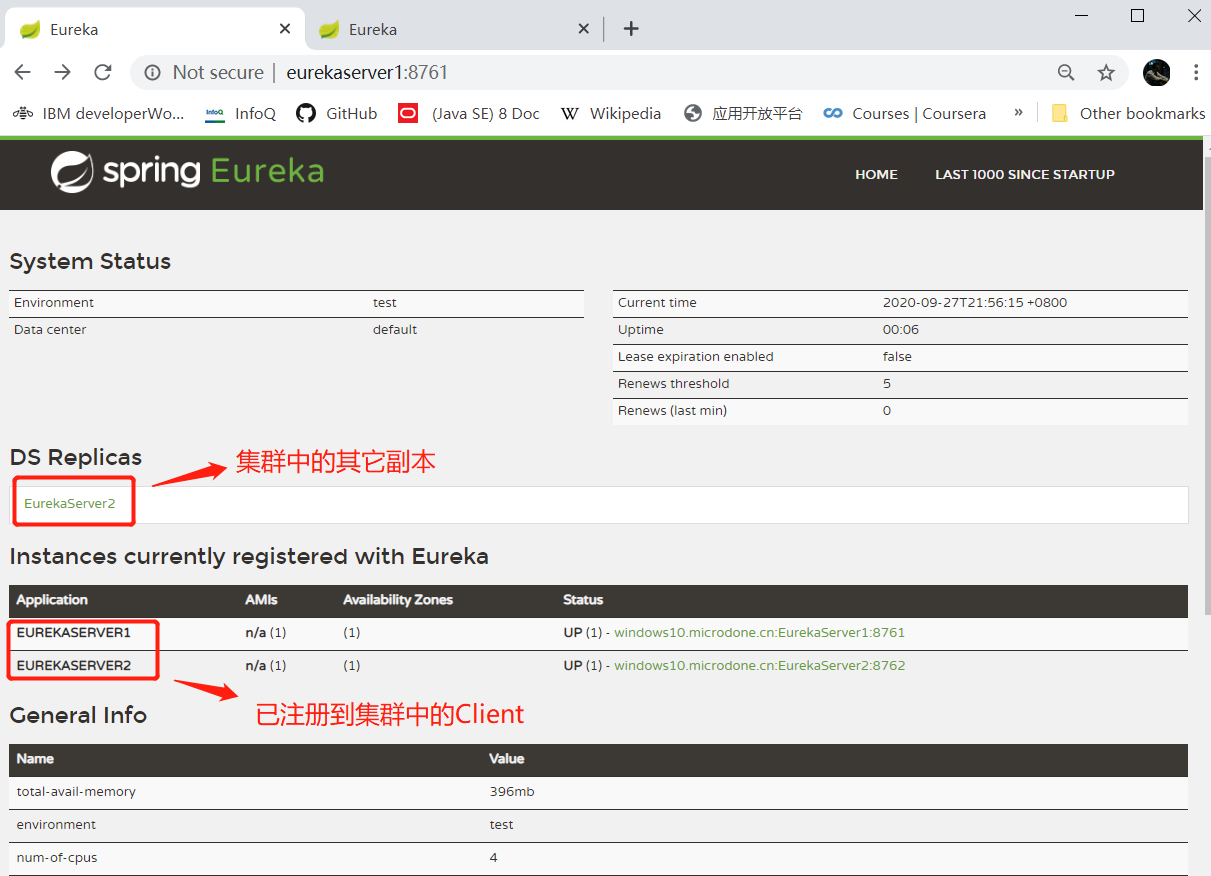
最后,我们分别启动这两个节点,然后通过访问http://EurekaServer2:8762/ 或者 http://EurekaServer1:8761/ 可以进入Eureka控制台,看到集群的整体情况。以EurekaServer1的控制台为例:
二、Eureka Client
接着,我们来新建两个服务SerivceA和ServiceB,作为Eureka Client。注意, Eureka提供的客户端是不区分Provider和Consumer的 ,也就是说,Provider同时也会是Consumer。
2.1 服务提供者
我这里将ServiceA作为服务提供者。首先引入maven pom依赖,我这里只贴dependencies依赖了,需要注意的是我没有引入spring-cloud-starter-eureka-server,因为这是一个Eureka Client:
    <dependencies>
        <dependency>
            <groupId>org.springframework.cloud</groupId>
            <artifactId>spring-cloud-starter-config</artifactId>
        </dependency>
        <dependency>
            <groupId>org.springframework.cloud</groupId>
            <artifactId>spring-cloud-starter-eureka</artifactId>
        </dependency>
    </dependencies>
接着,是Spring Boot的启动类,注意这里使用了@EnableEurekaClient注解,标识这是一个Eureka Client:
    @SpringBootApplication
    @EnableEurekaClient
    public class ServiceAApplication {
        public static void main(String[] args) {
            SpringApplication.run(ServiceAApplication.class, args);
        }
    }
ServiceA的Spring Boot配置如下:
    server:
      port: 8080
    # 应用名称
    spring:
      application:
        name: ServiceA
    eureka:
      # 应用实例信息
      instance:
        hostname: localhost
      client:
        serviceUrl:
          # 作为client向Eureka Server集群进行注册
          defaultZone: http://EurekaServer1:8761/eureka,http://EurekaServer2:8762/eureka
最后,ServiceA提供的服务接口如下:
    @RestController
    public class ServiceAController {
        @GetMapping(value = "/sayHello/{name}")
        public String sayHello(@PathVariable("name") String name) {
            System.out.println("Service A被调用了一次");
            return "{'msg': 'hello, " + name + "'}";
        }
    }
2.2 服务消费者
我这里将ServiceB作为服务消费者,启动类和pom与服务A完全相同。ServiceB的Spring Boot配置如下:
    server:
      port: 8081
    # 应用名称
    spring:
      application:
        name: ServiceB
    eureka:
      # 应用实例信息
      instance:
        hostname: localhost
      client:
        # 作为client向Eureka Server集群进行注册
        serviceUrl:
          defaultZone: http://EurekaServer1:8761/eureka,http://EurekaServer2:8762/eureka
注意:当defaultZone配置了多个Eureka Server节点时,谁配置在第一个,所有的服务优先就是访问那个eureka server。只有当这台eureka server宕机了,那么此时所有的服务在重试过后,才会访问其他的eureka server。
服务调用接口如下:
    @RestController
    @Configuration
    public class ServiceBController {
        @Bean
        @LoadBalanced
        public RestTemplate getRestTemplate() {
            return new RestTemplate();
        }

        @GetMapping(value = "/greeting/{name}")
        public String greeting(@PathVariable("name") String name) {
            RestTemplate restTemplate = getRestTemplate();
            return restTemplate.getForObject("http://ServiceA/sayHello/" + name, String.class);
        }
    }
这里我使用了@LoadBalanced注解,用于服务调用的客户端负载均衡,这个以后章节会提到,暂时不管。关键看服务调用的URL:
http://ServiceA/sayHello/
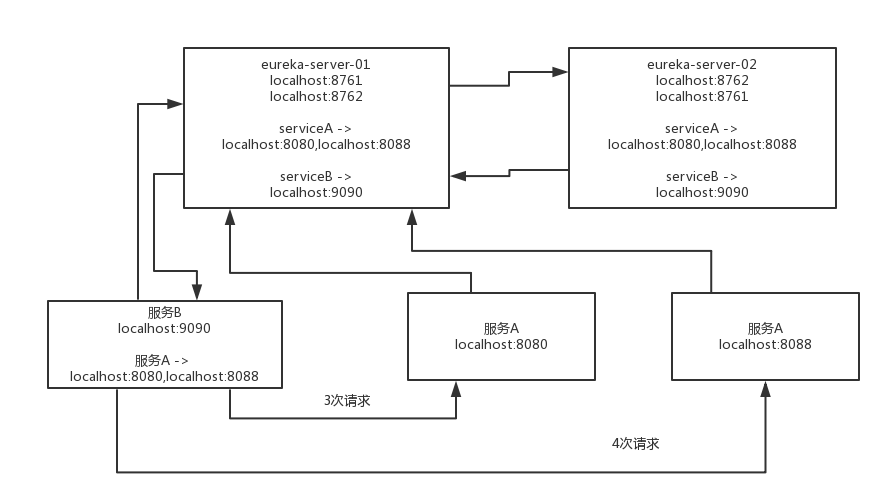
我这里并没有直接指定ServiceA的IP和端口,而是使用了它的应用名称——ServiceA。ServiceB会从Eureka Server拉取应用实例注册信息,然后从中选择一个ServiceA的实际地址进行调用,如下图:
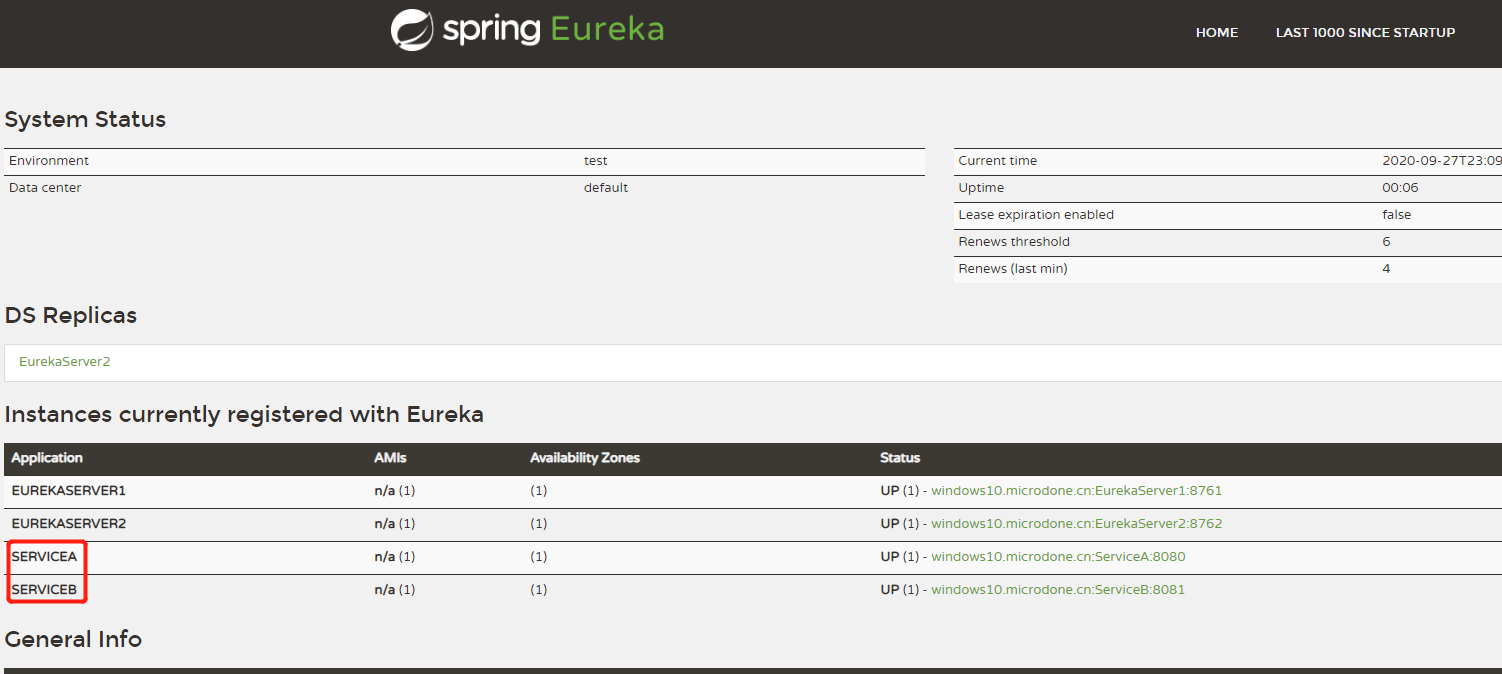
接着,我们再访问:http://eurekaserver1:8761/ ,可以看到Eureka Client多了ServiceA和ServiceB:
如果此时我们直接访问ServiceB的接口,正常情况下,ServiceB就会去调用ServiceA接口,并返回响应:

三、总结
本章,我讲解Eureka的基本使用,并搭建了一个集群部署的Eureka Demo。下一章开始,我们将正式进入Eureka源码的学习环节。
Java 面试宝典是大明哥全力打造的 Java 精品面试题,它是一份靠谱、强大、详细、经典的 Java 后端面试宝典。它不仅仅只是一道道面试题,而是一套完整的 Java 知识体系,一套你 Java 知识点的扫盲贴。
它的内容包括:
- 大厂真题:Java 面试宝典里面的题目都是最近几年的高频的大厂面试真题。
- 原创内容:Java 面试宝典内容全部都是大明哥原创,内容全面且通俗易懂,回答部分可以直接作为面试回答内容。
- 持续更新:一次购买,永久有效。大明哥会持续更新 3+ 年,累计更新 1000+,宝典会不断迭代更新,保证最新、最全面。
- 覆盖全面:本宝典累计更新 1000+,从 Java 入门到 Java 架构的高频面试题,实现 360° 全覆盖。
- 不止面试:内容包含面试题解析、内容详解、知识扩展,它不仅仅只是一份面试题,更是一套完整的 Java 知识体系。
- 宝典详情:https://www.yuque.com/chenssy/sike-java/xvlo920axlp7sf4k
- 宝典总览:https://www.yuque.com/chenssy/sike-java/yogsehzntzgp4ly1
- 宝典进展:https://www.yuque.com/chenssy/sike-java/en9ned7loo47z5aw
目前 Java 面试宝典累计更新 400+ 道,总字数 42w+。大明哥还在持续更新中,下图是大明哥在 2024-12 月份的更新情况:
想了解详情的小伙伴,扫描下面二维码加大明哥微信【daming091】咨询

同时,大明哥也整理一套目前市面最常见的热点面试题。微信搜[大明哥聊 Java]或扫描下方二维码关注大明哥的原创公众号[大明哥聊 Java] ,回复【面试题】 即可免费领取。
