一些重要属性
可以看到这些属性有上一篇所说的头尾处理器上下文,通道等,还有一些属性后面会用到,也注释了:
        private static final String HEAD_NAME = generateName0(HeadContext.class);//头结点名字
        private static final String TAIL_NAME = generateName0(TailContext.class);//尾结点名字
        //为当前线程存放类型和名字的映射,避免重名
        private static final FastThreadLocal<Map<Class<?>, String>> nameCaches =
                new FastThreadLocal<Map<Class<?>, String>>() {
            @Override
            protected Map<Class<?>, String> initialValue() {
                return new WeakHashMap<Class<?>, String>();
            }
        };
    //消息大小估算器更新
        private static final AtomicReferenceFieldUpdater<DefaultChannelPipeline, MessageSizeEstimator.Handle> ESTIMATOR =
                AtomicReferenceFieldUpdater.newUpdater(
                        DefaultChannelPipeline.class, MessageSizeEstimator.Handle.class, "estimatorHandle");
        final AbstractChannelHandlerContext head;//头处理器上下文
        final AbstractChannelHandlerContext tail;//尾处理器上下文

        private final Channel channel;//通道
        private final ChannelFuture succeededFuture;//通道异步结果
        private final VoidChannelPromise voidPromise;//任意类型的一步结果
        private final boolean touch = ResourceLeakDetector.isEnabled();//是否要资源泄露检测

        private Map<EventExecutorGroup, EventExecutor> childExecutors;//事件循环组合对应的执行器
        private volatile MessageSizeEstimator.Handle estimatorHandle;//消息大小评估处理器
        private boolean firstRegistration = true;//第一次注册

        /** 如果在通道没注册到事件循环之前添加了处理器,则HandlerAdded暂时不触发,被添加到pendingHandlerCallbackHead链表中,到时候就会处理。
         * 只需要保存头结点就可以,是个链表结构,因为结点不会太多,所以用这个省内存,方便
         */
        private PendingHandlerCallback pendingHandlerCallbackHead;

        private boolean registered;//通道只注册一次,不会变了
复制代码
构造方法
构造方法就已经将通道保存起来了,然后创建了头尾两个节点,是一个双向链表,还有异步回调:
      protected DefaultChannelPipeline(Channel channel) {
            this.channel = ObjectUtil.checkNotNull(channel, "channel");
            succeededFuture = new SucceededChannelFuture(channel, null);
            voidPromise =  new VoidChannelPromise(channel, true);

            tail = new TailContext(this);//创建尾结点
            head = new HeadContext(this);//创建头结点
    		//双向链表
            head.next = tail;
            tail.prev = head;
        }
复制代码
一些常见的方法
创建通道上下文
我们可以看到,创建上下文是DefaultChannelHandlerContext类型的,具体的后面会讲。
    //创建通道处理器上下文
        private AbstractChannelHandlerContext newContext(EventExecutorGroup group, String name, ChannelHandler handler) {
            return new DefaultChannelHandlerContext(this, childExecutor(group), name, handler);
        }
复制代码
头添加处理器addFirst
添加处理器能从头添加也能从尾添加,还能添加在某个结点前面,后面,或者干脆替换某个结点,原理都差不多,我们就那头添加来看看:
    //最常用的添加处理器方法
        public final ChannelPipeline addFirst(ChannelHandler handler) {
            return addFirst(null, handler);
        }
     @Override
        public final ChannelPipeline addFirst(String name, ChannelHandler handler) {
            return addFirst(null, name, handler);
        }

    //添加到head后 可以用EventExecutorGroup来执行耗时的任务,这个就是可以传入一个事件循环组来执行相应的操作
        @Override
        public final ChannelPipeline addFirst(EventExecutorGroup group, String name, ChannelHandler handler) {
            final AbstractChannelHandlerContext newCtx;
            synchronized (this) {//添加结点的时候要同步,多线程安全
                checkMultiplicity(handler);
                name = filterName(name, handler);

                newCtx = newContext(group, name, handler);//创建上下文

                addFirst0(newCtx);//添加到双向链表中

                // If the registered is false it means that the channel was not registered on an eventLoop yet.
                // In this case we add the context to the pipeline and add a task that will call
                // ChannelHandler.handlerAdded(...) once the channel is registered.
                if (!registered) {//通道还没注册
                    newCtx.setAddPending();//设置为待添加
                    callHandlerCallbackLater(newCtx, true);//设置后续的待添加的回调
                    return this;
                }
    //从通道获取获取执行器
                EventExecutor executor = newCtx.executor();
                if (!executor.inEventLoop()) {//执行器的线程不是当前线程
                    callHandlerAddedInEventLoop(newCtx, executor);//添加任务到执行器
                    return this;
                }
            }
            callHandlerAdded0(newCtx);//触发HandlerAdded回调
            return this;
        }
复制代码上面的方法其实会先生成一个上下文newCtx ,DefaultChannelHandlerContext类型的,处理器是传进上下文中的,然后addFirst0将上下文newCtx 添加到双向链表中,再判断通道是否有注册到事件循环上,如果没有,就将上下文设置为待添加状态,callHandlerCallbackLater设置后续来回调HandlerAdded方法,返回,如果上下文的执行器的线程不是当前线程,就添加任务到执行器里,返回,否则就触发HandlerAdded回调。
addFirst0添加到双向链表中
这个就是双向链表的添加操作,可以看到 实际添加的是处理器的上下文 ,而且 添加的位置并不是真正的头,而是头的后一个 :
    //双向链表添加到head后
        private void addFirst0(AbstractChannelHandlerContext newCtx) {
            AbstractChannelHandlerContext nextCtx = head.next;
            newCtx.prev = head;
            newCtx.next = nextCtx;
            head.next = newCtx;
            nextCtx.prev = newCtx;
        }
复制代码
callHandlerCallbackLater延迟触发HandlerAdded
有这个是因为通道注册到事件循环上异步的,需要事件循环线程启动执行任务,可能在此之前已经有添加了执行器,这个时候就不能触发HandlerAdded,人家通道还没注册完,怎么能说处理器添加好了呢对吧。所以把这些都封装成后续要执行的任务,然后用单链表链起来,毕竟不会太多,而要后面要一个个去回调,所以用单链表比较合适,当然这个也可以是删除任务:
    //添加处理器待执行的任务
        private void callHandlerCallbackLater(AbstractChannelHandlerContext ctx, boolean added) {
            assert !registered;
    //添加一个处理器待执行的任务 添加或者删除
            PendingHandlerCallback task = added ? new PendingHandlerAddedTask(ctx) : new PendingHandlerRemovedTask(ctx);
            PendingHandlerCallback pending = pendingHandlerCallbackHead;
            if (pending == null) {
                pendingHandlerCallbackHead = task;//如果没有设置过就设置为第一个
            } else {//否则就添加到最后,其实就是个单链表
                // Find the tail of the linked-list.
                while (pending.next != null) {
                    pending = pending.next;
                }
                pending.next = task;
            }
        }
复制代码
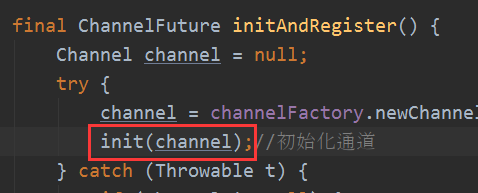
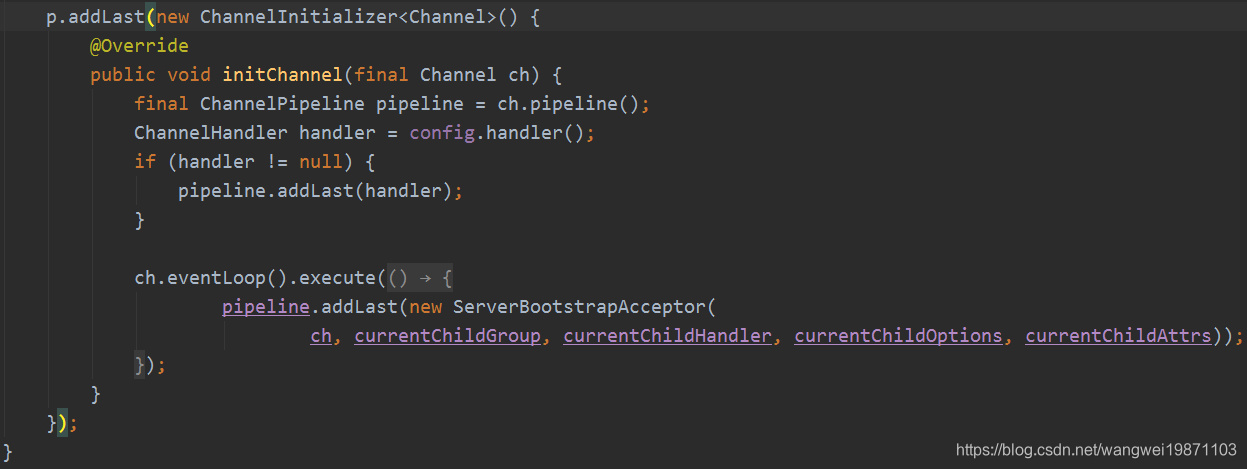
其实这个主要是针对注册前的初始化通道的时候,会添加接收器,这个时候还没注册,所以是会添加待处理任务,当然这里添加到尾部,原理类似的:
callHandlerAddedInEventLoop添加触发HandlerAdded任务
如果不当前线程不是事件循环的线程,就添加一个任务,执行的时候也就是调用了callHandlerAdded0:
    //添加任务到执行器
        private void callHandlerAddedInEventLoop(final AbstractChannelHandlerContext newCtx, EventExecutor executor) {
            newCtx.setAddPending();
            executor.execute(new Runnable() {
                @Override
                public void run() {
                    callHandlerAdded0(newCtx);
                }
            });
        }
复制代码
callHandlerAdded0触发上下文处理器添加事件
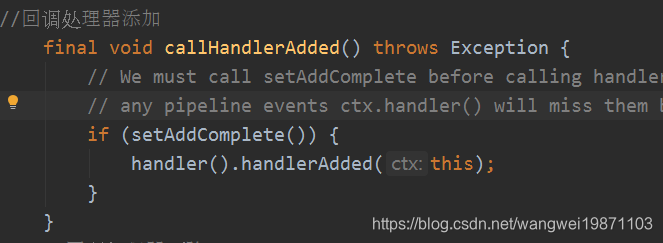
触发处理器上下文的callHandlerAdded方法,内部会去触发处理器的handlerAdded方法:
    private void callHandlerAdded0(final AbstractChannelHandlerContext ctx) {
            try {
                ctx.callHandlerAdded();//
            } catch (Throwable t) {
                boolean removed = false;
                try {
                    atomicRemoveFromHandlerList(ctx);//原子的删除处理器
                    ctx.callHandlerRemoved();//触发删除回调
                    removed = true;
                } catch (Throwable t2) {
                    if (logger.isWarnEnabled()) {
                        logger.warn("Failed to remove a handler: " + ctx.name(), t2);
                    }
                }
    //异常处理
                if (removed) {
                    fireExceptionCaught(new ChannelPipelineException(
                            ctx.handler().getClass().getName() +
                            ".handlerAdded() has thrown an exception; removed.", t));
                } else {
                    fireExceptionCaught(new ChannelPipelineException(
                            ctx.handler().getClass().getName() +
                            ".handlerAdded() has thrown an exception; also failed to remove.", t));
                }
            }
        }
复制代码最后是AbstractChannelHandlerContext 的callHandlerAdded:
删除处理器remove
删除处理器有很多中参数,比如直接传处理器对象,也可以传处理器上下文名字等,其实原理都是删除处理器上下文,然后触发处理器的handlerRemoved方法,拿个简单的根据处理器删除分析下吧,其他的都差不多,比较好理解。
remove(ChannelHandler handler)
得先获取相应的处理器上下文,然后进行删除:
     @Override
        public final ChannelPipeline remove(ChannelHandler handler) {
            remove(getContextOrDie(handler));
            return this;
        }
复制代码
getContextOrDie(ChannelHandler handler)
根据处理器获取上下文:
     //根据处理器获取相应的处理器上下文
        private AbstractChannelHandlerContext getContextOrDie(ChannelHandler handler) {
            AbstractChannelHandlerContext ctx = (AbstractChannelHandlerContext) context(handler);
            if (ctx == null) {
                throw new NoSuchElementException(handler.getClass().getName());
            } else {
                return ctx;
            }
        }
复制代码
getContextOrDie(ChannelHandler handler)
从头遍历,获取处理器相同的上下文:
    //根据处理器获取上下文
        @Override
        public final ChannelHandlerContext context(ChannelHandler handler) {
            ObjectUtil.checkNotNull(handler, "handler");

            AbstractChannelHandlerContext ctx = head.next;
            for (;;) {

                if (ctx == null) {
                    return null;
                }

                if (ctx.handler() == handler) {
                    return ctx;
                }

                ctx = ctx.next;
            }
        }
复制代码
remove(final AbstractChannelHandlerContext ctx)
删除也需要同步,而且断链的方法也是同步的,其他跟添加类似,如果没注册就会提交任务,否则最后就会直接触发处理器的handlerRemoved方法:
        private synchronized void atomicRemoveFromHandlerList(AbstractChannelHandlerContext ctx) {
            AbstractChannelHandlerContext prev = ctx.prev;
            AbstractChannelHandlerContext next = ctx.next;
            prev.next = next;
            next.prev = prev;
        }

     private AbstractChannelHandlerContext remove(final AbstractChannelHandlerContext ctx) {
            assert ctx != head && ctx != tail;

            synchronized (this) {
                atomicRemoveFromHandlerList(ctx);

                // If the registered is false it means that the channel was not registered on an eventloop yet.
                // In this case we remove the context from the pipeline and add a task that will call
                // ChannelHandler.handlerRemoved(...) once the channel is registered.
                if (!registered) {
                    callHandlerCallbackLater(ctx, false);
                    return ctx;
                }

                EventExecutor executor = ctx.executor();
                if (!executor.inEventLoop()) {
                    executor.execute(new Runnable() {
                        @Override
                        public void run() {
                            callHandlerRemoved0(ctx);
                        }
                    });
                    return ctx;
                }
            }
            callHandlerRemoved0(ctx);
            return ctx;
        }
复制代码
callHandlerRemoved0(final AbstractChannelHandlerContext ctx)
触发上下文的删除事件:
    //上下文删除回调
        private void callHandlerRemoved0(final AbstractChannelHandlerContext ctx) {
            // Notify the complete removal.
            try {
                ctx.callHandlerRemoved();
            } catch (Throwable t) {
                fireExceptionCaught(new ChannelPipelineException(
                        ctx.handler().getClass().getName() + ".handlerRemoved() has thrown an exception.", t));
            }
        }
复制代码
销毁所有处理器destroy
如果触发管道卸载事件,并且通道关闭了,这个时候就要销毁管道里的处理器啦:
     private synchronized void destroy() {
            destroyUp(head.next, false);
        }
复制代码
destroyUp
你会发现,其实他就是从head开始遍历到tail ,然后调用destroyDown开进行销毁,这里为什么不是直接destroyDown销毁呢,就是不想阻塞当前的IO线程,让上下文执行器的线程来做这个事,所以给上下文的执行器添加了任务去销毁,任务一旦遍历到tail,就开始调用destroyDown:
        private void destroyUp(AbstractChannelHandlerContext ctx, boolean inEventLoop) {
            final Thread currentThread = Thread.currentThread();
            final AbstractChannelHandlerContext tail = this.tail;
            for (;;) {
                if (ctx == tail) {
                    destroyDown(currentThread, tail.prev, inEventLoop);
                    break;
                }

                final EventExecutor executor = ctx.executor();
                if (!inEventLoop && !executor.inEventLoop(currentThread)) {//不是在同一线程,就提交个任务给执行器
                    final AbstractChannelHandlerContext finalCtx = ctx;
                    executor.execute(new Runnable() {
                        @Override
                        public void run() {
                            destroyUp(finalCtx, true);
                        }
                    });
                    break;
                }

                ctx = ctx.next;//遍历到下一个
                inEventLoop = false;//不是同一个线程,要添加任务给执行器
            }
        }
复制代码
destroyDown
这个就是从尾到头遍历结点,然后从双向链表中删除,同样也是不希望阻塞IO线程,也会用上下文执行器添加任务来执行:
     private void destroyDown(Thread currentThread, AbstractChannelHandlerContext ctx, boolean inEventLoop) {
            // We have reached at tail; now traverse backwards.
            final AbstractChannelHandlerContext head = this.head;
            for (;;) {
                if (ctx == head) {//直到head,停止
                    break;
                }

                final EventExecutor executor = ctx.executor();
                if (inEventLoop || executor.inEventLoop(currentThread)) {
                    atomicRemoveFromHandlerList(ctx);//从双向链表中删除
                    callHandlerRemoved0(ctx);//回调
                } else {//当前线程不是执行器线程就提交任务
                    final AbstractChannelHandlerContext finalCtx = ctx;
                    executor.execute(new Runnable() {
                        @Override
                        public void run() {
                            destroyDown(Thread.currentThread(), finalCtx, true);
                        }
                    });
                    break;
                }

                ctx = ctx.prev;//找到前驱
                inEventLoop = false;//尽可能线程任务来执行
            }
        }
复制代码
处理器上下文命名generateName
如果我们不传名字的话,他会进行自动命名,不同类型的第一次就是命名成xx#0,如果有同名的存在链表中的就再命名,就会后面的数字+1,就像xx#1,xx#2这种,这样就同类型也去重了,我们来看下主要的方法:
     private String generateName(ChannelHandler handler) {
            Map<Class<?>, String> cache = nameCaches.get();//获得类型缓存名字
            Class<?> handlerType = handler.getClass();
            String name = cache.get(handlerType);
            if (name == null) {
                name = generateName0(handlerType);
                cache.put(handlerType, name);
            }

            if (context0(name) != null) {//避免冲突,重命名,最后的编号+1
                String baseName = name.substring(0, name.length() - 1); // Strip the trailing '0'.
                for (int i = 1;; i ++) {
                    String newName = baseName + i;//标号+1 baseName#i
                    if (context0(newName) == null) {//直到没有重复的为止
                        name = newName;
                        break;
                    }
                }
            }
            return name;
        }
复制代码其实做的就是比如我以前有上下文#0,上下文#1,那现在新的就是上下文#2。
篇幅有点长了,下一篇继续吧。
好了,今天就到这里了,希望对学习理解有帮助,大神看见勿喷,仅为自己的学习理解,能力有限,请多包涵。
Java 面试宝典是大明哥全力打造的 Java 精品面试题,它是一份靠谱、强大、详细、经典的 Java 后端面试宝典。它不仅仅只是一道道面试题,而是一套完整的 Java 知识体系,一套你 Java 知识点的扫盲贴。
它的内容包括:
- 大厂真题:Java 面试宝典里面的题目都是最近几年的高频的大厂面试真题。
- 原创内容:Java 面试宝典内容全部都是大明哥原创,内容全面且通俗易懂,回答部分可以直接作为面试回答内容。
- 持续更新:一次购买,永久有效。大明哥会持续更新 3+ 年,累计更新 1000+,宝典会不断迭代更新,保证最新、最全面。
- 覆盖全面:本宝典累计更新 1000+,从 Java 入门到 Java 架构的高频面试题,实现 360° 全覆盖。
- 不止面试:内容包含面试题解析、内容详解、知识扩展,它不仅仅只是一份面试题,更是一套完整的 Java 知识体系。
- 宝典详情:https://www.yuque.com/chenssy/sike-java/xvlo920axlp7sf4k
- 宝典总览:https://www.yuque.com/chenssy/sike-java/yogsehzntzgp4ly1
- 宝典进展:https://www.yuque.com/chenssy/sike-java/en9ned7loo47z5aw
目前 Java 面试宝典累计更新 400+ 道,总字数 42w+。大明哥还在持续更新中,下图是大明哥在 2024-12 月份的更新情况:
想了解详情的小伙伴,扫描下面二维码加大明哥微信【daming091】咨询

同时,大明哥也整理一套目前市面最常见的热点面试题。微信搜[大明哥聊 Java]或扫描下方二维码关注大明哥的原创公众号[大明哥聊 Java] ,回复【面试题】 即可免费领取。
