一、什么是 Spring Security?
官方介绍
- Spring Security is a powerful and highly customizable authentication and access-control framework. It is the de-facto standard for securing Spring-based applications.
Spring Security是一个功能强大且高度可定制的身份认证和访问控制框架,它是保护基于spring应用程序的事实标准。
- Spring Security is a framework that focuses on providing both authentication and authorization to Java applications. Like all Spring projects, the real power of Spring Security is found in how easily it can be extended to meet custom requirements.
Spring Security是一个重点为Java应用程序提供认证和授权的框架。与所有Spring项目一样,Spring Security的真正强大之处在于它可以很容易地扩展以满足定制需求。
通俗来讲
- 首先我们前端应用访问后台资源,比如后台接口,是需要
带上访问凭证(令牌)的,我们肯定不能够直接将接口资源暴露给前端应用,这有很大安全隐患。 - 这个框架就是方便了获取凭证流程,其重点在于
认证和授权,认证就是对你的身份进行认证,比如校验用户名密码是否正确、手机号是否正确、是否在我们库中存在该手机号用户,认证的目的就是为了授权,授权的结果就是给到前端一个访问凭证,比如给到前端一个JWT令牌。 - 前端有了这个令牌,每次请求带上令牌就可以访问后台资源了,当然每次访问资源之前,后台都会对这个令牌进行一个
校验,判断这个令牌是否有效是否已过期等等。 - 可以暂时把它单纯的理解为
登录认证用的。
二、初始搭建
创建
-
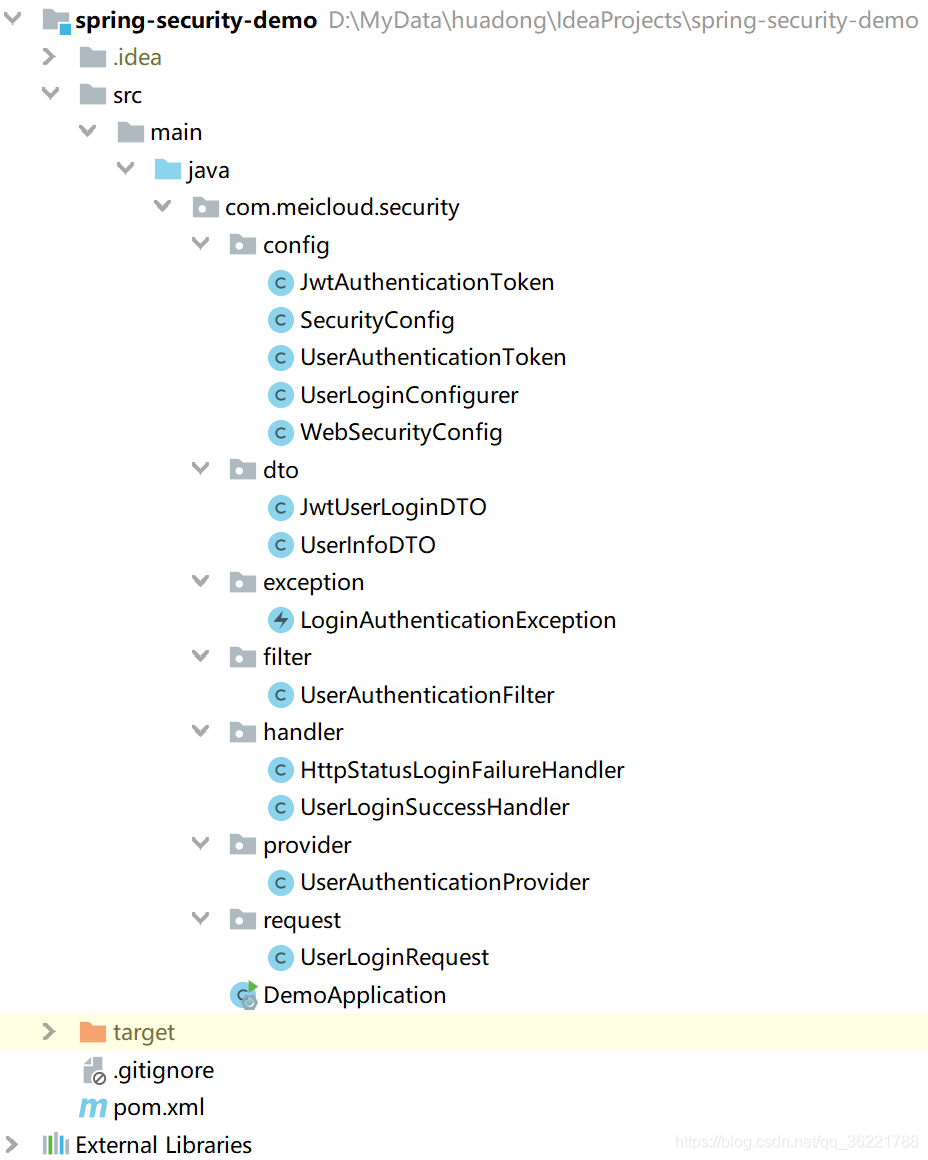
创建一个Maven空项目,引入依赖,创建主类
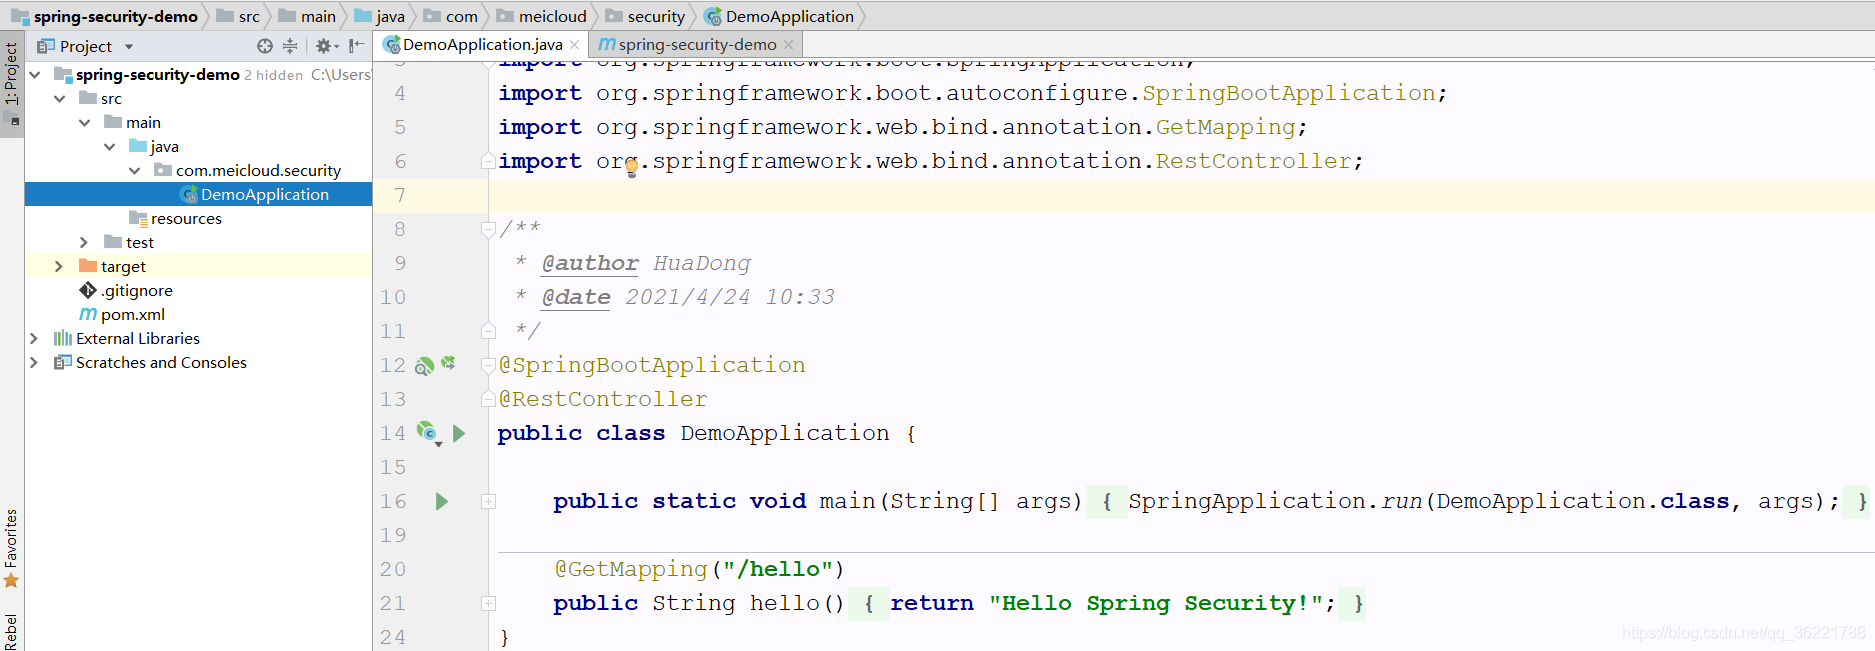
-
引入两个依赖
spring-boot-starter-web、spring-boot-starter-security
    	<dependencies>
            <dependency>
                <groupId>org.springframework.boot</groupId>
                <artifactId>spring-boot-starter-web</artifactId>
                <version>1.5.9.RELEASE</version>
            </dependency>
            <dependency>
                <groupId>org.springframework.boot</groupId>
                <artifactId>spring-boot-starter-security</artifactId>
                <version>1.5.9.RELEASE</version>
            </dependency>
        </dependencies>
- 创建启动类,同时定义一个
/hello接口
    @SpringBootApplication
    @RestController
    public class DemoApplication {

        public static void main(String[] args) {
            SpringApplication.run(DemoApplication.class, args);
        }

        @GetMapping("/hello")
        public String hello() {
            return "Hello Spring Security!";
        }
    }
启动
- 启动日志
      .   ____          _            __ _ _
     /\\ / ___'_ __ _ _(_)_ __  __ _ \ \ \ \
    ( ( )\___ | '_ | '_| | '_ \/ _` | \ \ \ \
     \\/  ___)| |_)| | | | | || (_| |  ) ) ) )
      '  |____| .__|_| |_|_| |_\__, | / / / /
     =========|_|==============|___/=/_/_/_/
     :: Spring Boot ::        (v1.5.9.RELEASE)

    2021-04-24 10:38:10.193  INFO 7684 --- [           main] com.meicloud.security.DemoApplication    : Starting DemoApplication on DESKTOP-T2KEH3M with PID 7684 (C:\Users\85176\Desktop\spring-security-demo\target\classes started by 85176 in C:\Users\85176\Desktop\spring-security-demo)
    2021-04-24 10:38:10.195  INFO 7684 --- [           main] com.meicloud.security.DemoApplication    : No active profile set, falling back to default profiles: default
    2021-04-24 10:38:10.237  INFO 7684 --- [           main] ationConfigEmbeddedWebApplicationContext : Refreshing org.springframework.boot.context.embedded.AnnotationConfigEmbeddedWebApplicationContext@6d4d66d2: startup date [Sat Apr 24 10:38:10 CST 2021]; root of context hierarchy
    2021-04-24 10:38:11.337  INFO 7684 --- [           main] s.b.c.e.t.TomcatEmbeddedServletContainer : Tomcat initialized with port(s): 8080 (http)
    2021-04-24 10:38:11.347  INFO 7684 --- [           main] o.apache.catalina.core.StandardService   : Starting service [Tomcat]
    2021-04-24 10:38:11.348  INFO 7684 --- [           main] org.apache.catalina.core.StandardEngine  : Starting Servlet Engine: Apache Tomcat/8.5.23
    2021-04-24 10:38:11.461  INFO 7684 --- [ost-startStop-1] o.a.c.c.C.[Tomcat].[localhost].[/]       : Initializing Spring embedded WebApplicationContext
    2021-04-24 10:38:11.461  INFO 7684 --- [ost-startStop-1] o.s.web.context.ContextLoader            : Root WebApplicationContext: initialization completed in 1227 ms
    2021-04-24 10:38:11.679  INFO 7684 --- [ost-startStop-1] o.s.b.w.servlet.FilterRegistrationBean   : Mapping filter: 'characterEncodingFilter' to: [/*]
    2021-04-24 10:38:11.679  INFO 7684 --- [ost-startStop-1] o.s.b.w.servlet.FilterRegistrationBean   : Mapping filter: 'hiddenHttpMethodFilter' to: [/*]
    2021-04-24 10:38:11.679  INFO 7684 --- [ost-startStop-1] o.s.b.w.servlet.FilterRegistrationBean   : Mapping filter: 'httpPutFormContentFilter' to: [/*]
    2021-04-24 10:38:11.679  INFO 7684 --- [ost-startStop-1] o.s.b.w.servlet.FilterRegistrationBean   : Mapping filter: 'requestContextFilter' to: [/*]
    2021-04-24 10:38:11.680  INFO 7684 --- [ost-startStop-1] .s.DelegatingFilterProxyRegistrationBean : Mapping filter: 'springSecurityFilterChain' to: [/*]
    2021-04-24 10:38:11.680  INFO 7684 --- [ost-startStop-1] o.s.b.w.servlet.ServletRegistrationBean  : Mapping servlet: 'dispatcherServlet' to [/]
    2021-04-24 10:38:11.963  INFO 7684 --- [           main] s.w.s.m.m.a.RequestMappingHandlerAdapter : Looking for @ControllerAdvice: org.springframework.boot.context.embedded.AnnotationConfigEmbeddedWebApplicationContext@6d4d66d2: startup date [Sat Apr 24 10:38:10 CST 2021]; root of context hierarchy
    2021-04-24 10:38:12.043  INFO 7684 --- [           main] s.w.s.m.m.a.RequestMappingHandlerMapping : Mapped "{[/hello],methods=[GET]}" onto public java.lang.String com.meicloud.security.DemoApplication.hello()
    2021-04-24 10:38:12.047  INFO 7684 --- [           main] s.w.s.m.m.a.RequestMappingHandlerMapping : Mapped "{[/error]}" onto public org.springframework.http.ResponseEntity<java.util.Map<java.lang.String, java.lang.Object>> org.springframework.boot.autoconfigure.web.BasicErrorController.error(javax.servlet.http.HttpServletRequest)
    2021-04-24 10:38:12.048  INFO 7684 --- [           main] s.w.s.m.m.a.RequestMappingHandlerMapping : Mapped "{[/error],produces=[text/html]}" onto public org.springframework.web.servlet.ModelAndView org.springframework.boot.autoconfigure.web.BasicErrorController.errorHtml(javax.servlet.http.HttpServletRequest,javax.servlet.http.HttpServletResponse)
    2021-04-24 10:38:12.101  INFO 7684 --- [           main] o.s.w.s.handler.SimpleUrlHandlerMapping  : Mapped URL path [/webjars/**] onto handler of type [class org.springframework.web.servlet.resource.ResourceHttpRequestHandler]
    2021-04-24 10:38:12.101  INFO 7684 --- [           main] o.s.w.s.handler.SimpleUrlHandlerMapping  : Mapped URL path [/**] onto handler of type [class org.springframework.web.servlet.resource.ResourceHttpRequestHandler]
    2021-04-24 10:38:12.158  INFO 7684 --- [           main] o.s.w.s.handler.SimpleUrlHandlerMapping  : Mapped URL path [/**/favicon.ico] onto handler of type [class org.springframework.web.servlet.resource.ResourceHttpRequestHandler]
    2021-04-24 10:38:12.371  INFO 7684 --- [           main] b.a.s.AuthenticationManagerConfiguration :

    Using default security password: 03deaaa0-d17f-445a-abf0-f21b2a6cf554

    2021-04-24 10:38:12.424  INFO 7684 --- [           main] o.s.s.web.DefaultSecurityFilterChain     : Creating filter chain: OrRequestMatcher [requestMatchers=[Ant [pattern='/css/**'], Ant [pattern='/js/**'], Ant [pattern='/images/**'], Ant [pattern='/webjars/**'], Ant [pattern='/**/favicon.ico'], Ant [pattern='/error']]], []
    2021-04-24 10:38:12.522  INFO 7684 --- [           main] o.s.s.web.DefaultSecurityFilterChain     : Creating filter chain: OrRequestMatcher [requestMatchers=[Ant [pattern='/**']]], [org.springframework.security.web.context.request.async.WebAsyncManagerIntegrationFilter@3e15bb06, org.springframework.security.web.context.SecurityContextPersistenceFilter@2cfa2c4f, org.springframework.security.web.header.HeaderWriterFilter@66c38e51, org.springframework.security.web.authentication.logout.LogoutFilter@5fe7f967, org.springframework.security.web.authentication.www.BasicAuthenticationFilter@3f049056, org.springframework.security.web.savedrequest.RequestCacheAwareFilter@48eb9836, org.springframework.security.web.servletapi.SecurityContextHolderAwareRequestFilter@79d06bbd, org.springframework.security.web.authentication.AnonymousAuthenticationFilter@6778aea6, org.springframework.security.web.session.SessionManagementFilter@12968227, org.springframework.security.web.access.ExceptionTranslationFilter@58cf8f94, org.springframework.security.web.access.intercept.FilterSecurityInterceptor@27b45ea]
    2021-04-24 10:38:12.664  INFO 7684 --- [           main] o.s.j.e.a.AnnotationMBeanExporter        : Registering beans for JMX exposure on startup
    2021-04-24 10:38:12.716  INFO 7684 --- [           main] s.b.c.e.t.TomcatEmbeddedServletContainer : Tomcat started on port(s): 8080 (http)
    2021-04-24 10:38:12.720  INFO 7684 --- [           main] com.meicloud.security.DemoApplication    : Started DemoApplication in 2.804 seconds (JVM running for 5.014)
-
访问接口
http://localhost:8080/hello,能弹出这个登录框就说明项目已经被Spring Security应用了,其实这个登录认证使用的是默认的登录过滤器,末尾放出相关源码文章,如果有兴趣可以了解了解是怎么配置的默认过滤器。
-
默认用户名是
user,密码在控制台已打印出来了,输入即可登录,登录后即可访问后台资源。
三、项目原理
原理
在实战之前你需要了解一些关于这个框架的原理,其实这个框架的核心是创建一个
FilterChainProxy类型的过滤器,这个过滤器里面维护了一组过滤器链,而我们要做的是创建一条我们自己的过滤器链,当然创建流程框架帮我们搞定了,我们要做的是把自己的过滤器链配置进框架,由框架帮我们创建出过滤器链。因此:
- 目的很明确:创建一条过滤器链。
- 操作很简单:配置我们的过滤器链到框架。
思考
只是要写一个登录接口,也就是一个过滤器就行了,为什么要配置一条过滤器链?
- 其实你确实只要写一个登录过滤器就行,但还是要加入到过滤器链中,你也需要(可选)很多其他的过滤器,比如
请求头过滤器、跨域资源共享过滤器、登出过滤器、Session过滤器等等,这些过滤器框架都已经提供了,可以直接配置。 - 你要知道使用这个框架的目的,
一个是方便搭建我们的过滤器,一个是它提供了很多默认的强大的过滤器,不用我们重新写,这是我们用这个框架的原因,大概就是图个方便。
四、登录认证
Github项目地址:spring-security-demo,其中类里完善了大量详细的描述,如果有用请默默点个赞,如果有不理解或者不对的地方欢迎评论一起探讨交流~
首先明确要做的是
创建一个登录过滤器,配置一条过滤器链。大致看看要创建的类,接下来一个一个了解:
登录过滤器
完整的登录过滤器应该包含很多组成部分,包括过滤器本身(
UnionidAuthenticationFilter),认证用的Provider(UnionidAuthenticationProvider),登录成功处理器(UnionidLoginSuccessHandler),登录失败处理器(HttpStatusLoginFailureHandler),还有最后一个过滤器配置器(UnionidLoginConfigurer),一个一个来说:
- 登录过滤器 :一般会继承抽象类
AbstractAuthenticationProcessingFilter,实现它的attemptAuthentication方法,登录的URL是/user/members:login。
    /**
     * 登录认证过滤器
     */
    public class UserAuthenticationFilter extends AbstractAuthenticationProcessingFilter {

    	public UserAuthenticationFilter() {
    		super(new AntPathRequestMatcher("/user/login", "POST"));
    	}

    	@Override
    	public void afterPropertiesSet() {
    		Assert.notNull(this.getAuthenticationManager(), "AuthenticationManager must be specified");
    		Assert.notNull(this.getSuccessHandler(), "AuthenticationSuccessHandler must be specified");
    		Assert.notNull(this.getFailureHandler(), "AuthenticationFailureHandler must be specified");
    	}

    	@Override
    	public Authentication attemptAuthentication(HttpServletRequest request, HttpServletResponse response)
    			throws AuthenticationException, IOException, ServletException {

    		// TODO 这里的逻辑主要有两个作用,一个是进行初步的校验,一个是组装待认证的Token,举几个例子:

    		// 1.微信授权登录:客户端会传过来一些加密串,这里逻辑主要解密这些加密串的数据获取unionId、openId、手机号以及用户昵称头像等基本信息,
    		// 然后组装Token传给Provider进行下一步认证,如果这里报错直接就返回异常,不会进行下一步认证。

    		// 2.手机短信验证码登录:这里主要验证短信验证码的正确性,然后组装Token传给Provider进行下一步认证,如果短信验证码错误直接抛异常

    		// 3.账号密码图形验证码登录:这里主要验证图形验证码的正确性,然后组装Token传给Provider进行下一步认证,如果图形验证码错误直接抛异常

    		// ...

    		// =================================================== 示例 ===============================================

    		String body = StreamUtils.copyToString(request.getInputStream(), StandardCharsets.UTF_8);
    		String mobile = null, password = null, verifyCode = null;

    		if(StringUtils.hasText(body)) {
    			UserLoginRequest loginRequest = JSON.parseObject(body, UserLoginRequest.class);
    			mobile = loginRequest.getMobile();
    			password = loginRequest.getPassword();
    			verifyCode = loginRequest.getVerifyCode();
    		}

    		// TODO 这里验证图形验证码 verifyCode 是否正确

    		UserAuthenticationToken token = new UserAuthenticationToken(
    				null, mobile, password);

    		// 这里进行下一步认证,会走到我们定义的 UserAuthenticationProvider 中
    		return this.getAuthenticationManager().authenticate(token);
    	}

    }
- 认证用的Provider :需要实现
AuthenticationProvider接口,实现authenticate()、supports()方法。
    /**
     * Unionid认证 Provider
     */
    public class UserAuthenticationProvider implements AuthenticationProvider {

    	public UserAuthenticationProvider() {

    	}

    	@Override
    	public Authentication authenticate(Authentication authentication) throws AuthenticationException {

    		// TODO 这里主要进行一个数据库层面的认证,比如账号密码的正确性,比如该账号是否被拉黑有什么权限等,都认证成功之后会组装一个认证通过的 Token

    		// 这里认证成功返回之后会跑到成功处理器:UserLoginSuccessHandler
    		// 只要整个认证(包括前面的校验)中有一个地方抛出异常都会调用失败处理器:HttpStatusLoginFailureHandler

    		// =================================================== 示例 ===============================================

    		UserAuthenticationToken token = (UserAuthenticationToken) authentication;

    		// 校验账号密码是否正确,同时返回用户信息
    		UserInfoDTO userInfo = this.checkAndGetUserInfo(token.getMobile(), token.getPassword());

    		// 组装并返回认证成功的 Token
    		JwtUserLoginDTO jwtUserLoginDTO = new JwtUserLoginDTO(userInfo.getUserId(), userInfo.getNickname(), userInfo.getMobile());

    		return new JwtAuthenticationToken(jwtUserLoginDTO, null, null);
    	}

    	private UserInfoDTO checkAndGetUserInfo(String mobile, String password) {

    		// 根据手机号查询用户信息,这里假设是根据手机号从数据库中查出的用户信息
    		UserInfoDTO userInfo = null;
    		if (mobile.equals("15600000000")) {
    			userInfo = new UserInfoDTO(100000000L, "张三", "15600000000", "888888");
    		}
    		if (Objects.isNull(userInfo)) {
    			throw LoginAuthenticationException.USER_NAME_NOT_EXIST;
    		}
    		// 校验密码是否正确
    		if (!Objects.equals(userInfo.getPassword(), password)) {
    			// 密码不正确直接抛异常
    			throw LoginAuthenticationException.PASSWORD_NOT_EXIST;
    		}

    		return userInfo;
    	}

    	/**
    	 * 表示这个 Provider 支持认证的 Token(这里是 UserAuthenticationToken)
    	 *
    	 * @param authentication
    	 * @return
    	 */
    	@Override
    	public boolean supports(Class<?> authentication) {
    		return authentication.isAssignableFrom(UserAuthenticationToken.class);
    	}
    }
- 登录成功处理器 :需要实现
AuthenticationSuccessHandler接口同时实现onAuthenticationSuccess()方法。
    /**
     * 登录成功处理器
     */
    public class UserLoginSuccessHandler implements AuthenticationSuccessHandler{

    	public static final String HEADER_SET_ACCESS_TOKEN = "Set-Access-Token";

    	private SecurityConfig securityConfig;

    	public UserLoginSuccessHandler(SecurityConfig securityConfig) {
    		this.securityConfig = securityConfig;
    	}

    	@Override
    	public void onAuthenticationSuccess(HttpServletRequest request, HttpServletResponse response,
    			Authentication authentication) throws IOException, ServletException {

    		// TODO 走到这里说明认证成功,可以组装一些响应头的信息给到客户端,比如生成JWT令牌,或者加一些业务上的需求,比如登录送积分等等

    		// =================================================== 示例 ===============================================

    		// 这里的逻辑是生成JWT令牌(很多公司也会用Session),将生成的JWT返回给前端
    		Date expiredDate = new Date(System.currentTimeMillis() + securityConfig.getTokenExpireTimeInSecond() * 1000);
    		Algorithm algorithm = Algorithm.HMAC256(securityConfig.getTokenEncryptSalt());

    		JwtUserLoginDTO jwtUserLoginDTO = (JwtUserLoginDTO) authentication.getPrincipal();
    		String token = jwtUserLoginDTO.sign(algorithm, expiredDate);

    		// 设置请求头,将JWT令牌以请求头的方式返回给前端
    		response.addHeader(HEADER_SET_ACCESS_TOKEN, token);

    	}
    }
- 登录失败处理器 :实现
AuthenticationFailureHandler接口同时实现onAuthenticationFailure方法。
    /**
     * 登录失败处理器
     */
    public class HttpStatusLoginFailureHandler implements AuthenticationFailureHandler{

    	@Override
    	public void onAuthenticationFailure(HttpServletRequest request, HttpServletResponse response,
    			AuthenticationException exception) throws IOException, ServletException {

    		// TODO 走到这里说明认证流程失败了,会对异常信息做一个统一的处理,通过 response 写回到客户端

    		// =================================================== 示例 ===============================================

    		response.setStatus(HttpServletResponse.SC_UNAUTHORIZED);
    		response.setContentType("application/json");
    		response.setCharacterEncoding(Charset.defaultCharset().displayName());

    		if (exception instanceof LoginAuthenticationException) {
    			LoginAuthenticationException e = (LoginAuthenticationException) exception;
    			response.getWriter().print(e.toJSONString());
    		}
    		response.getWriter().print("登录异常!");
    	}
    }
- 过滤器配置器 :一般继承
AbstractHttpConfigurer抽象类,实现configure()方法。主要配置成功处理器和失败处理器,同时将登录过滤器配置进HttpSecurity。
    /**
     * 登录过滤器配置
     */
    public class UserLoginConfigurer<T extends UserLoginConfigurer<T, B>, B extends HttpSecurityBuilder<B>> extends AbstractHttpConfigurer<T, B>  {

    	private SecurityConfig securityConfig;

    	public UserLoginConfigurer(SecurityConfig securityConfig) {
    		this.securityConfig = securityConfig;
    	}

    	@Override
    	public void configure(B http) throws Exception {

    		UserAuthenticationFilter authFilter = new UserAuthenticationFilter();

    		authFilter.setAuthenticationManager(http.getSharedObject(AuthenticationManager.class));
    		authFilter.setSessionAuthenticationStrategy(new NullAuthenticatedSessionStrategy());

    		// 登录成功处理器
    		authFilter.setAuthenticationSuccessHandler(new UserLoginSuccessHandler(securityConfig));
    		// 登录失败处理器
    		authFilter.setAuthenticationFailureHandler(new HttpStatusLoginFailureHandler());

    		// 拦截器位置
    		UserAuthenticationFilter filter = postProcess(authFilter);
    		http.addFilterAfter(filter, LogoutFilter.class);
    	}
    }
配置过滤器链
- 主要配置你需要的过滤器,以及自定义的登录过滤器,也可以配置哪些URL不应该被过滤器链拦截。一般会继承
WebSecurityConfigurerAdapter抽象类。 - 覆盖
configure(HttpSecurity http)方法配置过滤器链 - 注意还要覆盖
configure(AuthenticationManagerBuilder auth)方法将前面定义的UnionidAuthenticationProvider配置进AuthenticationManagerBuilder。
    /**
     * 核心配置器
     */
    @EnableWebSecurity
    @EnableGlobalMethodSecurity(prePostEnabled = true)
    public class WebSecurityConfig extends WebSecurityConfigurerAdapter {

    	@Autowired
    	private SecurityConfig securityConfig;

    	@Override
    	protected void configure(HttpSecurity http) throws Exception {
    				// 配置白名单(比如登录接口)
    				.antMatchers(securityConfig.getPermitUrls()).permitAll()
    				// 其他URL需要认证通过才能访问后台资源
    				.anyRequest().authenticated()
    				.and()
    				// 禁用跨站点伪造请求
    				.csrf().disable()
    				// 启用跨域资源共享
    				.cors()
    				.and()
    				// 请求头
    				.headers().addHeaderWriter(
    				new StaticHeadersWriter(Collections.singletonList(
    						new Header("Access-control-Allow-Origin", "*"))))
    				.and()
    			 	// 自定义的登录过滤器,不同的登录方式创建不同的登录过滤器,一样的配置方式
    				.apply(new UserLoginConfigurer<>(securityConfig))
    				.and()
    				// 登出过滤器
    				.logout()
    				// 登出成功处理器
    				.logoutSuccessHandler(new HttpStatusReturningLogoutSuccessHandler())
    				.and()
    				// 禁用Session会话机制(我们这个demo用的是JWT令牌的方式)
    				.sessionManagement().disable()
    				// 禁用SecurityContext,这个配置器实际上认证信息会保存在Session中,但我们并不用Session机制,所以也禁用
    				.securityContext().disable();
    	}

    	@Override
    	protected void configure(AuthenticationManagerBuilder auth) throws Exception {
    		auth.authenticationProvider(userAuthenticationProvider());
    	}

    	@Bean
    	protected AuthenticationProvider userAuthenticationProvider() throws Exception{
    		return new UserAuthenticationProvider();
    	}

    	@Override
    	public AuthenticationManager authenticationManagerBean() throws Exception {
    	    return super.authenticationManagerBean();
    	}

    	@Bean
    	protected CorsConfigurationSource corsConfigurationSource() {
    		CorsConfiguration configuration = new CorsConfiguration();
    		configuration.setAllowedOrigins(Collections.singletonList("*"));
    		configuration.setAllowedMethods(Arrays.asList("GET","POST","HEAD", "DELETE", "PUT","OPTION"));
    		configuration.setAllowedHeaders(Collections.singletonList("*"));
    		UrlBasedCorsConfigurationSource source = new UrlBasedCorsConfigurationSource();
    		source.registerCorsConfiguration("/**", configuration);
    		return source;
    	}

    }
类补充
由于篇幅太长,其他类请下载源码查看,Github项目地址:spring-security-demo
五、登录效果
本项目用的是JWT,登录成功后会在响应头返回JWT令牌,失败则显示错误信息。其中目前后台模拟了一个用户名为
15600000000,密码为888888的用户,注意后台并没有校验验证码,这部分请自行完善,来看看演示效果。
效果演示
-
用户名输入错误
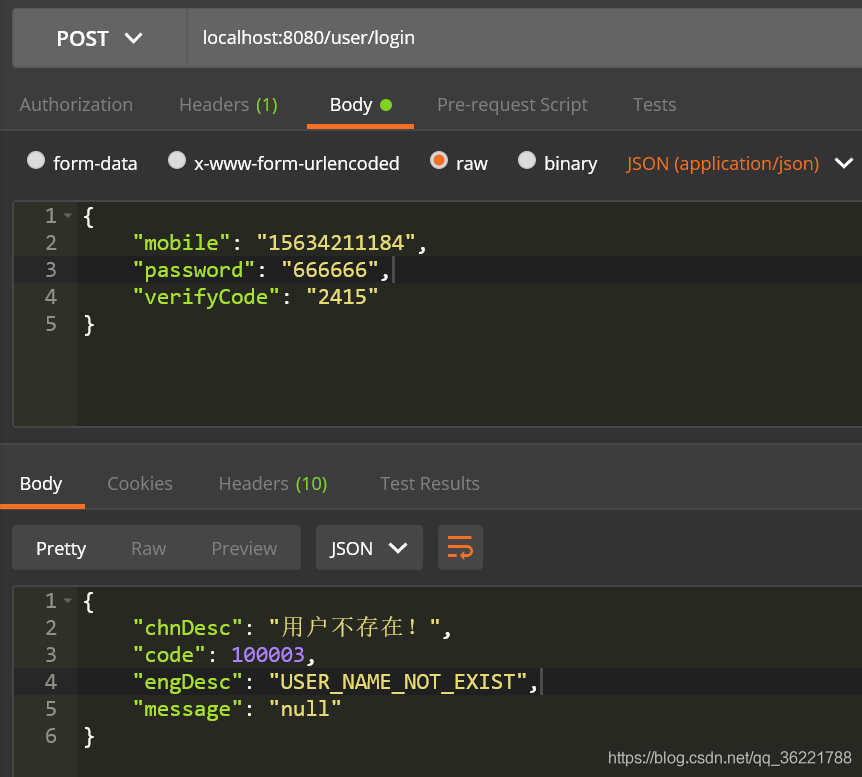
-
密码输入错误
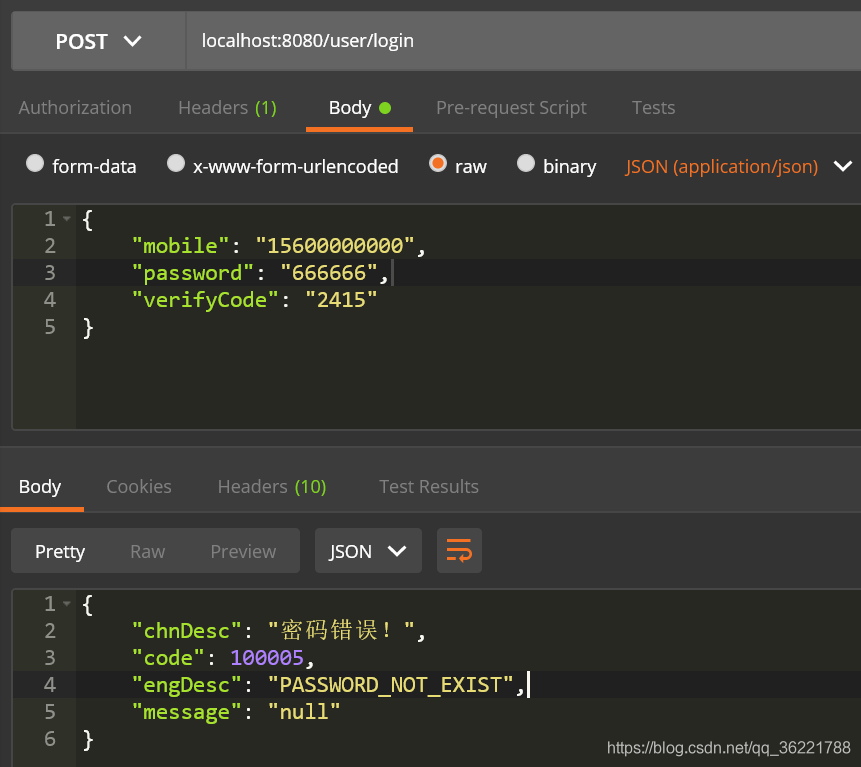
-
登录成功,返回令牌
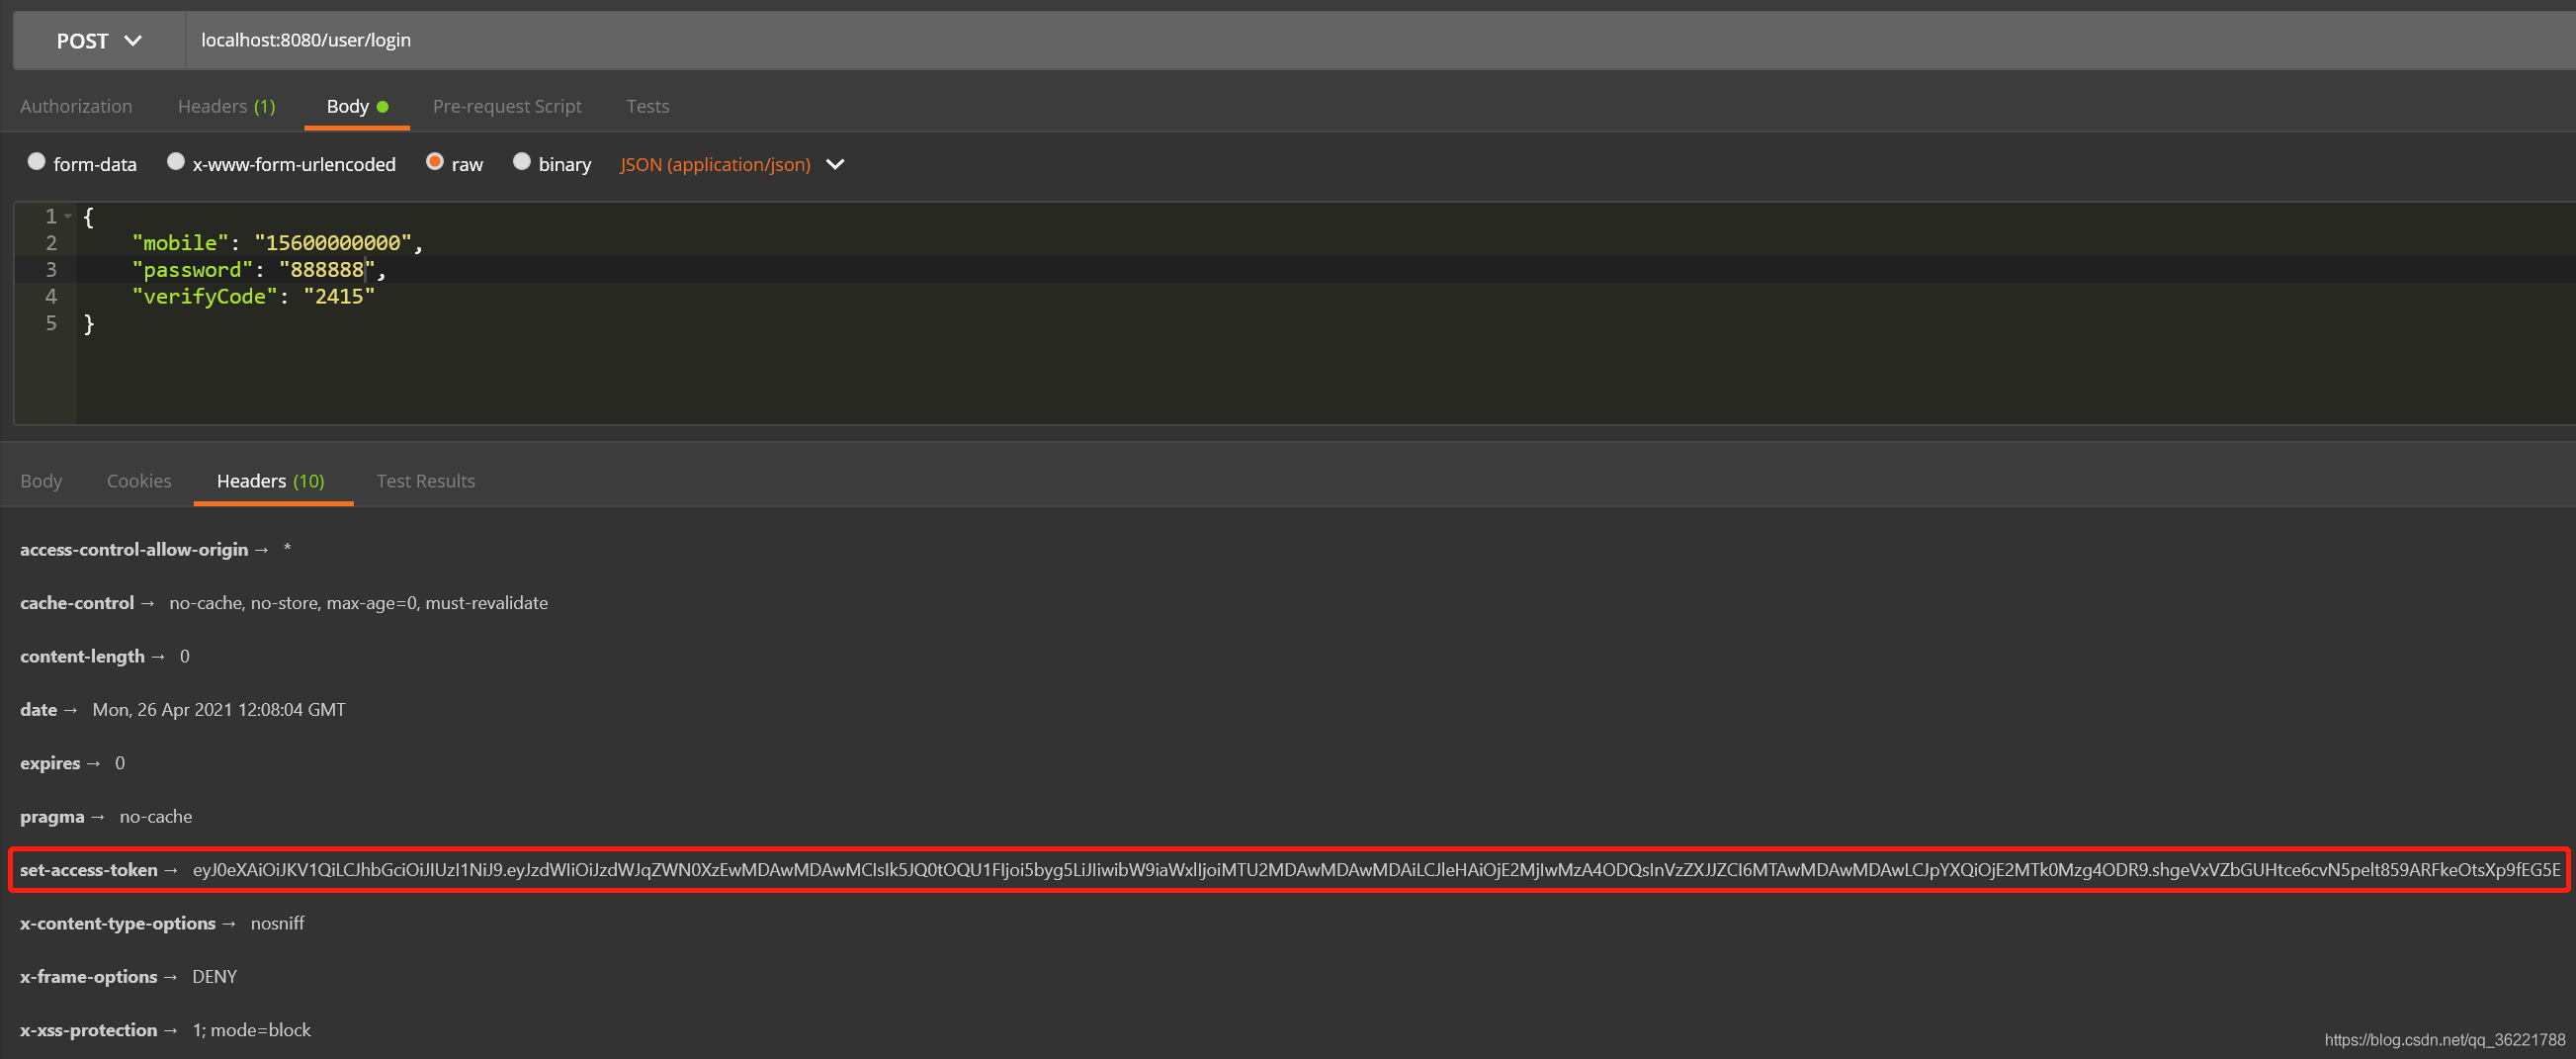
请求后台接口
-
登录成功后访问
/hello接口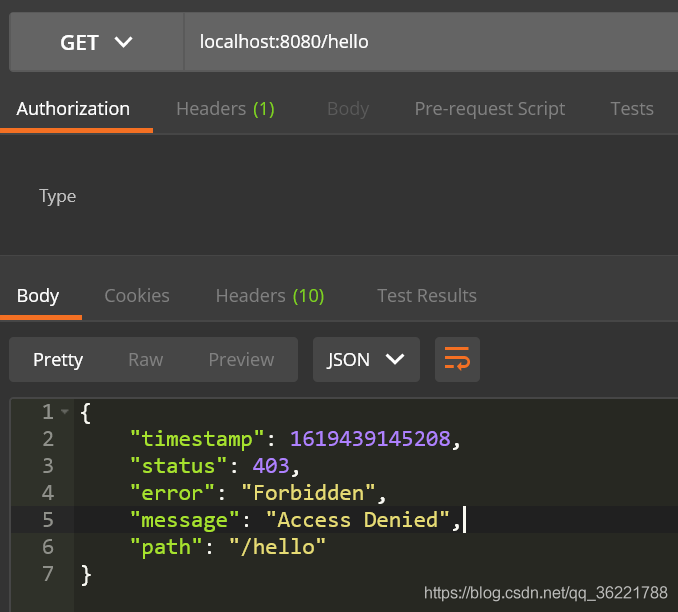
-
为什么登录成功了,还是禁止访问?
其实原因很简单,这个资源接口没有带上登录返回的JWT令牌,就算带上了后台也没有识别这个令牌的逻辑,也即后台还是无法识别普通请求,所以需要加上
识别请求令牌的逻辑。预知后续逻辑,请看下篇讲解~
六、系列文章
Spring Security 系列
- 《手把手教你如何使用Spring Security(上):登录授权》
- 《手把手教你如何使用Spring Security(中):接口认证》
- 《手把手教你如何使用Spring Security(下):访问控制》
- 《Spring Security源码(一):整体框架设计》
- 《Spring Security源码(二):建造者详解》
- 《Spring Security源码(三):HttpSecurity详解》
- 《Spring Security源码(四):配置器详解》
- 《Spring Security源码(五):FilterChainProxy是如何创建的?》
- 《Spring Security源码(六):FilterChainProxy是如何运行的?》
- 《Spring Security源码(七):设计模式在框架中的应用》
- 《Spring Security源码(八):登录认证源码流程》
- 《Spring Security源码(九):过滤器链上的过滤器是如何排序的?》
- 《Spring Security源码(十):权限访问控制是如何做到的?》
Spring Security OAuth 系列
Java 面试宝典是大明哥全力打造的 Java 精品面试题,它是一份靠谱、强大、详细、经典的 Java 后端面试宝典。它不仅仅只是一道道面试题,而是一套完整的 Java 知识体系,一套你 Java 知识点的扫盲贴。
它的内容包括:
- 大厂真题:Java 面试宝典里面的题目都是最近几年的高频的大厂面试真题。
- 原创内容:Java 面试宝典内容全部都是大明哥原创,内容全面且通俗易懂,回答部分可以直接作为面试回答内容。
- 持续更新:一次购买,永久有效。大明哥会持续更新 3+ 年,累计更新 1000+,宝典会不断迭代更新,保证最新、最全面。
- 覆盖全面:本宝典累计更新 1000+,从 Java 入门到 Java 架构的高频面试题,实现 360° 全覆盖。
- 不止面试:内容包含面试题解析、内容详解、知识扩展,它不仅仅只是一份面试题,更是一套完整的 Java 知识体系。
- 宝典详情:https://www.yuque.com/chenssy/sike-java/xvlo920axlp7sf4k
- 宝典总览:https://www.yuque.com/chenssy/sike-java/yogsehzntzgp4ly1
- 宝典进展:https://www.yuque.com/chenssy/sike-java/en9ned7loo47z5aw
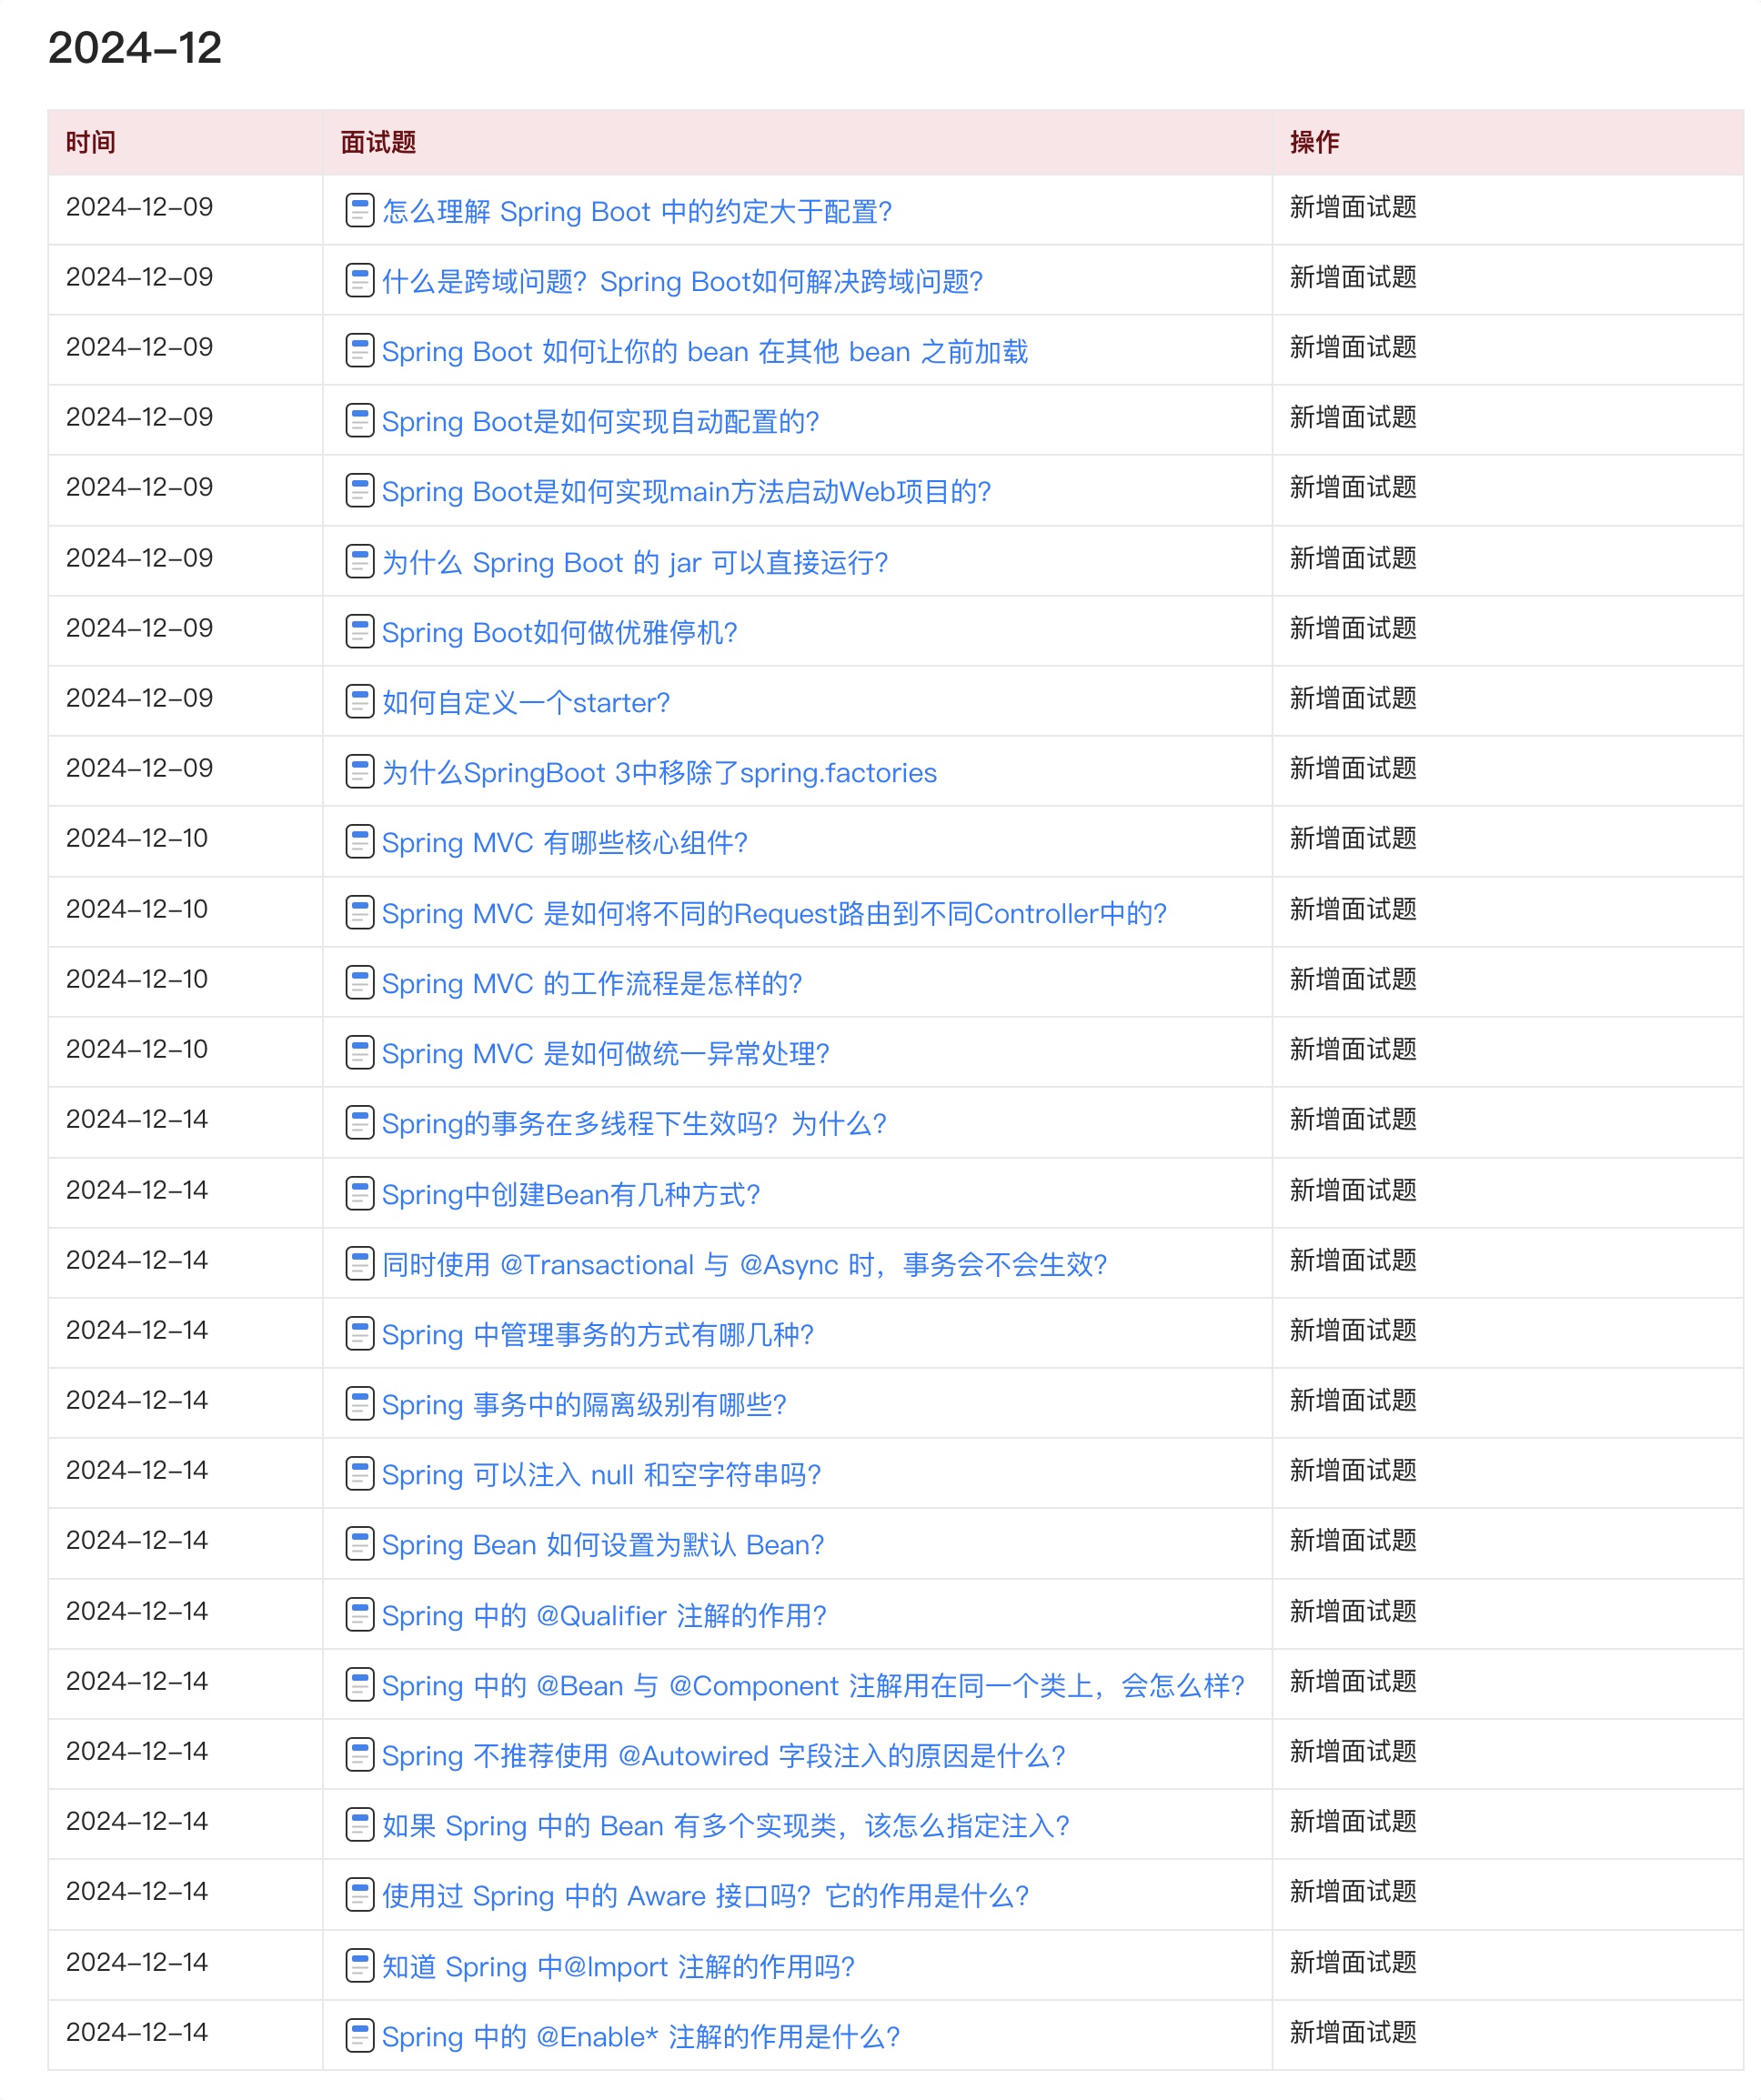
目前 Java 面试宝典累计更新 400+ 道,总字数 42w+。大明哥还在持续更新中,下图是大明哥在 2024-12 月份的更新情况:
想了解详情的小伙伴,扫描下面二维码加大明哥微信【daming091】咨询

同时,大明哥也整理一套目前市面最常见的热点面试题。微信搜[大明哥聊 Java]或扫描下方二维码关注大明哥的原创公众号[大明哥聊 Java] ,回复【面试题】 即可免费领取。


