从开始本章,我将讲解Kafka Server的日志子系统(Log Subsystem)。Log Subsystem负责的核心工作就是日志的持久化,也就是写消息到磁盘。Kafka之所以具有极高的性能,和Log Subsystem的优秀设计是分不开的。
本章,我先带大家回顾下Kafka的整个日志文件系统的设计,然后对Server端的几个核心日志组件进行整体讲解。
一、日志结构
我们回顾下《透彻理解Kafka(二)——消息存储:日志格式》中的内容,假设有一个名为“ topic”的主题,此主题具有 4 个分区 ,那么在物理存储上就有topic-0、topic-1、topic-2、topic-3四个目录:
    [root@nodel kafka- logs]# ls -al | grep topic-log
    drwxr-xr - x 2 root root 4096 May 16 18: 33 topic-0
    drwxr-xr - x 2 root root 4096 May 16 18: 33 topic-1
    drwxr-xr - x 2 root root 4096 May 16 18: 33 topic-2
    drwxr-xr - x 2 root root 4096 May 16 18: 33 topic-3
每个分区的目录下,都有很多log segment file(日志段文件),也就是说每个分区的数据都会被拆成多个文件,并且每个文件都有自己的索引文件,如下图:
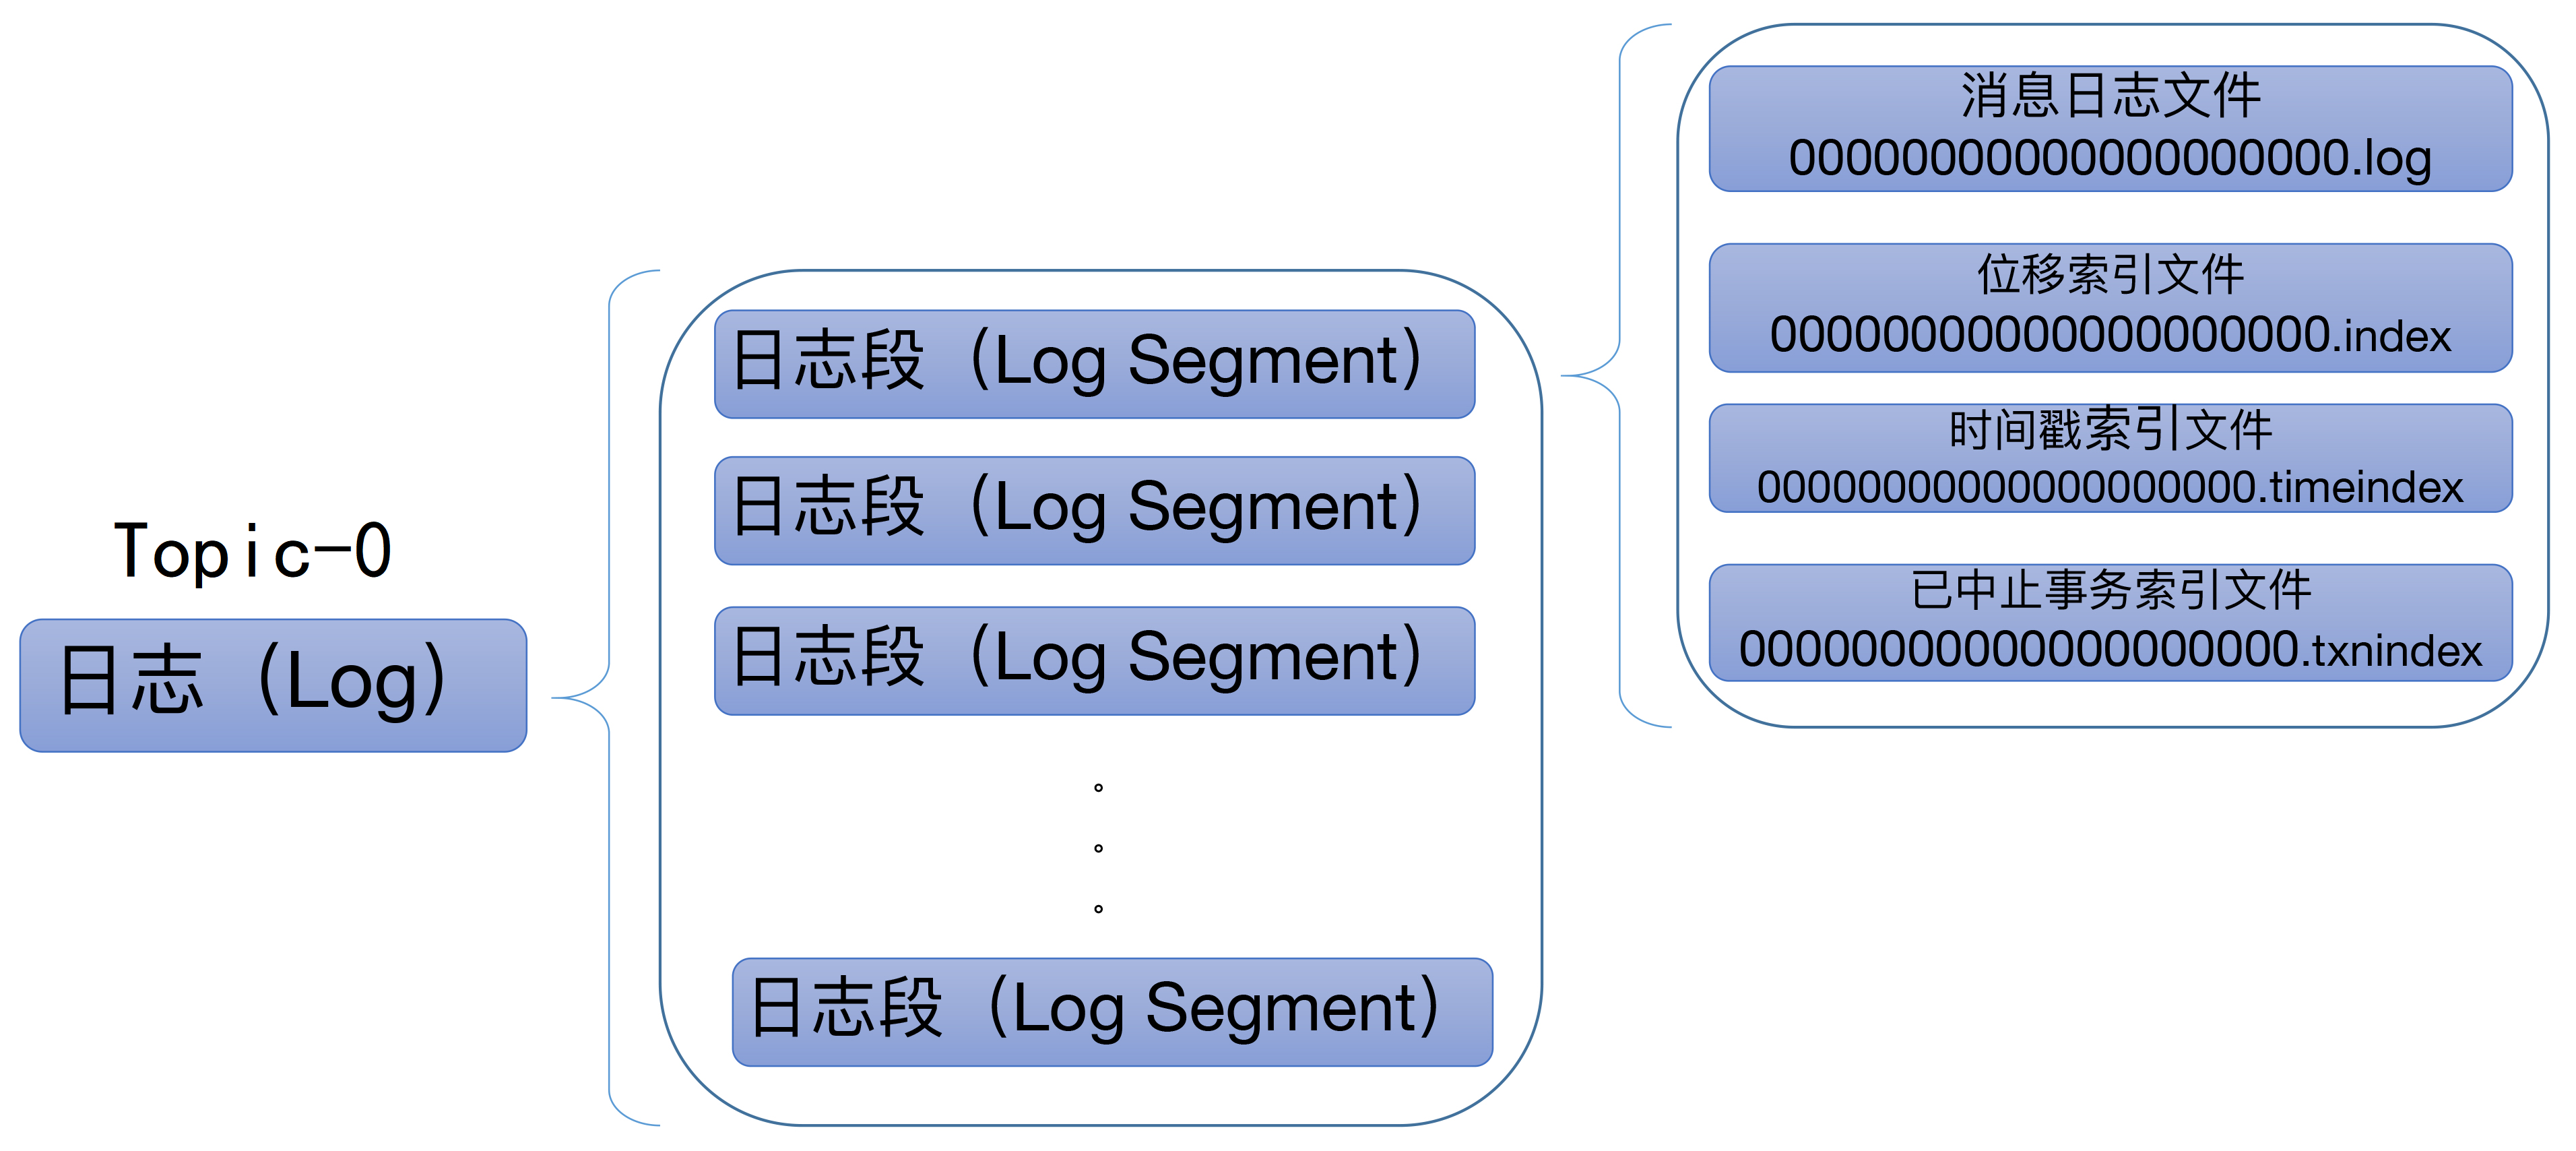
当生产者发送消息时,Kafka会将消息 顺序写入分区的最后一个 LogSegment 中,分区中的消息具有唯一的 offset ,每个LogSegment 对应于磁盘上的一个日志文件和两个索引文件,以及可能的其它文件(比如以.txnindex为后缀的事务索引文件),比如:
    00000000000000000000.index
    00000000000000000000.log
    00000000000000000000.timeindex

    00000000000005367851.index
    00000000000005367851.log
    00000000000005367851.timeindex

    00000000000009936472.index
    00000000000009936472.log
    00000000000009936472.timeindex
每个 LogSegment 都有一个基准偏移量 baseOffset(64 位长整型数),用来表示当前 LogSegment中第一条消息的 offset 。比如上述的示例中,第一个 LogSegment 的基准偏移量为 0,对应的日志文件为00000000000000000000.log,而9936472就表示00000000000009936472.log这个日志段文件的baseOffset。
Kafka Broker中有一个参数log.segment.bytes,限定了每个日志段文件的大小,默认1GB。一个日志段文件满了,就会新建一个日志段文件来写入,避免单个文件过大,影响文件的读写性能,这个过程叫做 log rolling ,正在被写入的那个日志段文件叫做 active log segment 。
Kafka使用了
ConcurrentSkipListMap来保存各个日志段,以每个日志段的baseOffset作为 key ,这样可以根据消息的offset快速定位到其所在的日志分段 。
1.1 索引文件
Kafka在写入日志文件的时候,会同时写索引文件,一个是 位移(偏移量)索引 (.index后缀),一个是 时间戳索引 (.timeindex后缀),也就是说每个日志段文件(.log后缀)都对应两个索引文件。
索引文件里的数据是按照位移/时间戳升序排序的,Kafka会用二分法查找索引,时间复杂度是O(logN),找到索引就可以在.log文件里定位到数据了。
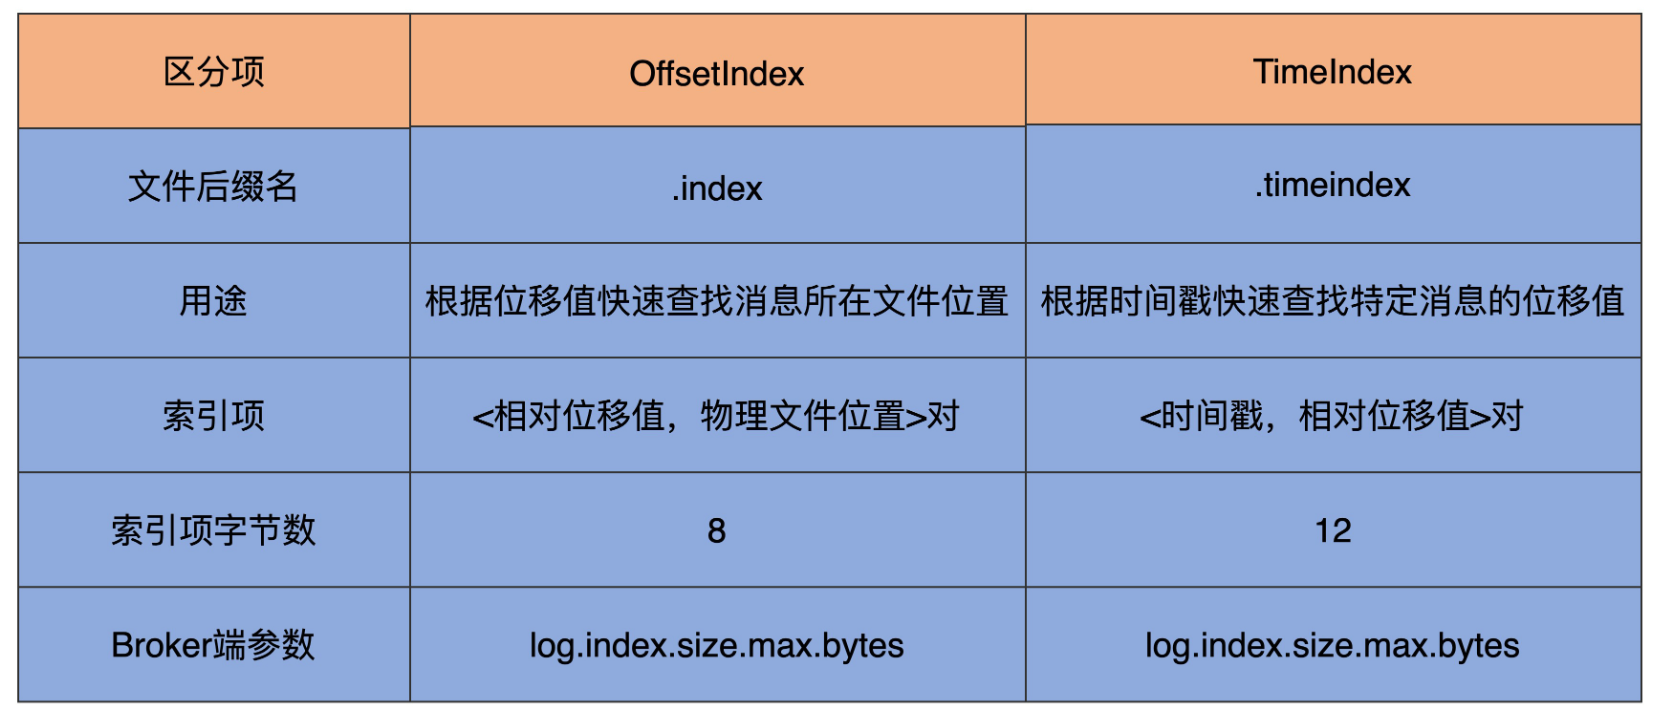
Kafka以 稀疏矩阵 的方式构造索引,不保证每个消息都有对应的索引。Kafka Broker中有个参数
log.index.interval.bytes,默认值为4096字节,表示每往日志文件写入4096字节数据就要在索引文件里写一条索引项。
位移索引
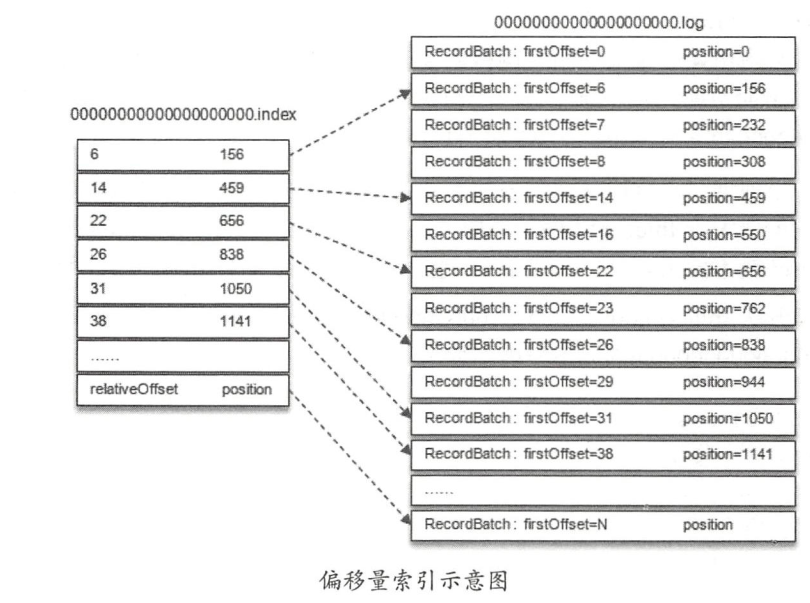
位移索引就是用来记录消息偏移量(offset)与物理地址之间的映射关系。位移索引项的格式如下,每个索引项占用4个字节,分为两个部分:

relativeOffset: 相对位移,表示消息相对于基准偏移量 baseOffset的位移,也就是说relativeOffset = 绝对位移 - baseOffset;
position: 物理地址,表示消息在日志分段文件中对应的物理位置。
举个例子:假设我们要查找分区中offset=25的消息,是怎样一个流程呢?
- 首先,由于Kafka使用了
ConcurrentSkipListMap来保存各个日志分段(以每个日志段的baseOffset作为 key) ,所以可以快速定位到offset=25这个消息所在的日志分段; - 假设第一步定位到了
00000000000000000000.log这个日志分段,它的基准偏移量baseOffset为0,那么相对位移 = 25- 0 = 25; - 接着,通过二分法在
00000000000000000000.index中查找最后一个relativeOffset ≤ 25的索引项,找到了[22,656]; - 最后,根据索引项中的position值,即656,从
00000000000000000000.log中的656物理位置开始向后查找,直到找到offset=25的消息。
时间戳索引
时间戳索引项的格式如下图:

timestamp : 当前日志分段最大的时间戳。
relativeOffset: 时间戳所对应的消息的相对位移。
同样举个例子:假设我们要查找时间戳 targetTimeStamp = 1526384718288 开始的消息,是怎样一个流程呢?
首先,要找到targetTimeStamp所在的日志段,这里无法使用跳表来快速定位,需要进行以下步骤:
- 将 targetTimeStamp 和每个日志段中的最大时间戳 largestTimeStamp 逐一对比(每个日志段都会记录自己的最大时间戳),直到找到最后一个小于等于targetTimeStamp 的日志段,假设就是
00000000000000000000.log这个日志段; - 然后在这个日志段的时间戳索引文件
00000000000000000000.timeindex中进行二分查找,找到最后一个小于等于targetTimeStamp 的索引项,这里是1526384718283,它的相对位移是28; - 接着,再根据相对位移28,去
00000000000000000000.index中查找消息的物理地址,找到了[26,838]这个索引项; - 最后,从
00000000000000000000.log的838的物理位置开始向后遍历查找targetTimeStamp = 1526384718288的消息。
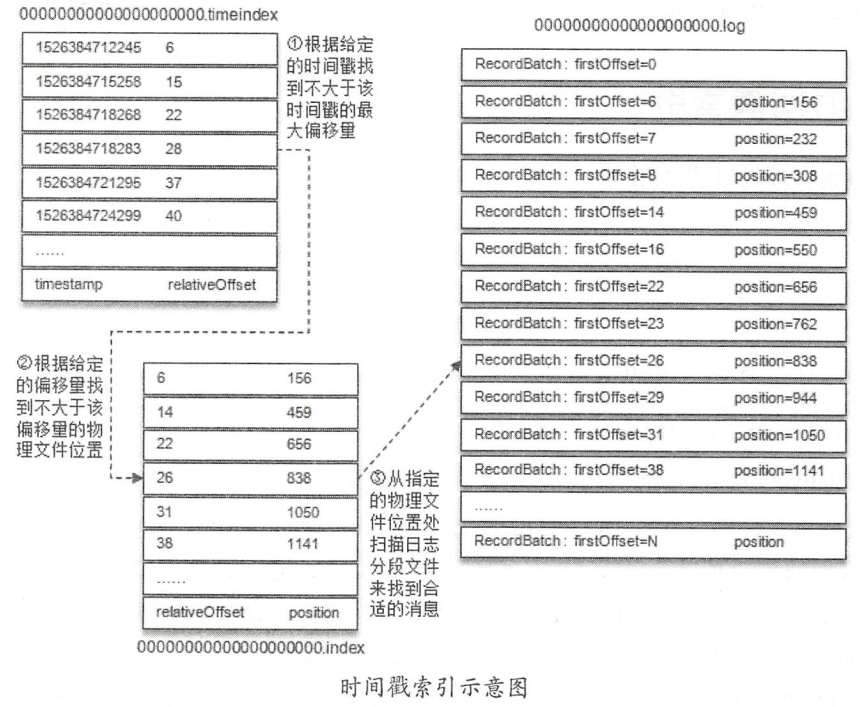
从上面的整个流程也可以看出,根据时间戳索引查找消息时,要 进行两次索引查找 ,效率要比直接根据位移索引查找低很多。
索引项中的 timestamp 必须大于之前追加的索引项的 timestamp ,否则不予追加 。如果 Kafka Broker 端参数
log.message.timestamp.type设置为LogAppendTime,那么消息的时间戳必定能够保持单调递增;相反,如果由生产者自己指定时间戳,则可能造成当前分区的时间戳乱序。
二、核心组件
回顾了Kafka的日志结构,我们从源码的角度看下Log Subsystem所涉及的核心组件:
- ReplicaManager: 负责管理和操作集群中 Broker 的副本,还承担部分分区管理工作;
- LogManager: 日志管理类,负责控制日志创建、日志读取/写入、日志清理;
- Log: 日志是日志段的容器,负责管理日志段;
- LogSegment: 日志段;
- OffsetIndex: 位移索引;
- TimeIndex: 时间索引。
我在后续章节会对上述这些组件的底层源码进行分析,但是我们还是先按照正常的功能调用流程来讲解。
2.1 初始化
KafkaServer启动后,会创建LogManager和ReplicaManager,这两个是与日志读写相关的核心管理组件,ReplicaManager内部封装了LogManager:
    // KafkaServer.scala
    def startup() {
        logManager = createLogManager(zkUtils.zkClient, brokerState)
        logManager.startup()

        replicaManager = new ReplicaManager(config, metrics, time, zkUtils, kafkaScheduler, logManager,
          isShuttingDown, quotaManagers.follower)
        replicaManager.startup()

        //...
    }
我们先来看下LogManager的初始化,内部就是启动了一些调度任务,包括:日志清理、日志刷磁盘、更新日志检查点等等:
    // LogManager.scala

    def startup() {
      if(scheduler != null) {
        // 日志清理任务
        info("Starting log cleanup with a period of %d ms.".format(retentionCheckMs))
        scheduler.schedule("kafka-log-retention",
                           cleanupLogs,
                           delay = InitialTaskDelayMs,
                           period = retentionCheckMs,
                           TimeUnit.MILLISECONDS)
        // 日志刷磁盘任务
        info("Starting log flusher with a default period of %d ms.".format(flushCheckMs))
        scheduler.schedule("kafka-log-flusher",
                           flushDirtyLogs,
                           delay = InitialTaskDelayMs,
                           period = flushCheckMs,
                           TimeUnit.MILLISECONDS)
        // 更新日志检查点任务
        scheduler.schedule("kafka-recovery-point-checkpoint",
                           checkpointRecoveryPointOffsets,
                           delay = InitialTaskDelayMs,
                           period = flushCheckpointMs,
                           TimeUnit.MILLISECONDS)
        // 删除日志任务
        scheduler.schedule("kafka-delete-logs",
                           deleteLogs,
                           delay = InitialTaskDelayMs,
                           period = defaultConfig.fileDeleteDelayMs,
                           TimeUnit.MILLISECONDS)
      }
      if(cleanerConfig.enableCleaner)
        cleaner.startup()
    }
再来看下ReplicaManager的初始化,它启动了两个调度任务,都是和ISR相关的,一个是清理落后太多的ISR副本,一个是将最新的ISR结果进行传播:
    // ReplicaManager.scala

    def startup() {
      // 清理ISR中落后的Follower副本
      scheduler.schedule("isr-expiration", maybeShrinkIsr, period = config.replicaLagTimeMaxMs / 2,
                         unit = TimeUnit.MILLISECONDS)
      // 传播最新的ISR副本
      scheduler.schedule("isr-change-propagation", maybePropagateIsrChanges, period = 2500L,
                         unit = TimeUnit.MILLISECONDS)
    }
三、整体流程
回忆一下,Kafka网络层(Network Layer)在接受到消息后,最终会转交给Kafka API层处理,而API层内部封装了ReplicaManager,在处理请求时,会委托ReplicaManager完成消息的写入:
    // KafkaApis.scala

    def handleProducerRequest(request: RequestChannel.Request) {
      val produceRequest = request.body.asInstanceOf[ProduceRequest]
      //...
      if (authorizedRequestInfo.isEmpty)
        sendResponseCallback(Map.empty)
      else {
        val internalTopicsAllowed = request.header.clientId == AdminUtils.AdminClientId

        // 委托ReplicaManager将消息写入分区的各个副本
        replicaManager.appendRecords(
          produceRequest.timeout.toLong,
          produceRequest.acks,
          internalTopicsAllowed,
          authorizedRequestInfo,
          sendResponseCallback)

        produceRequest.clearPartitionRecords()
      }
    }
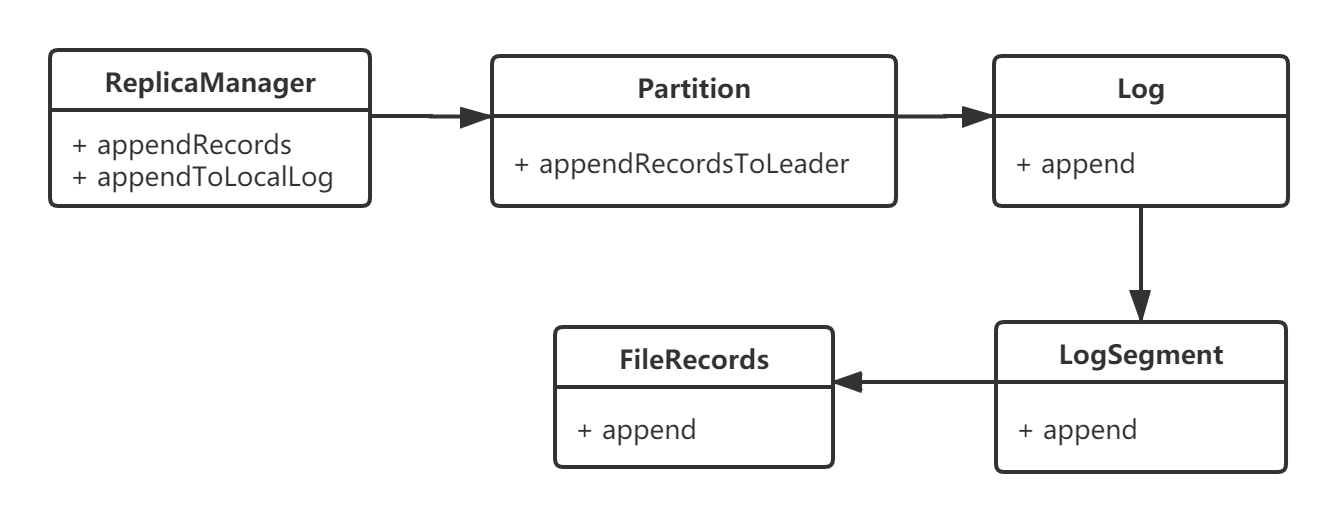
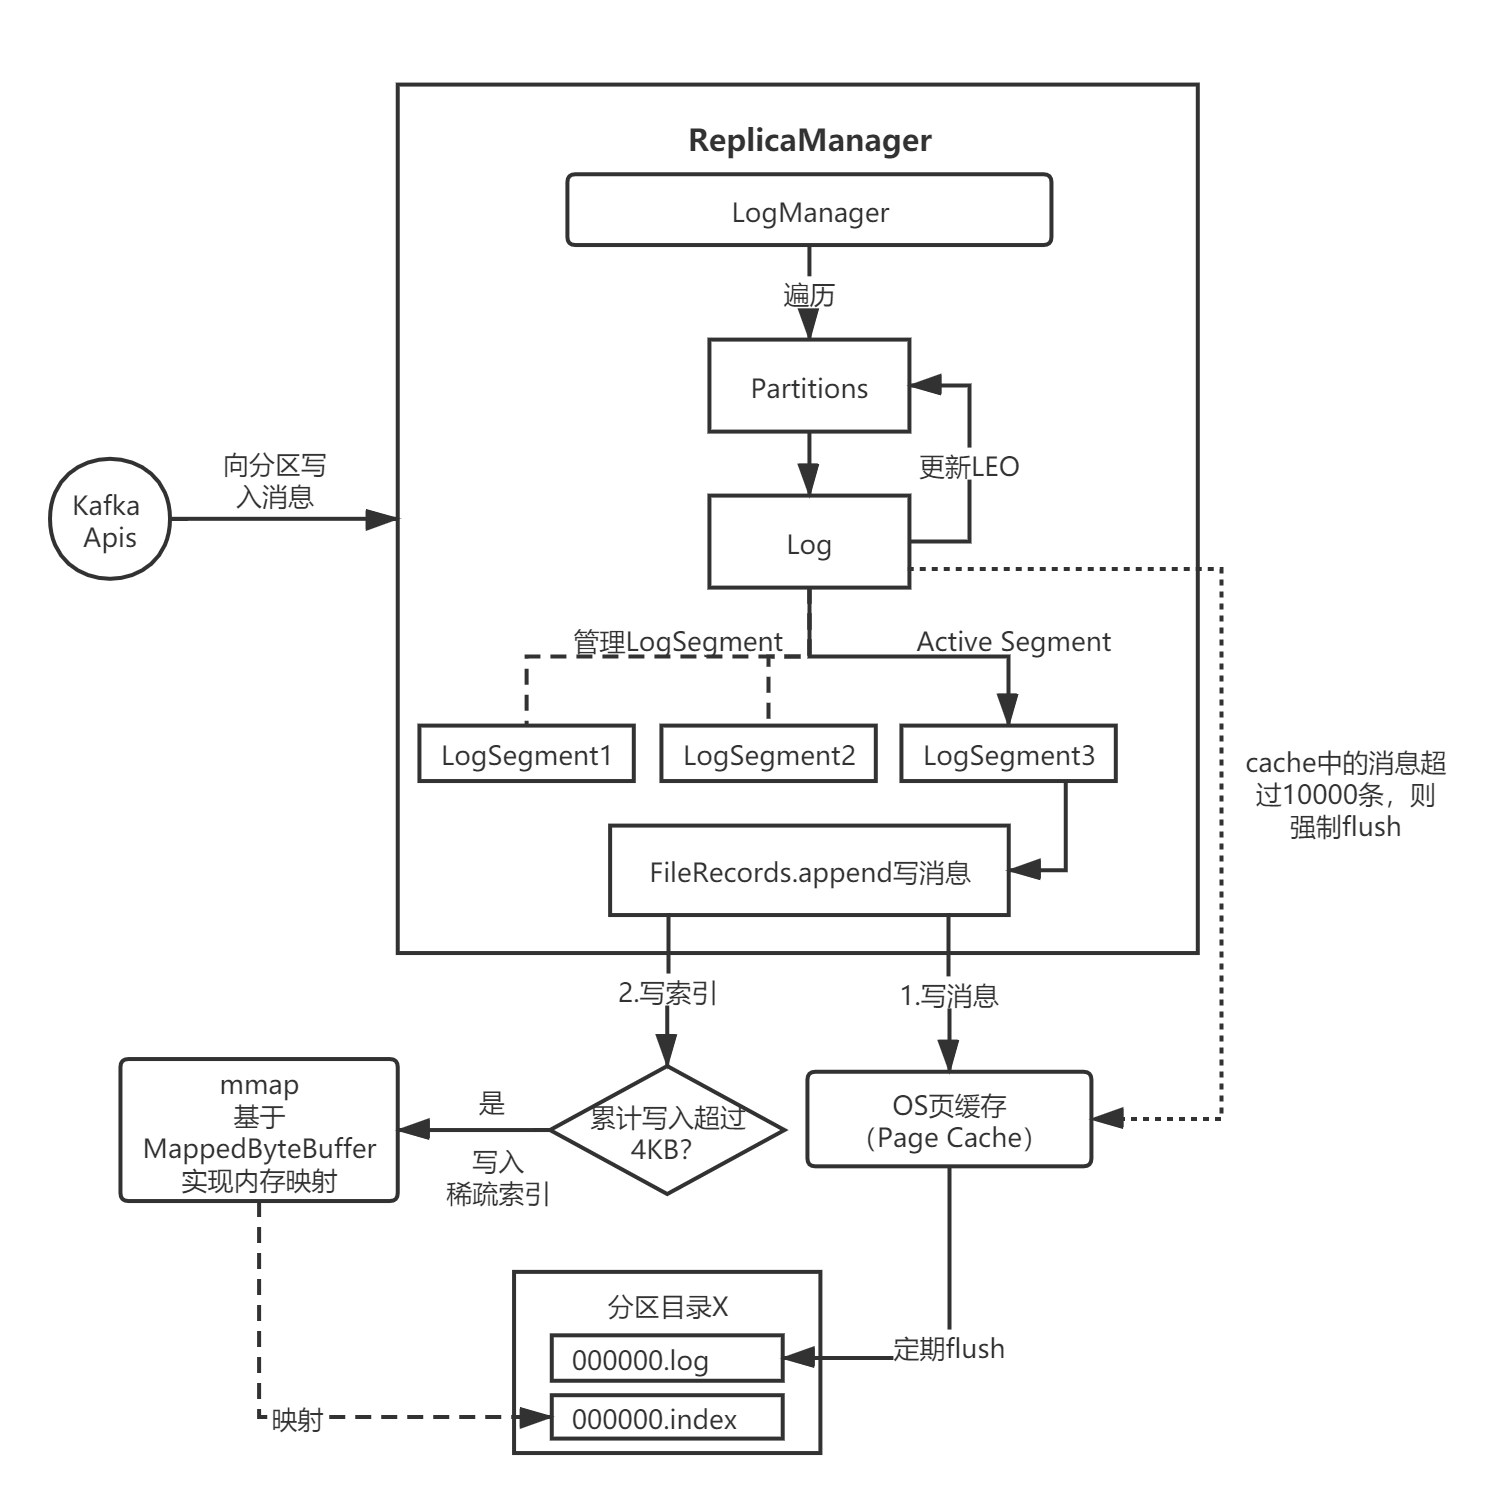
我用下面这两张流程图表示,忽略掉了很多非核心细节:
3.1 ReplicaManager
找到了消息写入的入口——ReplicaManager.appendRecords,我们来分析下消息写入的整体流程。ReplicaManager会委托LogManager完成消息的磁盘持久化:
    // ReplicaManager.scala

    def appendRecords(timeout: Long,
                      requiredAcks: Short,
                      internalTopicsAllowed: Boolean,
                      entriesPerPartition: Map[TopicPartition, MemoryRecords],
                      responseCallback: Map[TopicPartition, PartitionResponse] => Unit) {

      // 判断是否为有效的ACK参数
      if (isValidRequiredAcks(requiredAcks)) {
        val sTime = time.milliseconds
        // 关键:将消息写入当前Broker的Leader副本
        val localProduceResults = appendToLocalLog(internalTopicsAllowed, entriesPerPartition, requiredAcks)

        debug("Produce to local log in %d ms".format(time.milliseconds - sTime))
        val produceStatus = localProduceResults.map { case (topicPartition, result) =>
          topicPartition ->
                  ProducePartitionStatus(
                    result.info.lastOffset + 1, // required offset
                    new PartitionResponse(result.error, result.info.firstOffset, result.info.logAppendTime))
        }

        // 如果是延迟消息
        if (delayedRequestRequired(requiredAcks, entriesPerPartition, localProduceResults)) {
          val produceMetadata = ProduceMetadata(requiredAcks, produceStatus)
          val delayedProduce = new DelayedProduce(timeout, produceMetadata, this, responseCallback)

          val producerRequestKeys = entriesPerPartition.keys.map(new TopicPartitionOperationKey(_)).toSeq
          delayedProducePurgatory.tryCompleteElseWatch(delayedProduce, producerRequestKeys)
        } else {    // 如果是普通消息
          // 正常调用响应回调方法
          val produceResponseStatus = produceStatus.mapValues(status => status.responseStatus)
          responseCallback(produceResponseStatus)
        }
      } else {    // 如果是无效ACK参数,返回异常
        // 异常状态码
        val responseStatus = entriesPerPartition.map { case (topicPartition, _) =>
          topicPartition -> new PartitionResponse(Errors.INVALID_REQUIRED_ACKS,
          LogAppendInfo.UnknownLogAppendInfo.firstOffset, Record.NO_TIMESTAMP)
        }
        // 调用回调方法
        responseCallback(responseStatus)
      }
    }
上述代码最核心的部分是调用了appendToLocalLog,内部通过调用Partition.appendRecordsToLeader方法,往指定的分区写入消息日志:
    // ReplicaManager.scala

    private def appendToLocalLog(internalTopicsAllowed: Boolean,
                                 entriesPerPartition: Map[TopicPartition, MemoryRecords],
                                 requiredAcks: Short): Map[TopicPartition, LogAppendResult] = {
      trace("Append [%s] to local log ".format(entriesPerPartition))
      entriesPerPartition.map { case (topicPartition, records) =>
        BrokerTopicStats.getBrokerTopicStats(topicPartition.topic).totalProduceRequestRate.mark()
        BrokerTopicStats.getBrokerAllTopicsStats().totalProduceRequestRate.mark()

        // 如果是内部主题,且Broker参数配置不允许写入内部主题,则直接报错
        if (Topic.isInternal(topicPartition.topic) && !internalTopicsAllowed) {
          (topicPartition, LogAppendResult(
            LogAppendInfo.UnknownLogAppendInfo,
            Some(new InvalidTopicException(s"Cannot append to internal topic ${topicPartition.topic}"))))
        } else {
          // 正常流程
          try {
            // 1.获取分区
            val partitionOpt = getPartition(topicPartition)
            val info = partitionOpt match {
              case Some(partition) =>
                // 2.写入消息
                partition.appendRecordsToLeader(records, requiredAcks)
              case None => throw new UnknownTopicOrPartitionException("Partition %s doesn't exist on %d"
                .format(topicPartition, localBrokerId))
            }

            val numAppendedMessages =
              if (info.firstOffset == -1L || info.lastOffset == -1L)
                0
              else
                info.lastOffset - info.firstOffset + 1

            //...
          } catch {
            //...
          }
        }
      }
    }
3.2 Partition
来看下Partition.appendRecordsToLeader()方法,它的内部又调用了Log.append()方法写入消息:
    // Partition.scala

    def appendRecordsToLeader(records: MemoryRecords, requiredAcks: Int = 0) = {
      val (info, leaderHWIncremented) = inReadLock(leaderIsrUpdateLock) {
        leaderReplicaIfLocal match {
          case Some(leaderReplica) =>
            val log = leaderReplica.log.get
            val minIsr = log.config.minInSyncReplicas
            val inSyncSize = inSyncReplicas.size

            // 确保ISR副本数符合写入要求
            if (inSyncSize < minIsr && requiredAcks == -1) {
              throw new NotEnoughReplicasException("Number of insync replicas for partition %s is [%d], below required minimum [%d]"
                .format(topicPartition, inSyncSize, minIsr))
            }

            // 调用Log.append方法完成消息日志的写入
            val info = log.append(records, assignOffsets = true)
            replicaManager.tryCompleteDelayedFetch(TopicPartitionOperationKey(this.topic, this.partitionId))
            // we may need to increment high watermark since ISR could be down to 1
            (info, maybeIncrementLeaderHW(leaderReplica))

          case None =>
            throw new NotLeaderForPartitionException("Leader not local for partition %s on broker %d"
              .format(topicPartition, localBrokerId))
        }
      }
      //...
    }
3.3 Log
Log是Log Subsystem中最核心的一个类,它的append方法调用LogSegment.append()完成消息的写入:
    // Log.scala

    def append(records: MemoryRecords, assignOffsets: Boolean = true): LogAppendInfo = {
      //...

      try {
        lock synchronized {
          // ...

          // 判断是否需要新增分段日志,并返回最新的一个分段日志
          val segment = maybeRoll(messagesSize = validRecords.sizeInBytes,
            maxTimestampInMessages = appendInfo.maxTimestamp,
            maxOffsetInMessages = appendInfo.lastOffset)

          // 写入日志
          segment.append(firstOffset = appendInfo.firstOffset,
            largestOffset = appendInfo.lastOffset,
            largestTimestamp = appendInfo.maxTimestamp,
            shallowOffsetOfMaxTimestamp = appendInfo.offsetOfMaxTimestamp,
            records = validRecords)

          // 增加LEO
          updateLogEndOffset(appendInfo.lastOffset + 1)

          // 刷磁盘
          if (unflushedMessages >= config.flushInterval)
            flush()

          appendInfo
        }
      } catch {
        case e: IOException => throw new KafkaStorageException("I/O exception in append to log '%s'".format(name), e)
      }
    }
3.4 LogSegment
LogSegment的append方法,内部又调用了FileRecords.append()完成消息写入:
    // LogSegment.scala

    def append(firstOffset: Long, largestOffset: Long, largestTimestamp: Long, shallowOffsetOfMaxTimestamp: Long, records: MemoryRecords) {
      if (records.sizeInBytes > 0) {
        // 物理位置
        val physicalPosition = log.sizeInBytes()
        if (physicalPosition == 0)
          rollingBasedTimestamp = Some(largestTimestamp)
        // append the messages
        require(canConvertToRelativeOffset(largestOffset), "largest offset in message set can not be safely converted to relative offset.")
        // 调用FileRecords.append完成消息写入
        val appendedBytes = log.append(records)

        if (largestTimestamp > maxTimestampSoFar) {
          maxTimestampSoFar = largestTimestamp
          offsetOfMaxTimestamp = shallowOffsetOfMaxTimestamp
        }
        // 写入索引
        if(bytesSinceLastIndexEntry > indexIntervalBytes) {
          index.append(firstOffset, physicalPosition)
          timeIndex.maybeAppend(maxTimestampSoFar, offsetOfMaxTimestamp)
          bytesSinceLastIndexEntry = 0
        }
        bytesSinceLastIndexEntry += records.sizeInBytes
      }
    }
最后看下FileRecords.append():
    // FileRecords.java

    public int append(MemoryRecords records) throws IOException {
        int written = records.writeFullyTo(channel);
        size.getAndAdd(written);
        return written;
    }
四、总结
本章,我带大家回顾了Kafka的日志结构,然后对Log Subsystem的核心组件进行了整体分析,并找到了日志写入的入口,分析了日志写入的整体流程。下一章开始,我将逐一分析日志写入过程中涉及的各个核心组件。
Java 面试宝典是大明哥全力打造的 Java 精品面试题,它是一份靠谱、强大、详细、经典的 Java 后端面试宝典。它不仅仅只是一道道面试题,而是一套完整的 Java 知识体系,一套你 Java 知识点的扫盲贴。
它的内容包括:
- 大厂真题:Java 面试宝典里面的题目都是最近几年的高频的大厂面试真题。
- 原创内容:Java 面试宝典内容全部都是大明哥原创,内容全面且通俗易懂,回答部分可以直接作为面试回答内容。
- 持续更新:一次购买,永久有效。大明哥会持续更新 3+ 年,累计更新 1000+,宝典会不断迭代更新,保证最新、最全面。
- 覆盖全面:本宝典累计更新 1000+,从 Java 入门到 Java 架构的高频面试题,实现 360° 全覆盖。
- 不止面试:内容包含面试题解析、内容详解、知识扩展,它不仅仅只是一份面试题,更是一套完整的 Java 知识体系。
- 宝典详情:https://www.yuque.com/chenssy/sike-java/xvlo920axlp7sf4k
- 宝典总览:https://www.yuque.com/chenssy/sike-java/yogsehzntzgp4ly1
- 宝典进展:https://www.yuque.com/chenssy/sike-java/en9ned7loo47z5aw
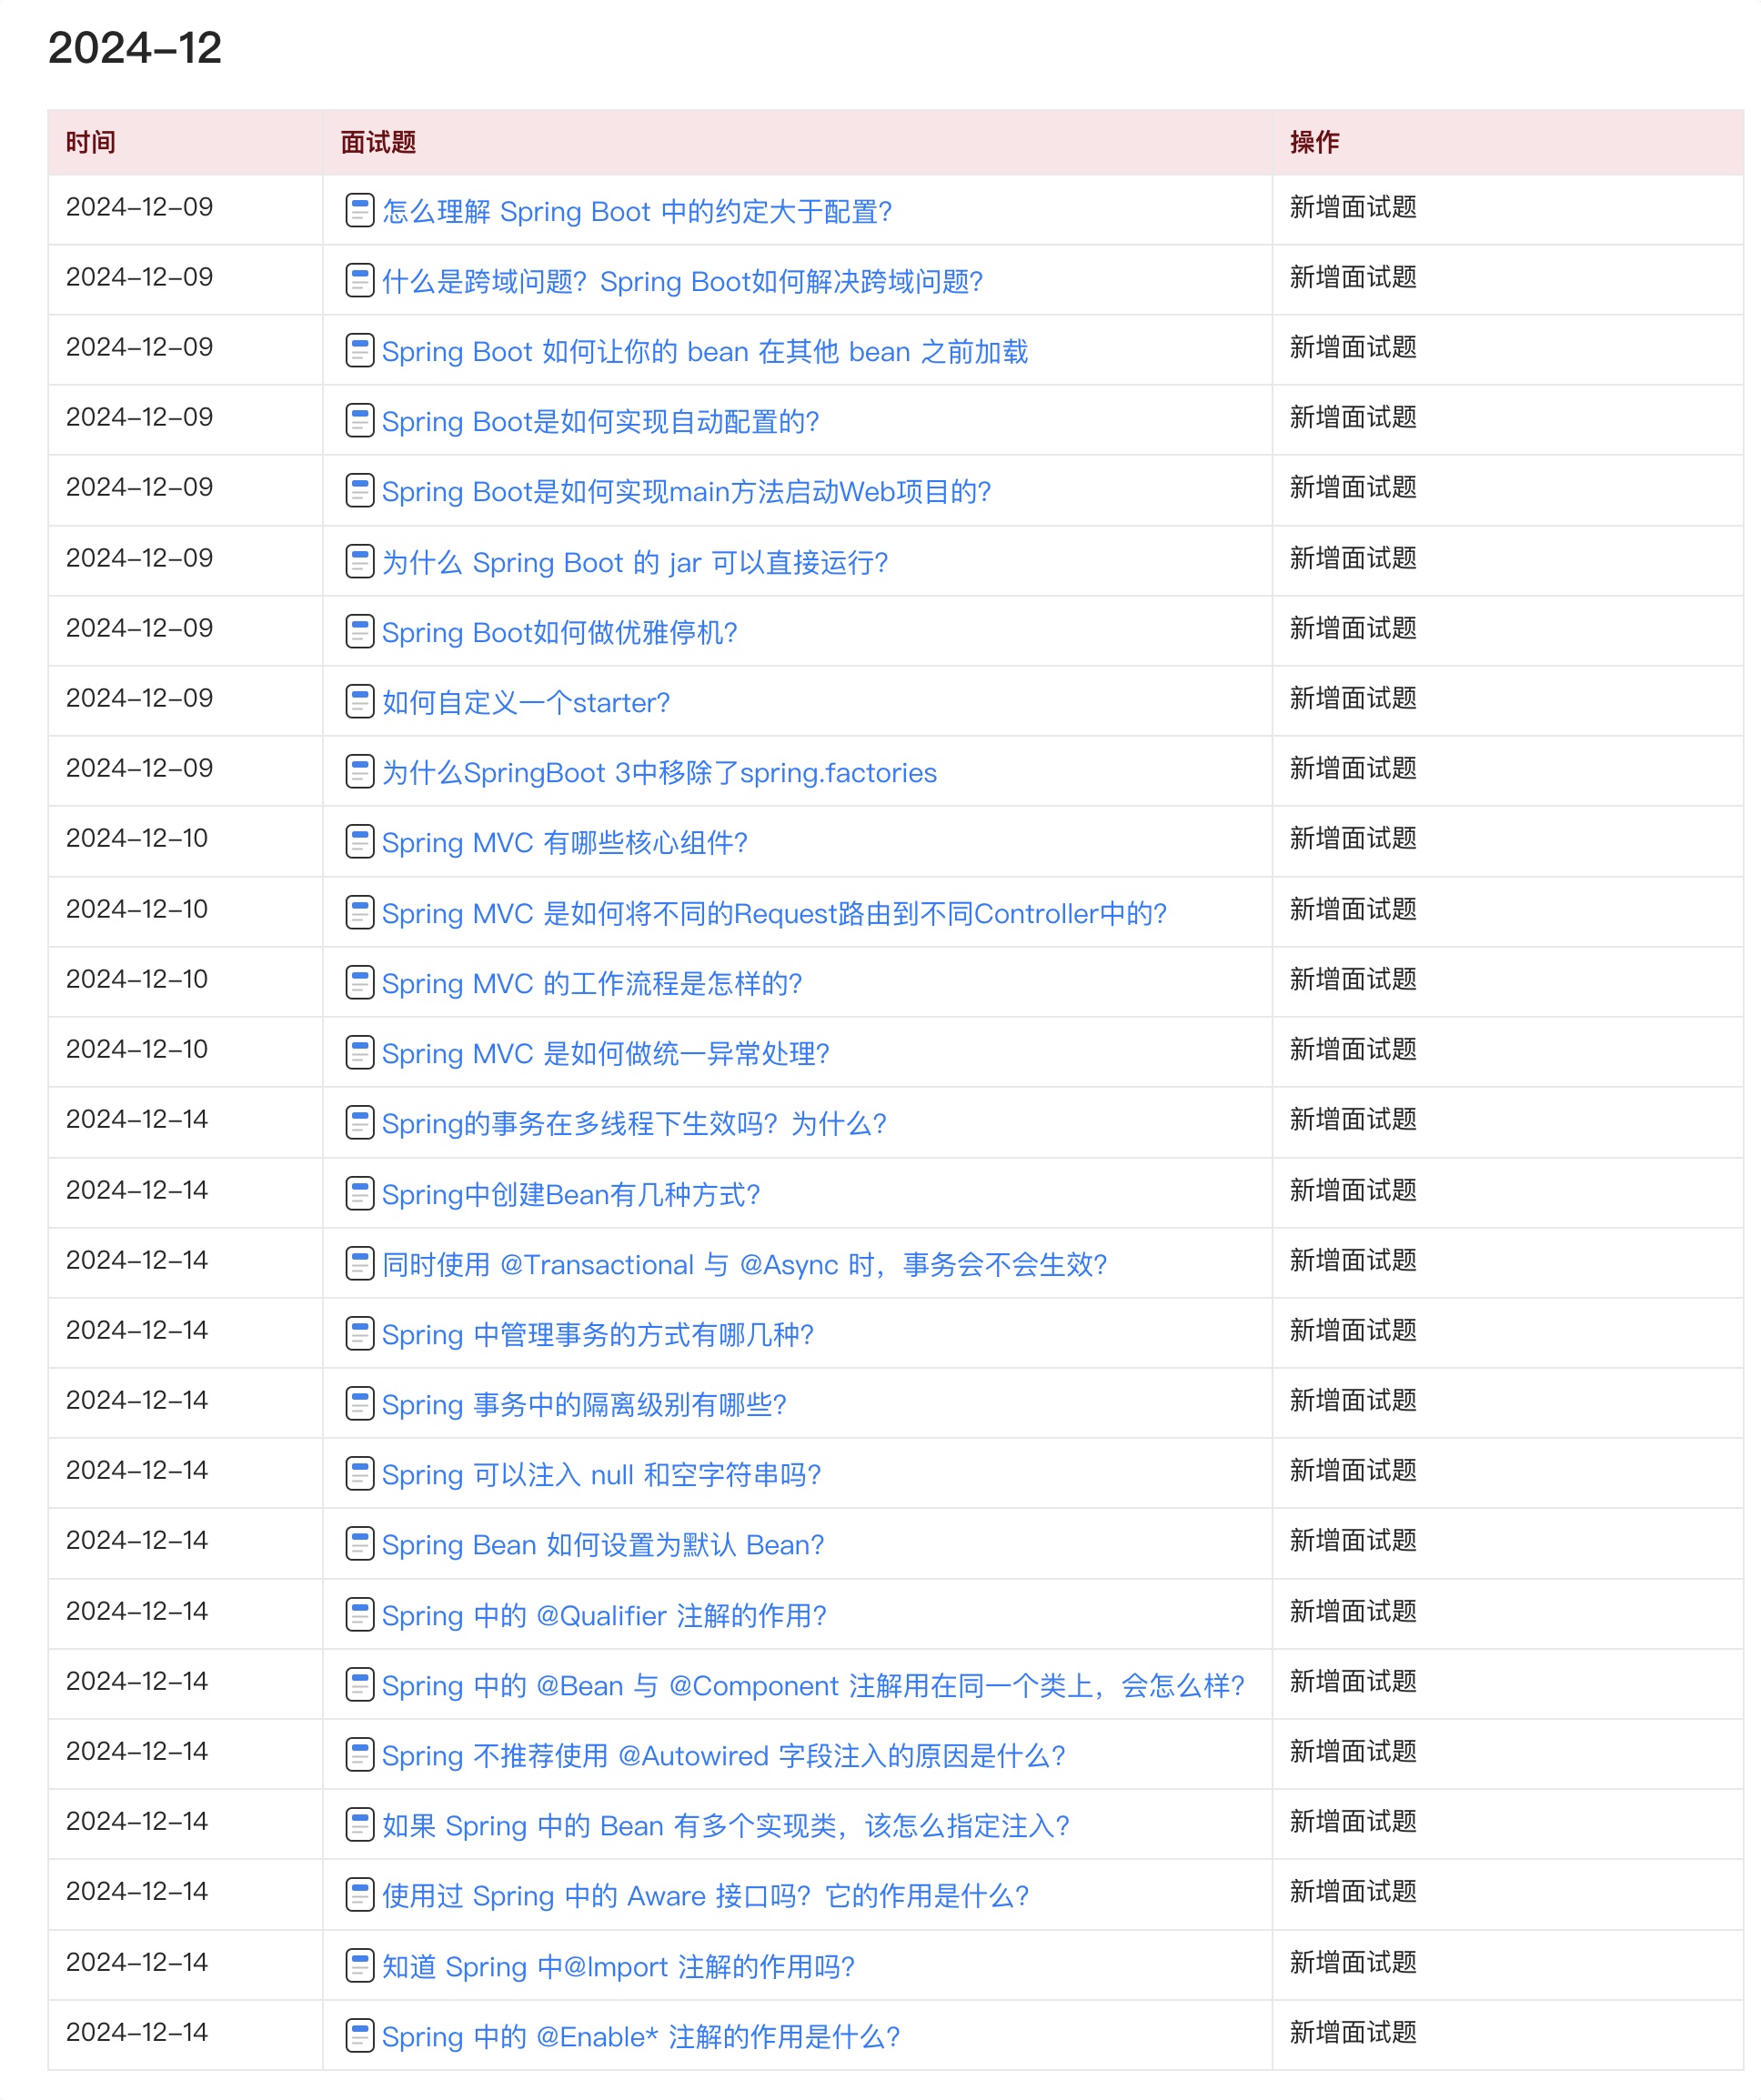
目前 Java 面试宝典累计更新 400+ 道,总字数 42w+。大明哥还在持续更新中,下图是大明哥在 2024-12 月份的更新情况:
想了解详情的小伙伴,扫描下面二维码加大明哥微信【daming091】咨询

同时,大明哥也整理一套目前市面最常见的热点面试题。微信搜[大明哥聊 Java]或扫描下方二维码关注大明哥的原创公众号[大明哥聊 Java] ,回复【面试题】 即可免费领取。
