核心流程-代理阶段
一、核心流程-代理阶段
1.1 分析
- Mybatis的核心流程三大阶段是:初始化–>动态代理–>数据读写阶段,本文主要分析代理阶段。在初始化阶段主要完成了配置的初始化,代理阶段主要是封装ibatis的编程模型,完成相关的工作以满足通过Java接口访问数据库的功能,代理阶段主要是在binding模块实现的,该模块通过读取配置信息,然后通过动态代理来实现面向接口的数据库操作。
- 从最初我写过的入门的文章里面可以看到,即使没有Java接口,也可以直接使用sqlSession来调用Mapper.xml映射文件里面的语句执行数据库的操作,只要定位到映射文件中正确的namespace+id即可,这是原始的ibatis编程模型。代码等效如下:
        //ibatis写法
    	SqlSession sqlSession = SqlSessionFactoryUtil.getSqlSessionFactoryInstace().openSession();
        int rowAffected = sqlSession.delete("item.deleteItemById", 1);

        //Mybatis写法,等价于上面的写法:
        SqlSession sqlSession = SqlSessionFactoryUtil.getSqlSessionFactoryInstace().openSession();
    	ItemMapper mapper = sqlSession.getMapper(ItemMapper.class);
        int rowAffected =  mapper.deleteItemById(1);
- 那么有了Java接口之后,我们直接调用接口,底层实际上就会走对应的映射文件里面的方法。这个映射关系是Mybatis框架帮我们做的,这个过程中框架做了什么呢?他需要找到一下几个对应的关系:
    1.根据方法名字和接口名字,定位到映射文件里面的语句(根据deleteItemById方法名和接口的包名,找到映射文件里面的item+deleteItemById这个namespace+id组合)
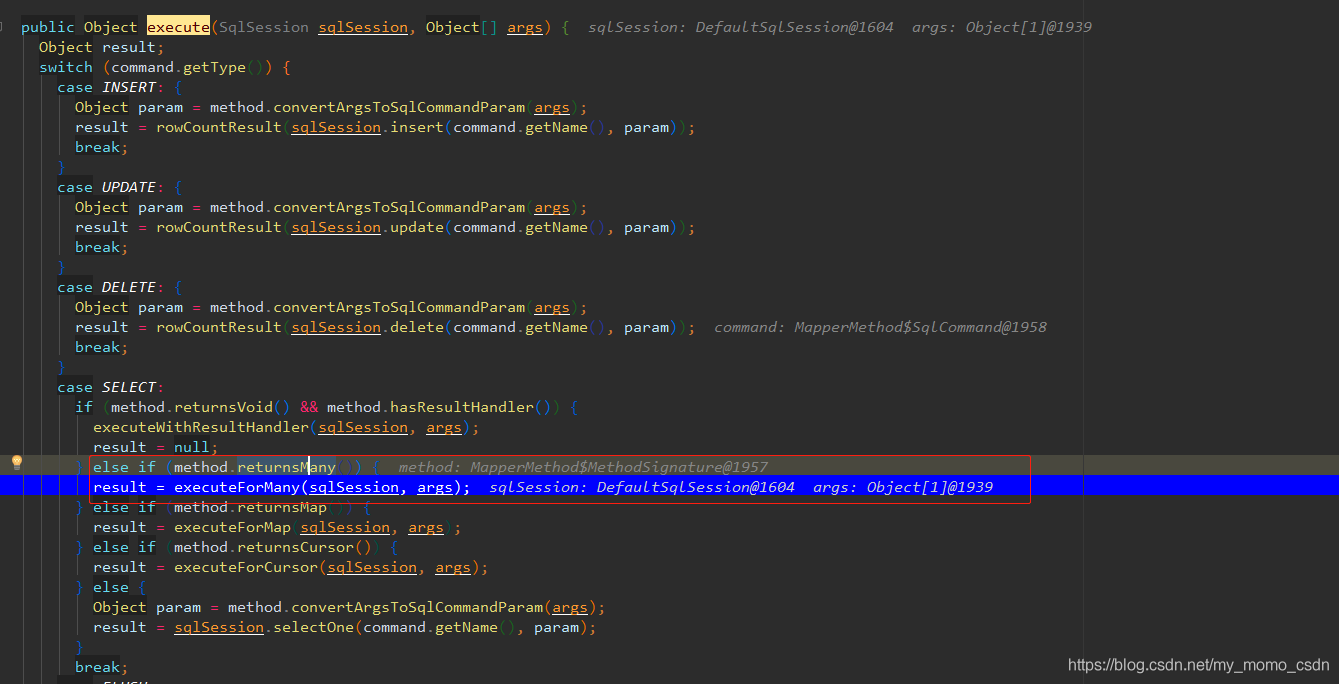
    2.根据接口返回值,找到SqlSession中对应的方法(在查询的时候,有很多种返回情况,比如返回一个或者多个,不同的情况对应了sqlsession中不同的方法,参考MapperMethod#execute)
    3.传递参数(传递参数1)
- 这三个绑定的过程,可以理解为一个翻译的过程,完成了这个过程之后,就可以通过动态代理,创建一个类来调用对应的方法了,这个代理的过程可以参考 01-Mybatis 入门的5.8小节
1.2 源码入口
- 在Mybatis中我们是面向SqlSession编程, getMapper方法是获取代理对象的开始,这就是我们等下分析的代码入口。getMapper方法里面找到了全局的配置对象,全局的配置对象里面在初始化的过程中已经注册了很多Mapper对象在里面去了,维护了一个MapperRegister,因此这个binding的过程是依赖于之前的初始化过程的,具体我们后面第四点的执行流程分析里面再看
        @Test
        public void query() {
            SqlSession sqlSession = SqlSessionFactoryUtil.getSqlSessionFactoryInstaceByConfig(CONFIG_FILE_PATH).openSession();
            MemberMapper mapper = sqlSession.getMapper(MemberMapper.class);
            List<Member> members = mapper.findMemberById(1);
            for (Member m : members) {
                System.out.println(m);
            }
        }
二、核心类
- binding模块核心类如下
| 核心类 | 备注 |
|---|---|
| MapperMethod | MapperMethod封装了Mapper接口中的方法信息和对应的SQL语句信息,它是Mapper接口与映射文件中的SQL语句之间的桥梁 |
| MapperProxy | MapperProxy实现了InvocationHandler接口,是Mapper接口的代理,对接口功能进行了增强 |
| MapperProxyFactory | 用于生成Mapper接口动态代理的实例对象,换言之这个类的工作就是创建代理对象的, |
| MapperRegistry | Mapper接口和对应的代理对象工厂注册中心,内部通过Map来保存, |

三、源码解析
- bingding模块只有4个需要关注的类,我们先对源码稍作分析,后面再根据代码执行流程调试分析。
3.1 MapperMethod
- MapperMethod封装了Mapper接口中的方法信息和对应的SQL语句信息,是Mapper接口与映射文件中的SQL语句之间的桥梁。在MapperMethod的内部有SqlCommand和MethodSignature这2个内部类。
3.1.1 SqlCommand
- SqlCommand从配置对象中获取了方法名,方法的命名空间,以及sql语句类型
    public static class SqlCommand {

        //sql的名称,命名空间+方法名称
        private final String name;
        //sql语句的类型
        private final SqlCommandType type;

        //构造方法省略...

        //省略getter...
      }

    public enum SqlCommandType {
      UNKNOWN, INSERT, UPDATE, DELETE, SELECT, FLUSH;
    }
3.1.2 MethodSignature
- MethodSignature封装了Mapper映射文件中的接口方法的信息,包括入参和返回值等
    public static class MethodSignature {

        //返回参数是否为集合或者数组
        private final boolean returnsMany;
        //返回参数是否为map
        private final boolean returnsMap;

        //返回值是否为空
        private final boolean returnsVoid;
        //返回值是否为游标类型
        private final boolean returnsCursor;

        //返回值类型
        private final Class<?> returnType;
        private final String mapKey;
        private final Integer resultHandlerIndex;
        private final Integer rowBoundsIndex;

        //方法参数解析器
        private final ParamNameResolver paramNameResolver;

        //构造方法省略...
        //辅助方法省略...
        //getter方法省略...
      }
3.1.3 MapperMethod
- MapperMethod主要是基于上面的2个内部类来完成相关功能。
    public class MapperMethod {

      //sqlCommand是对sql语句封装,从配置对象中获取方法的命名空间,方法名称和sql语句类型
      private final SqlCommand command;
      //封装mapper接口方法的相关信息(入参和返回值类型)
      private final MethodSignature method;

    }
- 更多源码注释阅读参考文档[1]
3.2 MapperProxy
- MapperProxy实现了InvocationHandler接口,是Mapper接口的代理,对接口功能进行了增强
    /**
     * @author Clinton Begin
     * @author Eduardo Macarron
     * MapperProxy实现了InvocationHandler接口,是Mapper接口的代理,对接口功能进行了增强
     */
    public class MapperProxy<T> implements InvocationHandler, Serializable {

        private static final long serialVersionUID = -6424540398559729838L;
        //1.关联的SqlSession对象
        private final SqlSession sqlSession;
        //2.Mapper接口对应的class对象
        private final Class<T> mapperInterface;
        //3.key是Mapper接口中对应的Method对象,value是MapperMethod,MapperMethod不存储任何信息,因此可以在多个代理对象之间共享
        private final Map<Method, MapperMethod> methodCache;

        public MapperProxy(SqlSession sqlSession, Class<T> mapperInterface, Map<Method, MapperMethod> methodCache) {
            this.sqlSession = sqlSession;
            this.mapperInterface = mapperInterface;
            this.methodCache = methodCache;
        }

        /**
         * ItemMapper mapper = sqlSession.getMapper(ItemMapper.class);
         *  int rowAffected =  mapper.deleteItemById(1);
         * 从代理对象的invoke方法我们可以看到,当我们显示调用类似于上面的mapper.xx方法的时候,底层是调用
         * mapperMethod.execute(sqlSession, args);mapperMethod里面封装了接口方法和sql语句的信息,实际上
         * 会去执行关联的sql语句
         * */
        @Override
        public Object invoke(Object proxy, Method method, Object[] args) throws Throwable {
            //1.如果是Object类的方法,那么就直接调用即可
            if (Object.class.equals(method.getDeclaringClass())) {
                try {
                    return method.invoke(this, args);
                } catch (Throwable t) {
                    throw ExceptionUtil.unwrapThrowable(t);
                }
            }
            //2.获取缓存的MapperMethod映射方法,缓存中没有则会创建一个并加到缓存
            final MapperMethod mapperMethod = cachedMapperMethod(method);
            //3.执行sql(MapperMethod内部包含接口方法和参数,sql等信息,可以直接执行sql)
            return mapperMethod.execute(sqlSession, args);
        }

        private MapperMethod cachedMapperMethod(Method method) {
            //1.如果缓存有则直接返回,如果没有就根据接口信息和配置文件信息生成MapperMethod
            MapperMethod mapperMethod = methodCache.get(method);
            if (mapperMethod == null) {
                mapperMethod = new MapperMethod(mapperInterface, method, sqlSession.getConfiguration());
                methodCache.put(method, mapperMethod);
            }
            return mapperMethod;
        }
    }
3.3 MapperProxyFactory
- MapperProxyFactory用于创建接口代理实例,也就是MapperProxy实例。代码简单,通过注释看的比较明白。从new MapperProxy(sqlSession, mapperInterface, methodCache);我们可以看到,MapperProxyFactory内部预先就保存了mapperInterface和methodCache这两个变量,只需要传入sqlsession就可以创建代理实例,因此我们知道MapperProxyFactory只能创建由mapperInterface指定的这个类型的接口代理,不能创建其他的接口类型的代理。假设我们的代码中有多个接口,因此Mybatis运行时会有多个MapperProxyFactory,每一个类型都对应一个MapperProxyFactory,而这些对应关系保存的地方就在MapperRegistry。
    /**
     * @author Lasse Voss
     * 用于生成Mapper接口动态代理的实例对象,换言之这个类的工作就是创建代理对象的,
     * 这些代理对象是Mapper接口的代理,也就是创建MapperProxy实例
     */
    public class MapperProxyFactory<T> {

        private final Class<T> mapperInterface;
        private final Map<Method, MapperMethod> methodCache = new ConcurrentHashMap<Method, MapperMethod>();

        public MapperProxyFactory(Class<T> mapperInterface) {
            this.mapperInterface = mapperInterface;
        }

        public Class<T> getMapperInterface() {
            return mapperInterface;
        }

        public Map<Method, MapperMethod> getMethodCache() {
            return methodCache;
        }

        //创建代理对象,参数传递的mapperProxy就是InvocationHandler的实现类(也就是实现代理逻辑的类)
        @SuppressWarnings("unchecked")
        protected T newInstance(MapperProxy<T> mapperProxy) {
            return (T) Proxy.newProxyInstance(mapperInterface.getClassLoader(), new Class[]{mapperInterface}, mapperProxy);
        }

        //生产代理了mapper接口的实例对象(MapperProxy实例)
        public T newInstance(SqlSession sqlSession) {
            final MapperProxy<T> mapperProxy = new MapperProxy<T>(sqlSession, mapperInterface, methodCache);
            return newInstance(mapperProxy);
        }
    }
3.4 MapperRegistry
- MapperRegistry保存了接口类型和该类型对应的MapperProxyFactory,在其内部通过Map<Class, MapperProxyFactory>来保存
    /**
     * @author Clinton Begin
     * @author Eduardo Macarron
     * @author Lasse Voss
     * Mapper接口和对应的代理对象工厂注册中心,内部通过Map来保存,
     */
    public class MapperRegistry {

        private final Configuration config;
        //1.保存了Mapper接口类型和该类型对应的MapperProxyFactory之间的关联关系,实际上就是记录了接口类型和动态代理工厂之间的关系
        //由此就可以很快得找到一个类型应该要哪一个工厂来创建代理实例
        private final Map<Class<?>, MapperProxyFactory<?>> knownMappers = new HashMap<Class<?>, MapperProxyFactory<?>>();

        //2.配置对象通过构造方法传入
        public MapperRegistry(Configuration config) {
            this.config = config;
        }

        //3.getMapper方法主要提供给SqlSession,SqlSession的getMapper底层就是走这个方法
        @SuppressWarnings("unchecked")
        public <T> T getMapper(Class<T> type, SqlSession sqlSession) {
            //1.通过类型获取MapperProxyFactory工厂
            final MapperProxyFactory<T> mapperProxyFactory = (MapperProxyFactory<T>) knownMappers.get(type);
            //2.没有工厂则报错。 有时候我们忘记在mybatis的主配置文件的mapper节点添加对应的映射文件的时候,就会抛出这个错误
            if (mapperProxyFactory == null) {
                throw new BindingException("Type " + type + " is not known to the MapperRegistry.");
            }
            //3.返回一个对应接口的代理
            try {
                return mapperProxyFactory.newInstance(sqlSession);
            } catch (Exception e) {
                throw new BindingException("Error getting mapper instance. Cause: " + e, e);
            }
        }

        public <T> boolean hasMapper(Class<T> type) {
            return knownMappers.containsKey(type);
        }

        //4.添加Mapper,实际上就是把这个Mapper类型和它对应的代理工厂保存到knownMappers这个Map里面去
        public <T> void addMapper(Class<T> type) {
            //1.Class代表接口才处理,否则不处理
            if (type.isInterface()) {
                //2.重复添加抛出异常
                if (hasMapper(type)) {
                    throw new BindingException("Type " + type + " is already known to the MapperRegistry.");
                }
                boolean loadCompleted = false;

                try {
                    //3.添加到Map集合保存
                    knownMappers.put(type, new MapperProxyFactory<T>(type));
                    // It's important that the type is added before the parser is run
                    // otherwise the binding may automatically be attempted by the
                    // mapper parser. If the type is already known, it won't try.
                    //4.解析接口上的注解信息,并添加至configuration对象
                    MapperAnnotationBuilder parser = new MapperAnnotationBuilder(config, type);
                    parser.parse();
                    loadCompleted = true;
                } finally {
                    if (!loadCompleted) {
                        knownMappers.remove(type);
                    }
                }
            }
        }
         //辅助方法省略...
    }
四、初始化流程分析
- 在核心流程一之初始化过程中会将所有的接口和对应的代理对应绑定关系初始化好并保存到Configuration对象中。在前面一篇文章的5.2.2XMLMapperBuilder#parse我们简单分析了XMLMapperBuilder#bindMapperForNamespace方法,并未深入了解,这里我们从这个方法开始来跟一下源码。
4.1 XMLMapperBuilder#bindMapperForNamespace
- 我们在XMLMapperBuilder的parse方法开始进行映射文件的解析,在如下:
    public void parse() {
            //判断是否已经加载过了,没有加载才继续加载(loadedResources是一个set集合,保存了已经加载的映射文件,如果一个配置在mappers里面写了2次,那么第二次就不加载了)
            if (!configuration.isResourceLoaded(resource)) {
                //处理mapper节点,比如:<mapper resource="com/xhm/mapper/UserMapper.xml" />, UserMapper.xml文件的根节点是/mapper,
                //这里使用XPathParser来解析UserMapper.xml文件,XPathParser在XMLMapperBuilder构造方法执行的时候就已经初始化好了,已经将
                //UserMapper.xml读取转换为一个document对象了
                configurationElement(parser.evalNode("/mapper"));
                //将解析过的文件添加到已经解析过的set集合里面
                configuration.addLoadedResource(resource);
                //注册mapper接口
                bindMapperForNamespace();
            }

            //把加载失败的节点重新加载一遍,因为这些节点可能在之前解析失败了,比如他们继承的节点还未加载导致,
            //因此这里把失败的部分再加载一次,之前加载失败的节点会放在一个map里面
            //处理解析失败的ResultMap节点
            parsePendingResultMaps();
            //处理解析失败的CacheRef节点
            parsePendingChacheRefs();
            //处理解析失败的Sql语句节点
            parsePendingStatements();
        }
- XMLMapperBuilder#bindMapperForNamespace方法进行mapper接口的注册
    private void bindMapperForNamespace() {
            //1.获取命名空间
            String namespace = builderAssistant.getCurrentNamespace();
            if (namespace != null) {
                Class<?> boundType = null;
                try {
                    //1.1 通过命名空间获取mapper接口的class对象
                    boundType = Resources.classForName(namespace);
                } catch (ClassNotFoundException e) {
                    //ignore, bound type is not required
                }

                if (boundType != null) {
                    //1.2 是否已经注册过该mapper接口?
                    if (!configuration.hasMapper(boundType)) {
                        // Spring may not know the real resource name so we set a flag
                        // to prevent loading again this resource from the mapper interface
                        // look at MapperAnnotationBuilder#loadXmlResource
                        //1.3如果没有注册,将命名空间添加至configuration.loadedResource集合中
                        configuration.addLoadedResource("namespace:" + namespace);
                        //1.4将mapper接口添加到mapper注册中心
                        configuration.addMapper(boundType);
                    }
                }
            }
        }
- 重点在configuration.addLoadedResource(“namespace:” + namespace)和configuration.addMapper(boundType);
4.2 Configuration#addLoadedResource
- 将加载过的资源用一个Set集合保存起来
        //加载到的所有*mapper.xml文件
        protected final Set<String> loadedResources = new HashSet<String>();

        public void addLoadedResource(String resource) {
            loadedResources.add(resource);
        }
4.3 Configuration#addMapper
- 注册Mapper接口的入口
        //mapper接口的动态代理注册中心
        protected final MapperRegistry mapperRegistry = new MapperRegistry(this);

        public <T> void addMapper(Class<T> type) {
            mapperRegistry.addMapper(type);
        }
- Configuration#addMapper方法直接就会走到前面解析过的MapperRegistry的addMapper方法,因此如果了解过 20-Mybatis 核心流程01-初始化阶段,解析过程还是比较明确简单的,直接调用的是MapperRegistry的方法。
五、执行流程分析
- 初始化好之后就是代码执行阶段,代码执行入口是1.2源码入口,我们跟一跟看这个根据类型获取代理对象的过程。因为SqlSession的默认实现类是DefaultSqlSession,因此我们把断点打在DefaultSqlSession#getMapper这个方法
- 第一步:DefaultSqlSession#getMapper。看到该方法内部走的是configuration的getMapper方法,走到第二步
      @Override
      public <T> T getMapper(Class<T> type) {
        return configuration.<T>getMapper(type, this);
      }
- 第二步:Configuration#getMapper。该方法内部走的是MapperRegistry的getMapper方法,走到第三步
        public <T> T getMapper(Class<T> type, SqlSession sqlSession) {
            return mapperRegistry.getMapper(type, sqlSession);
        }
- 第三步:MapperRegistry#getMapper。该方法内部会返回代理对象。

- 我们看到,这里的type是自己一个MemberMapper类型(传参是MemberMapper.class),这里会尝试返回一个代理对象
- 第四步: MapperProxyFactory#newInstance ,这里会创建代理对象并返回。

- 第五步:获得代理对象。在测试程序中获取到了代理对象。

- 第六步:代理对象访问接口方法。前面说过返回的代理对象实际上是一个MapperProxy,因此我们往下一步调试就走到了MapperProxy的invoke方法

- 第七步:代理对象执行sql。MapperProxy代理对象获取到对应的MapperMethod之后,就回去调用MapperMethod#execute方法执行sql语句(记住MapperMethod封装了Mapper接口中的方法信息和对应的SQL语句信息即可)最后走到executeForMany方法。(因为List members = mapper.findMemberById(1)是返回多个结果集),executeForMany方法是MapperMethod内部的辅助方法

- 第八步: executeForMany。executeForMany会执行sqlSession.selectList方法,最后走到DefaultSqlSession#selectList()方法。在这里我们终于看到了Executor组件。到此我们可以参考 17-Mybatis源码分析(StatementHandler数据库访问) 和 23-Mybatis 核心流程03-数据读取阶段 了解Executor组件的工作机制

六、SqlSession访问数据库流程
- Sqlsession获取 mapper -> 获取到代理对象 -> 代理对象访问接口方法 -> 代理对象真实去执行sql语句 -> 代理对象通过sqlsession执行sql -> sqlsession内部通过Executor执行 -> Executor内部通过StatementHandler访问数据库,ParameterHandler处理参数,ResultSetHandler做结果集映射 -> 返回结果集
七、小结
- 本文主要是解析了动态代理阶段,看到Mybatis是如何做到能够通过接口访问数据库的。实际上是在配置初始化阶段,他就将每一个接口和接口对应的代理工厂初始化好了,然后使用的使用获取到的就是代理工厂创建的代理实例
- 代理实例底层回去调用sqlsession执行sql语句。代理对象是MapperMethod实例,在初始化阶段它就获取到了映射文件中的sql信息和接口方法信息,知道sql类型和返回的结果集类型等信息,因此这个时候代理对象能够找到sqlsession中合适的方法去访问数据库。
- 代理实例执行sql语句其实是调用sqlsession的接口,在sqlsession内部调用Executor组件来执行sql,Executor又会把工作交给三大对象去做,而三大对象里面操作的就是JDBC的几个类。
- 后续文章会将Mybatis核心流程的三个阶段通过流程图呈现。
八、参考
- [1] 带注释源码
Java 面试宝典是大明哥全力打造的 Java 精品面试题,它是一份靠谱、强大、详细、经典的 Java 后端面试宝典。它不仅仅只是一道道面试题,而是一套完整的 Java 知识体系,一套你 Java 知识点的扫盲贴。
它的内容包括:
- 大厂真题:Java 面试宝典里面的题目都是最近几年的高频的大厂面试真题。
- 原创内容:Java 面试宝典内容全部都是大明哥原创,内容全面且通俗易懂,回答部分可以直接作为面试回答内容。
- 持续更新:一次购买,永久有效。大明哥会持续更新 3+ 年,累计更新 1000+,宝典会不断迭代更新,保证最新、最全面。
- 覆盖全面:本宝典累计更新 1000+,从 Java 入门到 Java 架构的高频面试题,实现 360° 全覆盖。
- 不止面试:内容包含面试题解析、内容详解、知识扩展,它不仅仅只是一份面试题,更是一套完整的 Java 知识体系。
- 宝典详情:https://www.yuque.com/chenssy/sike-java/xvlo920axlp7sf4k
- 宝典总览:https://www.yuque.com/chenssy/sike-java/yogsehzntzgp4ly1
- 宝典进展:https://www.yuque.com/chenssy/sike-java/en9ned7loo47z5aw
目前 Java 面试宝典累计更新 400+ 道,总字数 42w+。大明哥还在持续更新中,下图是大明哥在 2024-12 月份的更新情况:

想了解详情的小伙伴,扫描下面二维码加大明哥微信【daming091】咨询

同时,大明哥也整理一套目前市面最常见的热点面试题。微信搜[大明哥聊 Java]或扫描下方二维码关注大明哥的原创公众号[大明哥聊 Java] ,回复【面试题】 即可免费领取。

