上一章讲到,Sender线程会不断Loop循环,根据Batch是否就绪筛选出一批Broker。筛选完这些Broker后,还需要判断这些Broker的状态,比如连接是否已经成功建立,对于没有建立连接的Broker进行连接初始化,核心流程是在NetworkClient.ready()中完成的:
    // Sender.java

    // 3.检查与Broker的连接状态
    Iterator<Node> iter = result.readyNodes.iterator();
    long notReadyTimeout = Long.MAX_VALUE;
    while (iter.hasNext()) {
        Node node = iter.next();
        // 没有客户端与Broker没有成功建立连接,需要移除
        if (!this.client.ready(node, now)) {
            iter.remove();
            notReadyTimeout = Math.min(notReadyTimeout, this.client.connectionDelay(node, now));
        }
    }
本章,我就来讲解Broker筛选的底层原理。
一、整体流程
Broker筛选的核心逻辑是在NetworkClient.ready()中完成的,下面的方法首先判断Broker是否符合就绪条件,接着对于 从未建立过连接或断开连接超过一定时间 的Broker,尝试初始化连接:
    // NetworkClient.java

    public boolean ready(Node node, long now) {
        if (node.isEmpty())
            throw new IllegalArgumentException("Cannot connect to empty node " + node);

        // 1.判断Broker是否就绪
        if (isReady(node, now))
            return true;

        // 2.执行到这里,可能是从未建立过连接或断开连接超过一定时间,所以要初始化连接
        if (connectionStates.canConnect(node.idString(), now))
            initiateConnect(node, now);
        return false;
    }
1.1 就绪判断
我们先来看NetworkClient.isReady()方法,它会认为同时满足以下条件的Broker才处于就绪状态:
MetadataUpdater元数据更新器当前不处于“即将更新元数据”的状态,也就是说,如果此时即将要更新元数据了,就不能发送请求,必须要等待元数据更新完成后才能发送请求;- Broker已经建立连接,且连接状态正常。
    // NetworkClient.java

    public boolean isReady(Node node, long now) {
        // 当前没有准备更新元数据,且与Broker连接状态正常
        return !metadataUpdater.isUpdateDue(now) && canSendRequest(node.idString());
    }
第一个判断——MetadataUpdater.isUpdateDue(),本质就是要断定 当前客户端不能处于“即将更新元数据”的状态 :
    // NetworkClient.DefaultMetadataUpdater.java

    public boolean isUpdateDue(long now) {
        // 当前不处于更新中状态 && 下一次更新时间为0
        return !this.metadataFetchInProgress && this.metadata.timeToNextUpdate(now) == 0;
    }
第二个判断——NetworkClient.canSendRequest()方法包含了三部分判断逻辑,Broker必须满足以下三个条件才被认为是就绪的:
- Broker的连接状态是READY;
- Selector Channel已经就绪(NetworkClient底层采用了NIO通信机制);
- inFlightRequests 请求数未满,也就是说未响应的请求数不能超过参数
max.in.flight.requests.per.connection设置的值,默认为5个。
    // NetworkClient.java

    private boolean canSendRequest(String node) {
        return connectionStates.isReady(node) && selector.isChannelReady(node)
            && inFlightRequests.canSendMore(node);
    }
1.2 建立连接
经过第一层筛选后,还有一种情况需要考虑,就是 客户端与Broker之间不存在连接 ,所以需要通过ClusterConnectionStates.canConnect()判断下是否属于这种情况,如果是则要建立连接:
    // ClusterConnectionStates.java

    public boolean canConnect(String id, long now) {
        // 与当前Broker的连接状态
        NodeConnectionState state = nodeState.get(id);
        if (state == null)    // null表示从未建立过连接
            return true;
        else
            // 连接为断开状态且已经超过一段时间没有重连(默认100ms),也算没有建立过连接
            return state.state == ConnectionState.DISCONNECTED &&
            now - state.lastConnectAttemptMs >= this.reconnectBackoffMs;
    }
NetworkClient.initiateConnect()建立连接,这里其实用到了设计模式里的 状态模式 ,通过状态机来修改连接的不同状态:
    // NetworkClient.java

    private void initiateConnect(Node node, long now) {
        String nodeConnectionId = node.idString();
        try {
            log.debug("Initiating connection to node {} at {}:{}.", node.id(), node.host(), node.port());
            // 通过状态机修改连接状态
            this.connectionStates.connecting(nodeConnectionId, now);
            // 通过底层NIO组件建立连接
            selector.connect(nodeConnectionId,
                             new InetSocketAddress(node.host(), node.port()),
                             this.socketSendBuffer,
                             this.socketReceiveBuffer);
        } catch (IOException e) {
            connectionStates.disconnected(nodeConnectionId, now);
            metadataUpdater.requestUpdate();
            log.debug("Error connecting to node {} at {}:{}:", node.id(), node.host(), node.port(), e);
        }
    }
另外还要注意,Selector是Kafka客户端自己的NIO组件,底层建立的都是Socket连接。Selector在建立连接时,在底层初始化一个SocketChannel组件,然后把它注册到Selector上,监听它建立连接的事件。
二、初始化连接
上述Broker筛选过程中,如果客户端与某个Broker没有建立连接,就会通过Selector组件去建立连接。本节,我就对Selector这个NIO网络通信组件作一个讲解。
2.1 NetworkClient构造
我们在初始化KafkaProducer时,会创建网络通信组件 NetworkClient :
    // kafkaProducer.java

    NetworkClient client = new NetworkClient(
        new Selector(config.getLong(ProducerConfig.CONNECTIONS_MAX_IDLE_MS_CONFIG), this.metrics, time, "producer", channelBuilder),
        this.metadata, clientId,
        config.getInt(ProducerConfig.MAX_IN_FLIGHT_REQUESTS_PER_CONNECTION),
        config.getLong(ProducerConfig.RECONNECT_BACKOFF_MS_CONFIG),
        config.getInt(ProducerConfig.SEND_BUFFER_CONFIG),
        config.getInt(ProducerConfig.RECEIVE_BUFFER_CONFIG),
        this.requestTimeoutMs, time, true);
可以看到,它的内部封装了一个Selector对象,这个就是Kafka客户端最核心的通信组件:
    public class NetworkClient implements KafkaClient {
        private final Selectable selector;
        //...
    }
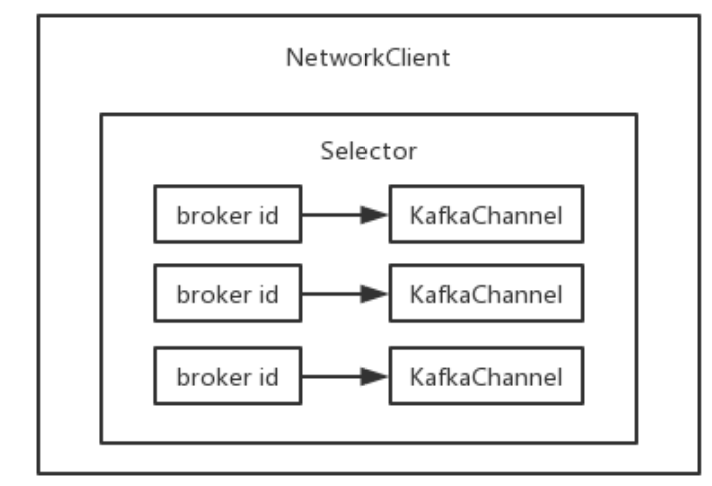
Selector内部封装了Java NIO核心组件——java.nio.channels.Selector,并且建立了Broker ID和KafkaChannel的映射关系:
    public class Selector implements Selectable {
        private final java.nio.channels.Selector nioSelector;
        private final Map<String, KafkaChannel> channels;

        //...
    }
KafkaChannel底层又封装了java.nio.channels.SocketChannel,所以本质就是利用了Java NIO来完成底层的网络通信,整个结构是下面这样的:
2.2 注册监听事件
我们再来看Selector是如何与Broker建立连接的,本质就是些Java NIO的代码,熟悉NIO编程的童鞋对这块应该不会陌生:
    // Selector.java

    private final Map<String, KafkaChannel> channels;    //Channel缓存

    public void connect(String id, InetSocketAddress address,
                        int sendBufferSize, int receiveBufferSize) throws IOException {
        if (this.channels.containsKey(id))
            throw new IllegalStateException("There is already a connection for id " + id);

        // 创建一个SocketChannel
        SocketChannel socketChannel = SocketChannel.open();
        // 非阻塞模式
        socketChannel.configureBlocking(false);
        Socket socket = socketChannel.socket();
        // keepalive = true,表示这是一个保活连接
        socket.setKeepAlive(true);
        // 发送缓冲区
        if (sendBufferSize != Selectable.USE_DEFAULT_BUFFER_SIZE)
            socket.setSendBufferSize(sendBufferSize);
        // 接受缓冲区
        if (receiveBufferSize != Selectable.USE_DEFAULT_BUFFER_SIZE)
            socket.setReceiveBufferSize(receiveBufferSize);
        // 设置TcpNoDelay=true,表示不对数据包进行拼接,而是立即发送
        socket.setTcpNoDelay(true);

        // 尝试建立连接,非阻塞模式下会立即返回,connected=false
        boolean connected;
        try {
            connected = socketChannel.connect(address);
        } catch (UnresolvedAddressException e) {
            socketChannel.close();
            throw new IOException("Can't resolve address: " + address, e);
        } catch (IOException e) {
            socketChannel.close();
            throw e;
        }

        // 向java.nio.channels.Selector注册SocketChannel,监听OP_CONNECT事件
        SelectionKey key = socketChannel.register(nioSelector, SelectionKey.OP_CONNECT);

        // 构造一个KafkaChannel
        KafkaChannel channel;
        try {
            channel = channelBuilder.buildChannel(id, key, maxReceiveSize);
        } catch (Exception e) {
            try {
                socketChannel.close();
            } finally {
                key.cancel();
            }
            throw new IOException("Channel could not be created for socket " + socketChannel, e);
        }
        // 关联KafkaChannel和SelectionKey
        key.attach(channel);
        // 缓存Channel,也就是每一个Broker对应一个KafkaChannel
        this.channels.put(id, channel);

        //...
    }
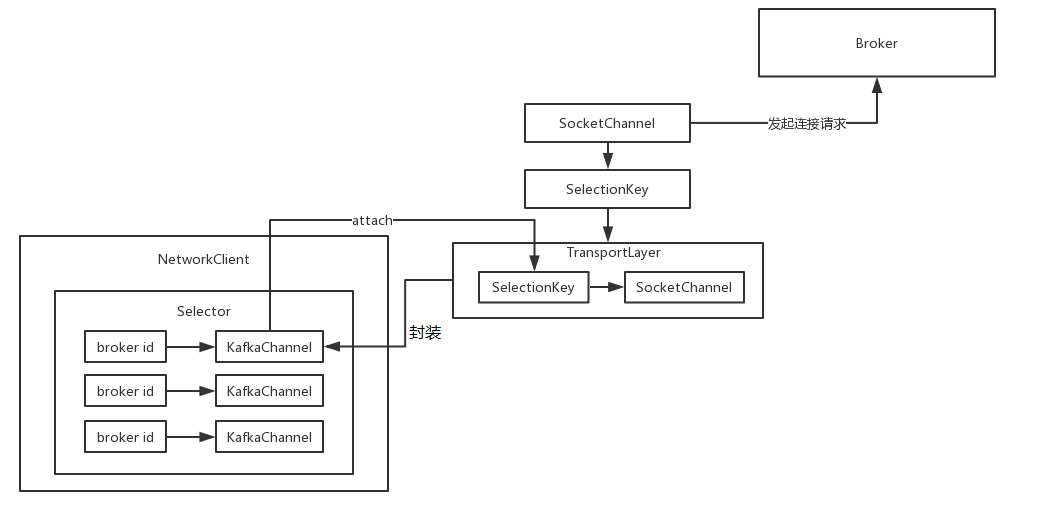
上述代码的目的就是创建SocketChannel,注册到Selector上,然后通过SelectionKey关联,可以用下面这张图描述:
有几个需要特别关注的地方:
- SocketChannel配置为“非阻塞”模式时,连接建立是异步的,Selector会监听SocketChannel上的OP_CONNECT事件,当有该事件发生时会获取到一个对应的SelectionKey,所以真正建立连接的地方在
Selector.pool()方法中,这个后面会讲; - SocketChannel的
keepalive,设置keepalive=true之后,如果一段时间内客户端和服务端没有任何通信,客户端就会发送一个探测包,根据探测包的结果保持连接、重新连接或者断开连接; - SocketChannel的
tcpNoDelay,这个参数当设置false时表示开启Nagle算法,就会把一些小数据包收集起来,组装成一个大包一次性发送出去。所以,如果设置为true,就代表不对数据包进行组装,立马发送; - Selector会缓存KafkaChannel,每个Broker一个KafkaChannel,代表着客户端与这个Broker之间的连接。KafkaChannel内部封装了一个TransportLayer对象,而TransportLayer又封装了Java NIO原生的SocketChannel和SelectionKey。
Kafka客户端的 NetworkClient 、 Selector 、 KafkaChannel 、 ConnectStates ,这些底层的通信组件是极为值得我们去研究的。因为Kakfa本身作为一个工业级的中间件,经历了无数线上环境的淬炼。所以,如果我们自己的公司要自研底层NIO通信组件,Kafka是一个现成的参考。
2.3 轮询处理
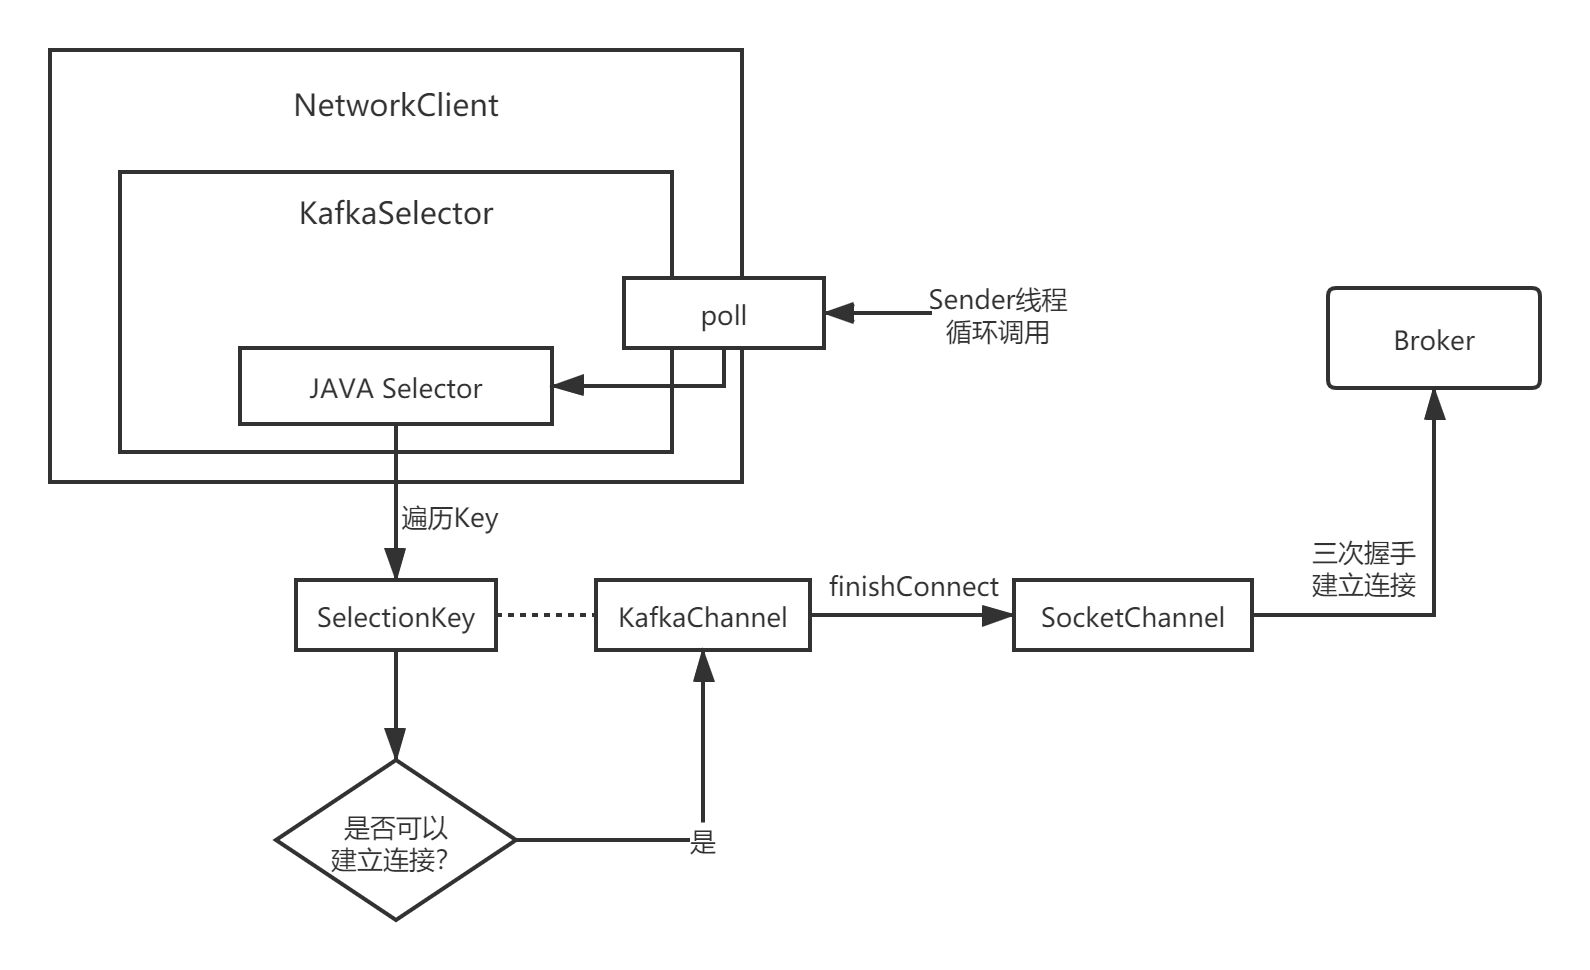
Selector会监听SocketChannel上的OP_CONNECT事件,真正建立连接的操作是通过Selector.poll方法完成的:
在Sender线程的主流程的最后一步会调用NetworkClient.poll():
    // Sender.java

    void run(long now) {
        //...

        // 8.负责真正的网络请求发送
        this.client.poll(pollTimeout, now);
    }
NetworkClient.poll()首先会根据元数据更新标识,判断是否要更新集群元数据,需要的话就通过 MetadataUpdater 更新;接着,调用Selector.poll()方法轮询SocketChannel上的所有SelectionKey,根据不同事件类型做处理:
    // NetworkClient.java

    public List<ClientResponse> poll(long timeout, long now) {
        // 1.判断是否需要更新元数据,需要的话就更新
        long metadataTimeout = metadataUpdater.maybeUpdate(now);

        // 2.轮询SocketChannel的事件,有相应的事件(建立连接、准备读、准备写)发生就进行处理
        try {
            this.selector.poll(Utils.min(timeout, metadataTimeout, requestTimeoutMs));
        } catch (IOException e) {
            log.error("Unexpected error during I/O", e);
        }

        // 3.处理响应
        long updatedNow = this.time.milliseconds();
        List<ClientResponse> responses = new ArrayList<>();
        handleAbortedSends(responses);
        handleCompletedSends(responses, updatedNow);
        handleCompletedReceives(responses, updatedNow);
        handleDisconnections(responses, updatedNow);
        handleConnections();
        handleInitiateApiVersionRequests(updatedNow);
        handleTimedOutRequests(responses, updatedNow);

        // 4.触发回调函数
        for (ClientResponse response : responses) {
            try {
                response.onComplete();
            } catch (Exception e) {
                log.error("Uncaught error in request completion:", e);
            }
        }
        return responses;
    }
我们重点看Selector.poll(),它的核心逻辑在内部的pollSelectionKeys方法中:
    // Selector.java

    public void poll(long timeout) throws IOException {
        if (timeout < 0)
            throw new IllegalArgumentException("timeout should be >= 0");

        // 1.各类缓存数据清理
        clear();
        if (hasStagedReceives() || !immediatelyConnectedKeys.isEmpty())
            timeout = 0;

        // 2.判断是否已经有就绪Channel
        long startSelect = time.nanoseconds();
        int readyKeys = select(timeout);
        long endSelect = time.nanoseconds();
        this.sensors.selectTime.record(endSelect - startSelect, time.milliseconds());
        if (readyKeys > 0 || !immediatelyConnectedKeys.isEmpty()) {
            // 重点在这里:根据不同事件进行处理
            pollSelectionKeys(this.nioSelector.selectedKeys(), false, endSelect);
            pollSelectionKeys(immediatelyConnectedKeys, true, endSelect);
        }

        addToCompletedReceives();

        long endIo = time.nanoseconds();
        this.sensors.ioTime.record(endIo - endSelect, time.milliseconds());

        // 3.关闭长时间空闲的连接
        maybeCloseOldestConnection(endSelect);
    }
Selector.pollSelectionKeys()就是从底层的java.nio.channels.Selector获取注册的SelectionKey:
    private void pollSelectionKeys(Iterable<SelectionKey> selectionKeys,
                                   boolean isImmediatelyConnected,
                                   long currentTimeNanos) {
        // 遍历SelectionKey
        Iterator<SelectionKey> iterator = selectionKeys.iterator();
        while (iterator.hasNext()) {
            SelectionKey key = iterator.next();
            iterator.remove();
            // 1.获取关联的KafkaChannel
            KafkaChannel channel = channel(key);

            sensors.maybeRegisterConnectionMetrics(channel.id());

            // 2.idleExpiryManager内部保存了一个LRU Map,用来跟踪剔除最近最少使用的连接
            if (idleExpiryManager != null)
                idleExpiryManager.update(channel.id(), currentTimeNanos);

            try {

                // 3.key.isConnectable:发生了可建立连接的事件
                if (isImmediatelyConnected || key.isConnectable()) {
                    // 尝试建立连接
                    if (channel.finishConnect()) {
                        // 将连接添加到缓存
                        this.connected.add(channel.id());
                        this.sensors.connectionCreated.record();
                    } else
                        continue;
                }

                // 2.已经连接上,但连接还没完全就绪
                if (channel.isConnected() && !channel.ready())
                    // 完成三次握手
                    channel.prepare();

                // 3.连接已经建立,且发生了可读事件
                if (channel.ready() && key.isReadable() && !hasStagedReceive(channel)) {
                    NetworkReceive networkReceive;
                    while ((networkReceive = channel.read()) != null)
                        addToStagedReceives(channel, networkReceive);
                }

                // 4.连接已经建立,且发生了可写事件
                if (channel.ready() && key.isWritable()) {
                    Send send = channel.write();
                    if (send != null) {
                        this.completedSends.add(send);
                        this.sensors.recordBytesSent(channel.id(), send.size());
                    }
                }

                // 5.对于无效Key,关闭对应的Channel
                if (!key.isValid())
                    close(channel, true);
            } catch (Exception e) {
                //...
                close(channel, true);
            }
        }
    }
2.4 建立连接
当SelectionKey上发生可建立连接的事件时,客户端最终会通过KafkaChannel.finishConnect()方法完成连接的建立:
    // Selector.java

    if (isImmediatelyConnected || key.isConnectable()) {
        if (channel.finishConnect()) {    // 真正建立连接的地方
            this.connected.add(channel.id());
            this.sensors.connectionCreated.record();
        } else
            continue;
    }
    // KafkaChannel.java

    public boolean finishConnect() throws IOException {
        // 调用了内部的TransportLayer组件,里面又封装了SocketChannel
        return transportLayer.finishConnect();
    }
底层就是调用Java NIO的SocketChannel.finishConnect():
    public boolean finishConnect() throws IOException {
        // 建立连接
        boolean connected = socketChannel.finishConnect();
        if (connected)
            // 如果连接已经建立,则对于当前Channel,后续不关注OP_CONNECT和OP_READ事件
            key.interestOps(key.interestOps() & ~SelectionKey.OP_CONNECT | SelectionKey.OP_READ);
        return connected;
    }
三、总结
本章,我对客户端检查Broker连接状态的底层原理进行了讲解,核心思路就是 检查当前客户端与哪些待筛选的Broker还没有建立TCP长连接 ,如果没有建立连接,Kafka Producer就会在底层通过Java NIO的封装组件尝试建立连接。
Java 面试宝典是大明哥全力打造的 Java 精品面试题,它是一份靠谱、强大、详细、经典的 Java 后端面试宝典。它不仅仅只是一道道面试题,而是一套完整的 Java 知识体系,一套你 Java 知识点的扫盲贴。
它的内容包括:
- 大厂真题:Java 面试宝典里面的题目都是最近几年的高频的大厂面试真题。
- 原创内容:Java 面试宝典内容全部都是大明哥原创,内容全面且通俗易懂,回答部分可以直接作为面试回答内容。
- 持续更新:一次购买,永久有效。大明哥会持续更新 3+ 年,累计更新 1000+,宝典会不断迭代更新,保证最新、最全面。
- 覆盖全面:本宝典累计更新 1000+,从 Java 入门到 Java 架构的高频面试题,实现 360° 全覆盖。
- 不止面试:内容包含面试题解析、内容详解、知识扩展,它不仅仅只是一份面试题,更是一套完整的 Java 知识体系。
- 宝典详情:https://www.yuque.com/chenssy/sike-java/xvlo920axlp7sf4k
- 宝典总览:https://www.yuque.com/chenssy/sike-java/yogsehzntzgp4ly1
- 宝典进展:https://www.yuque.com/chenssy/sike-java/en9ned7loo47z5aw
目前 Java 面试宝典累计更新 400+ 道,总字数 42w+。大明哥还在持续更新中,下图是大明哥在 2024-12 月份的更新情况:
想了解详情的小伙伴,扫描下面二维码加大明哥微信【daming091】咨询

同时,大明哥也整理一套目前市面最常见的热点面试题。微信搜[大明哥聊 Java]或扫描下方二维码关注大明哥的原创公众号[大明哥聊 Java] ,回复【面试题】 即可免费领取。
