重构社交登录
app里面的第三方登录不向浏览器中一样,一般是通过调用sdk,引导到第三方app应用登录后返回;
浏览器模式

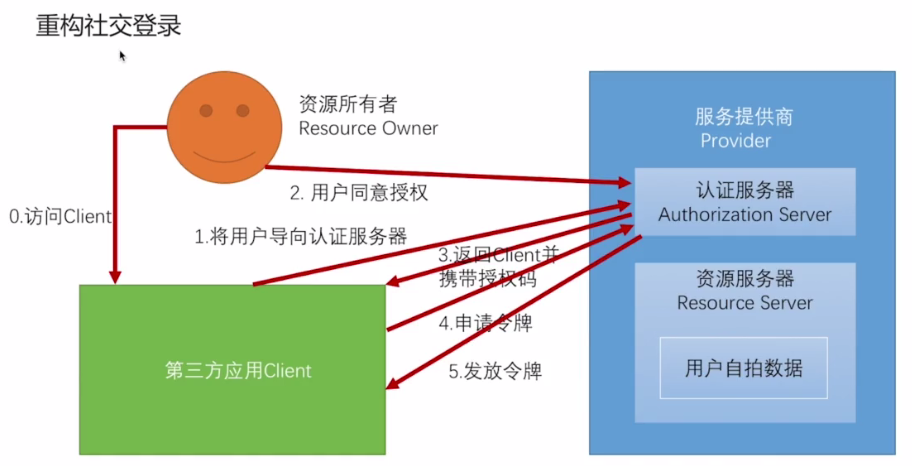
可能以下两种模式;
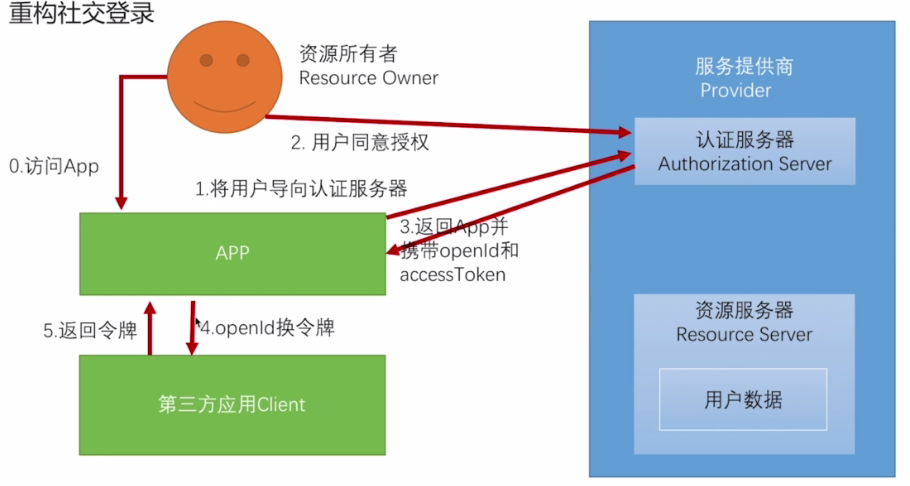
简化模式

上图来看,拿到openId之后,只要我们支持使用openid登录,即可;
可以大部分模仿短信验证码登录的代码,只有一点不同,提交的openid是属于social表中的数据,
所以相关的用户信息SocialUserDetailsService和用户连接信息UsersConnectionRepository
需要通过 socaial提供的表来获取校验逻辑
先看配置
    package cn.mrcode.imooc.springsecurity.securityapp.social.openid;

    import org.springframework.beans.factory.annotation.Autowired;
    import org.springframework.security.authentication.AuthenticationManager;
    import org.springframework.security.config.annotation.SecurityConfigurerAdapter;
    import org.springframework.security.config.annotation.web.builders.HttpSecurity;
    import org.springframework.security.web.DefaultSecurityFilterChain;
    import org.springframework.security.web.authentication.AuthenticationFailureHandler;
    import org.springframework.security.web.authentication.AuthenticationSuccessHandler;
    import org.springframework.security.web.authentication.UsernamePasswordAuthenticationFilter;
    import org.springframework.social.connect.UsersConnectionRepository;
    import org.springframework.social.security.SocialUserDetailsService;
    import org.springframework.stereotype.Component;

    /**
     * ${desc}
     * @author zhuqiang
     * @version 1.0.1 2018/8/8 15:59
     * @date 2018/8/8 15:59
     * @since 1.0
     */
    @Component
    public class OpenIdAuthenticationSecurityConfig
            extends SecurityConfigurerAdapter<DefaultSecurityFilterChain, HttpSecurity> {
        @Autowired
        private SocialUserDetailsService userDetailsService;

        @Autowired
        private UsersConnectionRepository usersConnectionRepository;

        @Autowired
        private AuthenticationFailureHandler authenticationFailureHandler;
        @Autowired
        private AuthenticationSuccessHandler authenticationSuccessHandler;

        @Override
        public void configure(HttpSecurity builder) throws Exception {
            OpenIdAuthenticationProvider provider = new OpenIdAuthenticationProvider();
            provider.setUserDetailsService(userDetailsService);
            provider.setUsersConnectionRepository(usersConnectionRepository);

            OpenIdAuthenticationFilter filter = new OpenIdAuthenticationFilter();
            // 获取manager的是在源码中看到过
            filter.setAuthenticationManager(builder.getSharedObject(AuthenticationManager.class));
            filter.setAuthenticationFailureHandler(authenticationFailureHandler);
            filter.setAuthenticationSuccessHandler(authenticationSuccessHandler);

            // 需要一个服务提供商 和 一个过滤器
            builder.
                    authenticationProvider(provider)
                    .addFilterAfter(filter, UsernamePasswordAuthenticationFilter.class);
        }
    }
服务商
    package cn.mrcode.imooc.springsecurity.securityapp.social.openid;

    import org.apache.commons.collections.CollectionUtils;
    import org.springframework.security.authentication.AuthenticationProvider;
    import org.springframework.security.authentication.InternalAuthenticationServiceException;
    import org.springframework.security.core.Authentication;
    import org.springframework.security.core.AuthenticationException;
    import org.springframework.security.core.userdetails.UserDetails;
    import org.springframework.social.connect.UsersConnectionRepository;
    import org.springframework.social.security.SocialUserDetailsService;

    import java.util.HashSet;
    import java.util.Set;

    /**
     * ${desc}
     * @author zhuqiang
     * @version 1.0.1 2018/8/8 16:14
     * @date 2018/8/8 16:14
     * @since 1.0
     */
    public class OpenIdAuthenticationProvider implements AuthenticationProvider {
        // 要使用social的
        private SocialUserDetailsService userDetailsService;

        private UsersConnectionRepository usersConnectionRepository;

        @Override
        public Authentication authenticate(Authentication authentication) throws AuthenticationException {
            // 这里和之前短信验证码登录 唯一不同的是
            // 这里是使用社交登录的userDetailsService 和 usersConnectionRepository
            // 因为只有社交信息里面才会存在相关信息
            OpenIdAuthenticationToken authenticationToken = (OpenIdAuthenticationToken) authentication;
            Set<String> providerUserIds = new HashSet<>();
            providerUserIds.add((String) authenticationToken.getPrincipal());
            Set<String> userIds = usersConnectionRepository.findUserIdsConnectedTo(authenticationToken.getProviderId(), providerUserIds);

            if (CollectionUtils.isEmpty(userIds) || userIds.size() != 1) {
                throw new InternalAuthenticationServiceException("无法获取用户信息");
            }

            String userId = userIds.iterator().next();

            UserDetails user = userDetailsService.loadUserByUserId(userId);

            if (user == null) {
                throw new InternalAuthenticationServiceException("无法获取用户信息");
            }

            OpenIdAuthenticationToken authenticationResult = new OpenIdAuthenticationToken(user, user.getAuthorities());

            authenticationResult.setDetails(authenticationToken.getDetails());

            return authenticationResult;
        }

        @Override
        public boolean supports(Class<?> authentication) {
            return OpenIdAuthenticationToken.class.isAssignableFrom(authentication);
        }

        public SocialUserDetailsService getUserDetailsService() {
            return userDetailsService;
        }

        public void setUserDetailsService(SocialUserDetailsService userDetailsService) {
            this.userDetailsService = userDetailsService;
        }

        public UsersConnectionRepository getUsersConnectionRepository() {
            return usersConnectionRepository;
        }

        public void setUsersConnectionRepository(UsersConnectionRepository usersConnectionRepository) {
            this.usersConnectionRepository = usersConnectionRepository;
        }
    }
过滤器
    package cn.mrcode.imooc.springsecurity.securityapp.social.openid;

    import cn.mrcode.imooc.springsecurity.securitycore.properties.QQProperties;
    import cn.mrcode.imooc.springsecurity.securitycore.properties.SecurityConstants;
    import org.springframework.security.authentication.AuthenticationServiceException;
    import org.springframework.security.core.Authentication;
    import org.springframework.security.core.AuthenticationException;
    import org.springframework.security.web.authentication.AbstractAuthenticationProcessingFilter;
    import org.springframework.security.web.util.matcher.AntPathRequestMatcher;
    import org.springframework.util.Assert;

    import javax.servlet.http.HttpServletRequest;
    import javax.servlet.http.HttpServletResponse;

    /**
     * ${desc}
     * @author zhuqiang
     * @version 1.0.1 2018/8/8 16:03
     * @date 2018/8/8 16:03
     * @since 1.0
     */
    public class OpenIdAuthenticationFilter extends
            AbstractAuthenticationProcessingFilter {
        // ~ Static fields/initializers
        // =====================================================================================
        private String openIdParameter = SecurityConstants.DEFAULT_PARAMETER_NAME_OPEN_ID;
        // 服务提供商id,qq还是微信
        /** @see QQProperties#providerId */
        private String providerIdParameter = SecurityConstants.DEFAULT_PARAMETER_NAME_PROVIDERID;
        private boolean postOnly = true;

        // ~ Constructors
        // ===================================================================================================

        public OpenIdAuthenticationFilter() {
            super(new AntPathRequestMatcher(SecurityConstants.DEFAULT_LOGIN_PROCESSING_URL_OPEN_ID, "POST"));
        }

        // ~ Methods
        // ========================================================================================================

        @Override
        public Authentication attemptAuthentication(HttpServletRequest request,
                                                    HttpServletResponse response) throws AuthenticationException {
            if (postOnly && !request.getMethod().equals("POST")) {
                throw new AuthenticationServiceException(
                        "Authentication method not supported: " + request.getMethod());
            }

            String openId = obtainOpenId(request);
            String providerId = obtainProviderId(request);

            if (openId == null) {
                openId = "";
            }
            if (providerId == null) {
                providerId = "";
            }
            openId = openId.trim();

            OpenIdAuthenticationToken authRequest = new OpenIdAuthenticationToken(openId, providerId);

            // Allow subclasses to set the "details" property
            setDetails(request, authRequest);

            return this.getAuthenticationManager().authenticate(authRequest);
        }


        protected String obtainOpenId(HttpServletRequest request) {
            return request.getParameter(openIdParameter);
        }

        private String obtainProviderId(HttpServletRequest request) {
            return request.getParameter(providerIdParameter);
        }

        protected void setDetails(HttpServletRequest request,
                                  OpenIdAuthenticationToken authRequest) {
            authRequest.setDetails(authenticationDetailsSource.buildDetails(request));
        }

        public void setOpenIdParameter(String openIdParameter) {
            Assert.hasText(openIdParameter, "Username parameter must not be empty or null");
            this.openIdParameter = openIdParameter;
        }

        public void setPostOnly(boolean postOnly) {
            this.postOnly = postOnly;
        }

        public final String getOpenIdParameter() {
            return openIdParameter;
        }
    }
token 实体
    package cn.mrcode.imooc.springsecurity.securityapp.social.openid;

    import org.springframework.security.authentication.AbstractAuthenticationToken;
    import org.springframework.security.core.GrantedAuthority;
    import org.springframework.security.core.SpringSecurityCoreVersion;

    import java.util.Collection;

    /**
     * ${desc}
     * @author zhuqiang
     * @version 1.0.1 2018/8/8 16:11
     * @date 2018/8/8 16:11
     * @since 1.0
     */
    public class OpenIdAuthenticationToken extends AbstractAuthenticationToken {

        private static final long serialVersionUID = SpringSecurityCoreVersion.SERIAL_VERSION_UID;

        // ~ Instance fields
        // ================================================================================================

        private final Object principal;
        private String providerId;

        // ~ Constructors
        // ===================================================================================================
        public OpenIdAuthenticationToken(Object principal, String providerId) {
            super(null);
            this.principal = principal;
            this.providerId = providerId;
            super.setAuthenticated(true); // must use super, as we override
        }

        public OpenIdAuthenticationToken(Object principal,
                                         Collection<? extends GrantedAuthority> authorities) {
            super(authorities);
            this.principal = principal;
            super.setAuthenticated(true); // must use super, as we override
        }

        // ~ Methods
        // ========================================================================================================


        @Override
        public Object getPrincipal() {
            return this.principal;
        }

        @Override
        public Object getCredentials() {
            return null;
        }

        public String getProviderId() {
            return providerId;
        }

        @Override
        public void setAuthenticated(boolean isAuthenticated) throws IllegalArgumentException {
            if (isAuthenticated) {
                throw new IllegalArgumentException(
                        "Cannot set this token to trusted - use constructor which takes a GrantedAuthority list instead");
            }

            super.setAuthenticated(false);
        }

        @Override
        public void eraseCredentials() {
            super.eraseCredentials();
        }


    }
资源服务器增加安全配置
    cn.mrcode.imooc.springsecurity.securityapp.MyResourcesServerConfig#configure
    .and().apply(openIdAuthenticationSecurityConfig)

    记得放行openid过滤器的拦截地址
测试
在数据库中imooc_userconnection找一个之前在网页qq授权登录的openid
    POST /authentication/openid HTTP/1.1
    Host: localhost:80
    Authorization: Basic bXlpZDpteWlk
    Content-Type: application/x-www-form-urlencoded

    openId=81F03E50B76D6D829F5A4875941567A6&providerId=qq
授权码模式

这个模式。只需要app端把拿到的授权码转发给服务器即可获得授权码;
这里需要注意的是: 这里拿到code。最终返回来的不是qq的accessToken,而是我们自己服务器的accessToken;
上面简化模式是客户端能直接拿到qq的accessToken和openid,
这里授权码模式是客户端只能拿到 code。还需要服务器去走social获取用户信息的步骤,
这里获取到qq的accessToken和openid后。我们拿着客户端传递的我们自己的client信息和这里获取到的openid;
然后走oath2的 token生成逻辑。最后返回
测试思路:
- demo引用浏览器环境
- 使用浏览器登录后,得到code
- 使用工具发送post请求到token地址,带上code和client信息
    org.springframework.social.security.provider.OAuth2AuthenticationService#getAuthToken

    public SocialAuthenticationToken getAuthToken(HttpServletRequest request, HttpServletResponse response) throws SocialAuthenticationRedirectException {
      String code = request.getParameter("code");
      if (!StringUtils.hasText(code)) {
        OAuth2Parameters params =  new OAuth2Parameters();
        params.setRedirectUri(buildReturnToUrl(request));
        setScope(request, params);
        params.add("state", generateState(connectionFactory, request));
        addCustomParameters(params);
        throw new SocialAuthenticationRedirectException(getConnectionFactory().getOAuthOperations().buildAuthenticateUrl(params));
      } else if (StringUtils.hasText(code)) {
        try {
          String returnToUrl = buildReturnToUrl(request);
          // 在这里打断点,使用浏览器模块访问qq登录后,会重定向到这里
          // 然后把服务器关闭掉
          // 浏览器中的地址就是带有code的
          AccessGrant accessGrant = getConnectionFactory().getOAuthOperations().exchangeForAccess(code, returnToUrl, null);
          // TODO avoid API call if possible (auth using token would be fine)
          Connection<S> connection = getConnectionFactory().createConnection(accessGrant);
          return new SocialAuthenticationToken(connection, null);
        } catch (RestClientException e) {
          logger.debug("failed to exchange for access", e);
          return null;
        }
      } else {
        return null;
      }
    }
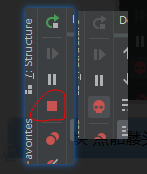
注意:在关闭服务时,需要点击 idea 左下角的 方块停止,需要快速点击,方块点完就会出现骷髅头,要连续快速点击,否则可能会导致断点继续往下走一会儿

我们拿到浏览器中带code的地址,把服务切回app模块,然后在工具中带上client信息访问;
    GET /auth/qq?code=ACEB8728F5DE5B32F9C995BEFEB3C065&state=3cb4d5c7-60c6-4e88-b2a3-f34c5a8b176c HTTP/1.1
    Host: mrcode.cn
    Authorization: Basic bXlpZDpteWlk
我这里成功获取到了token(控制台打印的),但是postman中返回的错误信息
    {
        "error": "unauthorized",
        "error_description": "Full authentication is required to access this resource"
    }
我跟了源码,发现成功后跳转到了"/";但是为什么不是重定向而是异常? 这个有待跟踪源码了解下
自定义获取第三方用户信息成功后的逻辑处理
之前讲到可以获得过滤器更改自定义注册地址;这里过滤器里面也可以设置一个授权成功的自定义处理器
    cn.mrcode.imooc.springsecurity.securitycore.social.MySpringSocialConfigurer

    public class MySpringSocialConfigurer extends SpringSocialConfigurer {
        @Override
        protected <T> T postProcess(T object) {
            // org.springframework.security.config.annotation.SecurityConfigurerAdapter.postProcess()
            // 在SocialAuthenticationFilter中配置死的过滤器拦截地址
            // 这样的方法可以更改拦截的前缀
            SocialAuthenticationFilter filter = (SocialAuthenticationFilter) super.postProcess(object);
            // filter.setFilterProcessesUrl("/oaths");
           filter.setAuthenticationSuccessHandler();  // 可以把处理器添加到这里
            return (T) filter;
        }
    }
现在来改造下
定义处理器接口,让使用处来实现,我们使用注解来获取初始化的bean
    package cn.mrcode.imooc.springsecurity.securitycore.social;

    import org.springframework.social.security.SocialAuthenticationFilter;

    /**
     * @author zhailiang
     *
     */
    public interface SocialAuthenticationFilterPostProcessor {

    	void process(SocialAuthenticationFilter socialAuthenticationFilter);

    }
编写配置文件,获取过滤器设置处理器
    package cn.mrcode.imooc.springsecurity.securitycore.social;

    import org.springframework.social.security.SocialAuthenticationFilter;
    import org.springframework.social.security.SpringSocialConfigurer;

    /**
     * @author : zhuqiang
     * @version : V1.0
     * @date : 2018/8/6 12:12
     */
    public class MySpringSocialConfigurer extends SpringSocialConfigurer {
        private SocialAuthenticationFilterPostProcessor socialAuthenticationFilterPostProcessor;

        @Override
        protected <T> T postProcess(T object) {
            // org.springframework.security.config.annotation.SecurityConfigurerAdapter.postProcess()
            // 在SocialAuthenticationFilter中配置死的过滤器拦截地址
            // 这样的方法可以更改拦截的前缀
            SocialAuthenticationFilter filter = (SocialAuthenticationFilter) super.postProcess(object);
    //        filter.setFilterProcessesUrl("/oaths");
    //        filter.setAuthenticationSuccessHandler();
            // 让使用处自己获取token成功的逻辑
            if (socialAuthenticationFilterPostProcessor != null) {
                // 在配置初始化的时候,把过滤器传递给使用方,让使用方把处理器注入
                socialAuthenticationFilterPostProcessor.process(filter);
            }
            return (T) filter;
        }

        public SocialAuthenticationFilterPostProcessor getSocialAuthenticationFilterPostProcessor() {
            return socialAuthenticationFilterPostProcessor;
        }

        public void setSocialAuthenticationFilterPostProcessor(SocialAuthenticationFilterPostProcessor socialAuthenticationFilterPostProcessor) {
            this.socialAuthenticationFilterPostProcessor = socialAuthenticationFilterPostProcessor;
        }
    }
配置文件引用
    cn.mrcode.imooc.springsecurity.securitycore.social.SpringSocialConfig

    @Autowired(required = false)
    private SocialAuthenticationFilterPostProcessor socialAuthenticationFilterPostProcessor;

    @Bean
    public SpringSocialConfigurer imoocSocialSecurityConfig() {
        // 默认配置类,进行组件的组装
        // 包括了过滤器SocialAuthenticationFilter 添加到security过滤链中
        MySpringSocialConfigurer springSocialConfigurer = new MySpringSocialConfigurer();
        springSocialConfigurer.signupUrl(securityProperties.getBrowser().getSignUpUrl());
        // 通过注解获取到使用方注入的bean,给我们刚才写的配置类
        springSocialConfigurer.setSocialAuthenticationFilterPostProcessor(socialAuthenticationFilterPostProcessor);
        return springSocialConfigurer;
    }
app实现该配置,配置处理成功的处理器
    /**
     *
     */
    package cn.mrcode.imooc.springsecurity.securityapp.social.impl;

    import cn.mrcode.imooc.springsecurity.securitycore.social.SocialAuthenticationFilterPostProcessor;
    import org.springframework.beans.factory.annotation.Autowired;
    import org.springframework.security.web.authentication.AuthenticationSuccessHandler;
    import org.springframework.social.security.SocialAuthenticationFilter;
    import org.springframework.stereotype.Component;

    /**
     * @author zhailiang
     */
    @Component
    public class AppSocialAuthenticationFilterPostProcessor implements SocialAuthenticationFilterPostProcessor {

        @Autowired
        private AuthenticationSuccessHandler imoocAuthenticationSuccessHandler;

        /**
         * @see cn.mrcode.imooc.springsecurity.securitycore.social.SocialAuthenticationFilterPostProcessor.process
         */
        @Override
        public void process(SocialAuthenticationFilter socialAuthenticationFilter) {
            // 这里设置的其实就是之前  重构用户名密码登录里面实现的 MyAuthenticationSuccessHandler
            socialAuthenticationFilter.setAuthenticationSuccessHandler(imoocAuthenticationSuccessHandler);
        }

    }
最后再次测试,得到了我们自己系统的 accessToken
Java 面试宝典是大明哥全力打造的 Java 精品面试题,它是一份靠谱、强大、详细、经典的 Java 后端面试宝典。它不仅仅只是一道道面试题,而是一套完整的 Java 知识体系,一套你 Java 知识点的扫盲贴。
它的内容包括:
- 大厂真题:Java 面试宝典里面的题目都是最近几年的高频的大厂面试真题。
- 原创内容:Java 面试宝典内容全部都是大明哥原创,内容全面且通俗易懂,回答部分可以直接作为面试回答内容。
- 持续更新:一次购买,永久有效。大明哥会持续更新 3+ 年,累计更新 1000+,宝典会不断迭代更新,保证最新、最全面。
- 覆盖全面:本宝典累计更新 1000+,从 Java 入门到 Java 架构的高频面试题,实现 360° 全覆盖。
- 不止面试:内容包含面试题解析、内容详解、知识扩展,它不仅仅只是一份面试题,更是一套完整的 Java 知识体系。
- 宝典详情:https://www.yuque.com/chenssy/sike-java/xvlo920axlp7sf4k
- 宝典总览:https://www.yuque.com/chenssy/sike-java/yogsehzntzgp4ly1
- 宝典进展:https://www.yuque.com/chenssy/sike-java/en9ned7loo47z5aw
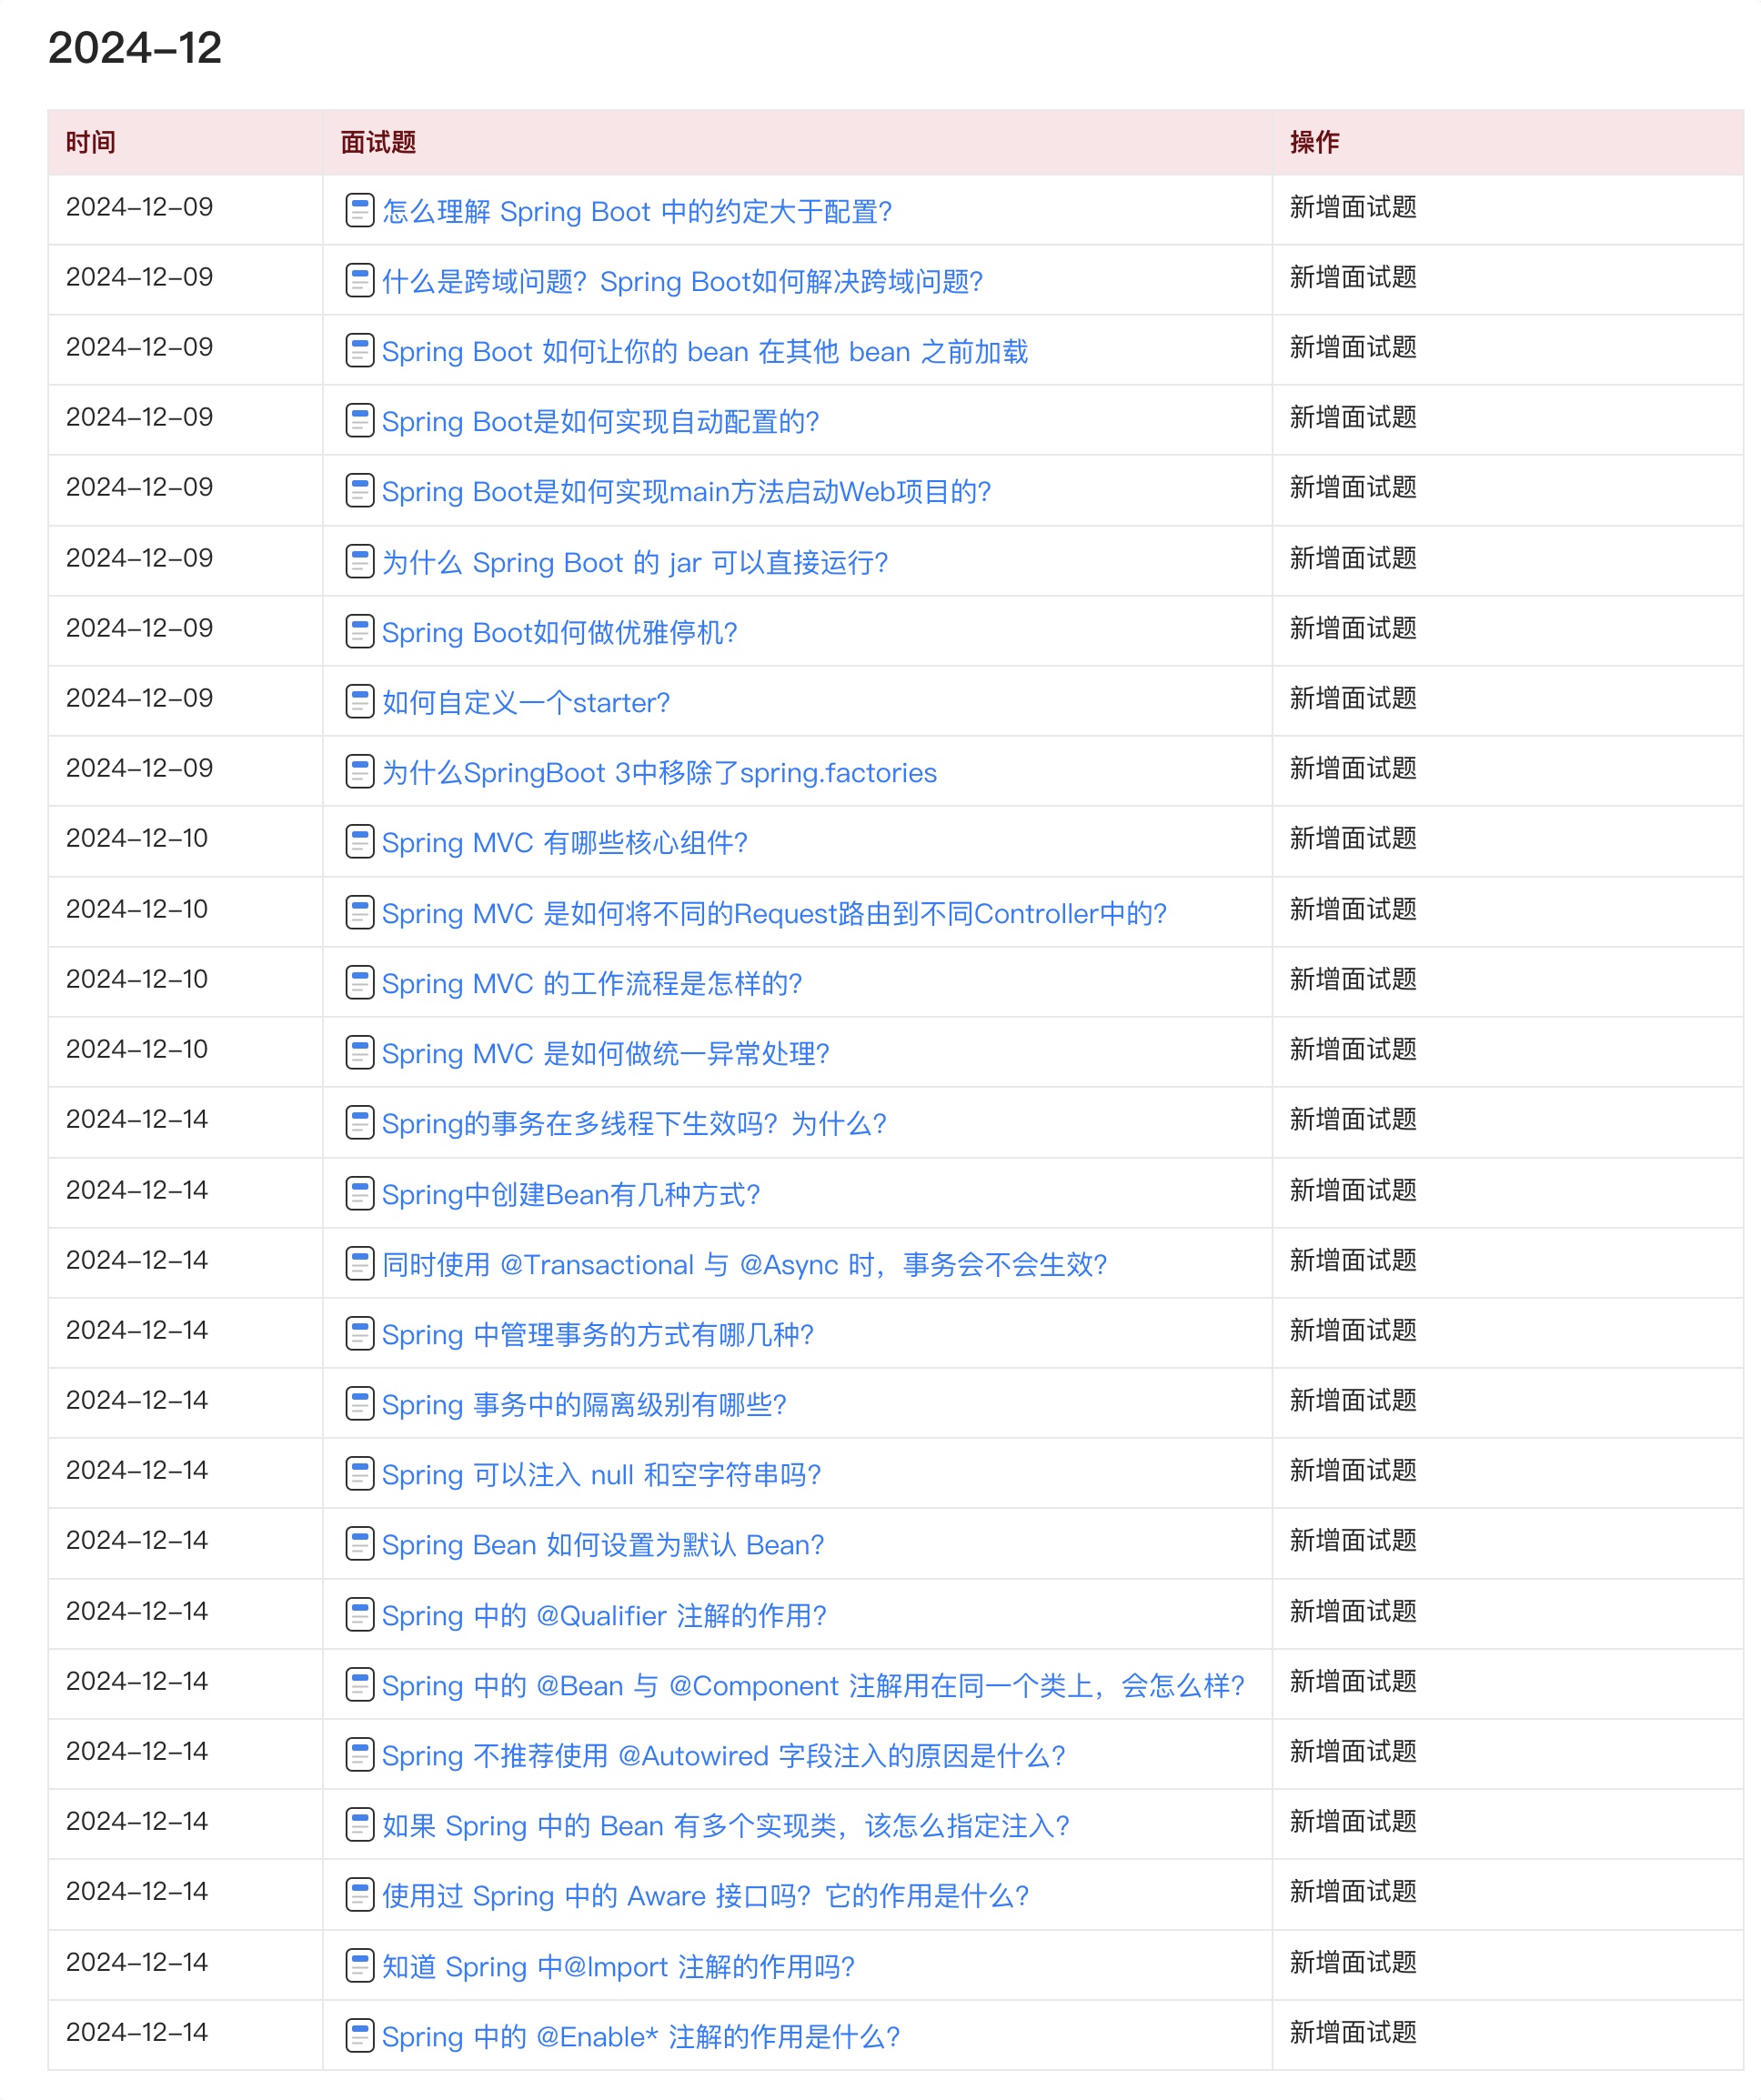
目前 Java 面试宝典累计更新 400+ 道,总字数 42w+。大明哥还在持续更新中,下图是大明哥在 2024-12 月份的更新情况:

想了解详情的小伙伴,扫描下面二维码加大明哥微信【daming091】咨询

同时,大明哥也整理一套目前市面最常见的热点面试题。微信搜[大明哥聊 Java]或扫描下方二维码关注大明哥的原创公众号[大明哥聊 Java] ,回复【面试题】 即可免费领取。

