SpringIOC 和SpringAop的入门和实战
SpringIOC的解释
IOC(控制反转)就是依赖倒置原则的一种代码设计思路,就是把原先在代码里面需要实现的对象创建、对象之间的依赖、反转给容器来帮忙实现 SpringIOC 容器通过XML,注解等其他方式配置其他方式类以及类之间的依赖关系,完成了对象的创建和依赖的管理注入。实现IOC的主要设计模式是工厂模式。 这句话的意思是:
- IOC控制反转的含义,它是把Java面向对象的创建的过程,交给容器来进行管理一种机制。
- 它的实现方式,是通过XM,获取注解,配置类的方式实现类和类之间的依赖关系。
- 来完成的对象的创建和依赖管理的注入。
SpringIOC的设计初衷是什么?
- 集中管理,实现类的可配置和易管理
- 减低类与类之间的耦合度,实现Java高内聚低耦合的设计思想
- 同时可提升Java应用程序的性能,减轻JVM的内存压力
SpringIOC的核心概念
其实本质是通过:Java语言衍生出来的框架和项目产品,只不过开源出来。 使用spring最大的感受就是:很少使用new对象或者很少实例化对象 核心:创建对象,注入对象,控制对象等,一句话:springioc管理对象的整个生命周期。
总结: 面试题:谈谈你对SpringIOC的理解和认识是什么?
答:首先Spring框架是通过JAVA语言开发出来的一个框架或者一个项目产品。我们Java的最大的特点是:面向对象,在没有使用Spring框架的时候,我们要调用类中的方法或者给属性赋值,都是通过new去实例化对象,使用Spring框架以后,它内部提供IOC机制,也就是控制反转的含义,它的核心基础是:把对象创建的过程交由容器(Map)来进行管理一种机制,我们会把通过容器来管理对象的方式,将传统的创建更换成交由容器管理对象的过程称之为IOC控制反转的过程。总之如果要实现对象交由Spring的IOC来管理话,就必须遵循Spring提供的规范,而这些规范在传统spring开发中,是通过xml的方式来进行注入和管理的bean到容器中,现在主流的方式都是采用注解的方式进行的管理和控制bean到容器中,现在主流的方式都是采用注解的方式 来进行管理和控制bean到容器中等,这样做的好处是:
- 集中管理,实现类的可配置和易管理。
- 降低了类与类之间的耦合度。实现Java高内聚低耦合的设计思想。
- 同时可以提升Java应用程序的性能,减轻JVM的内存压力。
DI:
它其实就是把容器中存在的类,如果这个类和另外一个类存在依赖关系的话,DI机制会把这个类中存在的类进行实例化 的过程称之为:依赖注入,但是前提是:必须要遵循依赖注入的规则:
1: set注入
2: 构建函数注入
3: 注解注入 @Resource/@Autowired
4: 工厂方法注入
SpringIOC容器的bean是单例的吗?
这个所谓的单列不是指:用所谓的单列模式开发和你们所认识的单列不一样。
在你们眼中的单列模式:恶汉模式,懒汉模式,双重检查机制等等。
它们的共同点是:在内存空间中只有一份内存,思想是一样的。
那么SpringIOC的bean的单例指是什么? 答案:就是一个容器Map,因为这个Map是一个全局的变量。
    public class Factory{
    	private final Map<String,BeanDefintion> beanDefinitionMap;

    	beanDefinitionMap.put("userServiceImpl",new);
    }
所谓的依赖注入
所谓的依赖注入:其实就是告诉你,在实际的开发和生产中,类和类之间很多时候会存在所谓依赖关系。
为了这种一个对象依赖另外一个对象的时候,把存在依赖的对象实例化的过程中称之为:依赖注入。 DI:它其实就是把容器创建存放好的对象,通过DI机制去完成类执行对象的实例化的问题,说白了就是: 具体IOC动作。
IOC实战
导入Pom文件
    <dependencies>
        <dependency>
            <groupId>org.springframework</groupId>
            <artifactId>spring-context</artifactId>
            <version>5.3.15</version>
        </dependency>
        <dependency>
            <groupId>org.projectlombok</groupId>
            <artifactId>lombok</artifactId>
            <version>1.18.22</version>
        </dependency>
        <dependency>
            <groupId>org.springframework</groupId>
            <artifactId>spring-aspects</artifactId>
            <version>5.2.4.RELEASE</version>
        </dependency>
    </dependencies>
基于XML和基于注解
基于XML:开发者把需要的对象在xml中配置,spring框架读取这个配置文件,根据配置文件的内容来创建对象
创建实体类
    @Data
    public class DataConfig {
        private String url;
        private String username;
        private String driverName;
        private String password;
    }
在resources目录下新建一个 spring.xml 配置类
    <?xml version="1.0" encoding="UTF-8"?>
    <beans xmlns="http://www.springframework.org/schema/beans"
           xmlns:xsi="http://www.w3.org/2001/XMLSchema-instance"
           xmlns:context="http://www.springframework.org/schema/context"
           xmlns:c="http://www.springframework.org/schema/c"
           xmlns:p="http://www.springframework.org/schema/p"
           xmlns:aop="http://www.springframework.org/schema/aop"
           xsi:schemaLocation="http://www.springframework.org/schema/beans
           http://www.springframework.org/schema/beans/spring-beans.xsd
           http://www.springframework.org/schema/aop
           http://www.springframework.org/schema/aop/spring-aop.xsd
           http://www.springframework.org/schema/context
           http://www.springframework.org/schema/context/spring-context.xsd">
        <!-- 将bean注入到IOC容器中 -->
        <bean class="com.southwind.ioc.DataConfig" id="config">
            <!-- 为bean的某个属性赋值 -->
            <property name="username" value="root"></property>
        </bean>
    </beans>
测试
    public static void main(String[] args) {
            ApplicationContext context = new ClassPathXmlApplicationContext("spring.xml");
            System.out.println(context.getBean("config"));
        }
结果:

基于注解
1、配置类
用一个Java类来替代xml文件,把在xml中配置的内容放到配置类中。
    @Configuration
    public class BeanConfiguration {
        @Bean(value = "config")
        public DataConfig dataConfig(){
            DataConfig dataConfig = new DataConfig();
            dataConfig.setDriverName("Driver");
            dataConfig.setPassword("root");
            dataConfig.setUrl("localhost:3306/dbname");
            dataConfig.setUsername("root");
            return dataConfig;
        }
    }
2、扫包+注解
    @Component
    public class DataConfig {
        private String url;
        private String username;
        private String driverName;
        private String password;
    }
       ApplicationContext context =new AnnotationConfigApplicationContext("com.southwind.ioc");
       System.out.println(context.getBean(DataConfig.class));
更简单的方式,不再需要依赖于xml或者配置类,而是将bean的创建交给目标类,在目标类中添加注解实现 ·@Autiwired 通过类型进行注入,如果需要通过名称取值 通过@Qualifier注解完成名称的映射
AOP
面向切面编程,是一种抽象化的面向对象编程,对面向对象编程的补充, 打印日志业务代码和打印日志耦合起来
计算器方法中,日志和业务混合在一起,aop要做的就是将日志代码全部抽象出去统一进行处理,计算器方法中只保留核心的业务代码。 做到核心业务和非业务代码的解耦合。
1. 创建切面类
2. 实现类添加@Component注解
3. 配置自动扫包,开启带自动生成代理对象
切面类:
    @Component
    @Aspect
    public class LoggerAspect {

        @Before(value = "execution(public int com.southwind.aop.CalImpl.*(..))")
        public void before(JoinPoint joinPoint) {
            String name = joinPoint.getSignature().getName();
            System.out.println(name + "方法的参数是:" + Arrays.toString(joinPoint.getArgs()));
        }

        @AfterReturning(value = "execution(public int com.southwind.aop.CalImpl.*(..))", returning = "result")
        public void afterReturning(JoinPoint joinPoint, Object result) {
            String name = joinPoint.getSignature().getName();
            System.out.println(name + "方法的结果是" + result);

        }
    }
目标类:
    public interface Cal {
        public int add(int num1,int num2);
        public int sub(int num1,int num2);
        public int mul(int num1,int num2);
        public int div(int num1,int num2);
    }
    @Component
    public class CalImpl implements Cal {


        public int add(int num1, int num2) {
            return num1 + num2;
        }

        public int sub(int num1, int num2) {
            return num1 - num2;
        }

        public int mul(int num1, int num2) {
            return num1 * num2;
        }

        public int div(int num1, int num2) {
            return num1 / num2;
        }
    }
在rosurces资源目录下开启动态代理
    <?xml version="1.0" encoding="UTF-8"?>
    <beans xmlns="http://www.springframework.org/schema/beans"
           xmlns:xsi="http://www.w3.org/2001/XMLSchema-instance"
           xmlns:context="http://www.springframework.org/schema/context"
           xmlns:c="http://www.springframework.org/schema/c"
           xmlns:p="http://www.springframework.org/schema/p"
           xmlns:aop="http://www.springframework.org/schema/aop"
           xsi:schemaLocation="http://www.springframework.org/schema/beans
           http://www.springframework.org/schema/beans/spring-beans.xsd
           http://www.springframework.org/schema/aop
           http://www.springframework.org/schema/aop/spring-aop.xsd
           http://www.springframework.org/schema/context
           http://www.springframework.org/schema/context/spring-context.xsd">
        <!-- 自动扫包 -->
        <context:component-scan base-package="com.southwind.aop"></context:component-scan>
        <!-- 开启自动代理生成代理 -->
        <aop:aspectj-autoproxy></aop:aspectj-autoproxy>
    </beans>
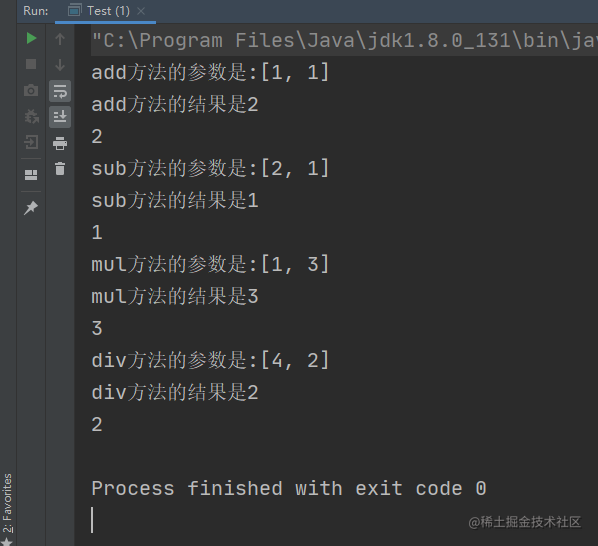
测试:
    public class Test {
        public static void main(String[] args) {
            ApplicationContext context = new ClassPathXmlApplicationContext("spring.xml");
            Cal bean = context.getBean(Cal.class);
            System.out.println(bean.add(1, 1));
            System.out.println(bean.sub(2, 1));
            System.out.println(bean.mul(1, 3));
            System.out.println(bean.div(4, 2));
        }
    }
结果:

