一、概述
JavaConfig 原来是 Spring 的一个子项目,它通过 Java 类的方式提供 Bean 的定义信息,在 Spring4 的版本, JavaConfig 已正式成为 Spring4 的核心功能 。
二、准备
首先将之前文章准备好的基于Maven搭建的Spring项目已完成。
三、基于Java的容器配置
3-1、@Bean和@Configuration的基本概念
在之前,我们将Bean注入到IOC容器中,主要使用spring.xml文件,一种是直接将bean注入直接写在xml文件中,另外一种是在xml中配置context:component-scan进行包的扫描,然后在需要注入的bean上面加上@Controller @Service @Repsoitory @Component这四个注解来注入IOC容器中,需要注意的是IOC对于这四个注解在注入的时候是不进行区分的,只是我们在写代码的时候根据习惯以及方便代码管理进行分成注解。
javaconfig可以抛弃之前基于xml进行配置注入IOC的方式。
3-2、@Configuration 标记配置类
通过给Bean设置@Configuration就可以标记为一个配置类,相当于之前spring的xml,通过这个配置就可以将之前的sping.xml文件删掉了。
3-3、@ComponentScan 配置扫描包路径
通过给Bean添加@ComponentScan(basePackages="com.jony"),basePackages="com.jony"就是指定扫描包的路径,相当于我们之前使用的context:component-scan
3-4、@PropertySource 加载外部资源文件
通过@PropertySrouce可以加载我们在resource中的资源文件,相当于我们之前使用的context:property-placeholder
    package com.jony;

    import org.springframework.context.annotation.ComponentScan;
    import org.springframework.context.annotation.Configuration;
    import org.springframework.context.annotation.PropertySource;

    //@Configuration用户标记一个配置类,之前根据xml启动spring上下文
    //相当于 xml文件 <bean></bean>
    @Configuration
    @ComponentScan(basePackages = "com.jony")//可以配置包的扫描路径,相当于之前xml里面的<context:component-scan>
    @PropertySource("user.properties") //可以配置加载外部资源文件,相当于之前的<context:property-placeholder
    public class IocJavaConfig {
    }
3-4、加载spring容器
之前我们在使用IOC容器的时候,通过使用如下来进行加载spring的配置
ClassPathXmlApplicationContext ioc=new ClassPathXmlApplicationContext("spring_ioc.xml");
再回之前提到加载spring容器一共有以下几种方式
    // 加载spring容器
    //ApplicationContext spring的顶层核心接口
    ClassPathXmlApplicationContext 根据项目路径的xml配置来实例化spring容器 //
    FileSystemXmlApplicationContext 根据磁盘路径的xml配置来实例化spring容器 //
    AnnotationConfigApplicationContext 根据javaconfig 来配置实例化spring容器 //
    在容器实例化的时候 就会加载所有的bean
    ApplicationContext ioc=new ClassPathXmlApplicationContext("spring-ioc.xml");
3-4-1、使用AnnotationConfigApplicationContext加载spring容器
通过使用AnnotationConfigApplicationContext加载之前我们创建的IocJavaConfig来进行容器的加载
    import com.jony.IocJavaConfig;
    import com.jony.controller.UserController;
    import org.junit.Test;
    import org.springframework.context.annotation.AnnotationConfigApplicationContext;

    public class TestIocJavaConfig {

        @Test
        public void test01(){
            AnnotationConfigApplicationContext ioc=new AnnotationConfigApplicationContext(IocJavaConfig.class);
            UserController userController=ioc.getBean("userController",UserController.class);
            userController.getBean();
        }

    }
3-4-2、测试结果
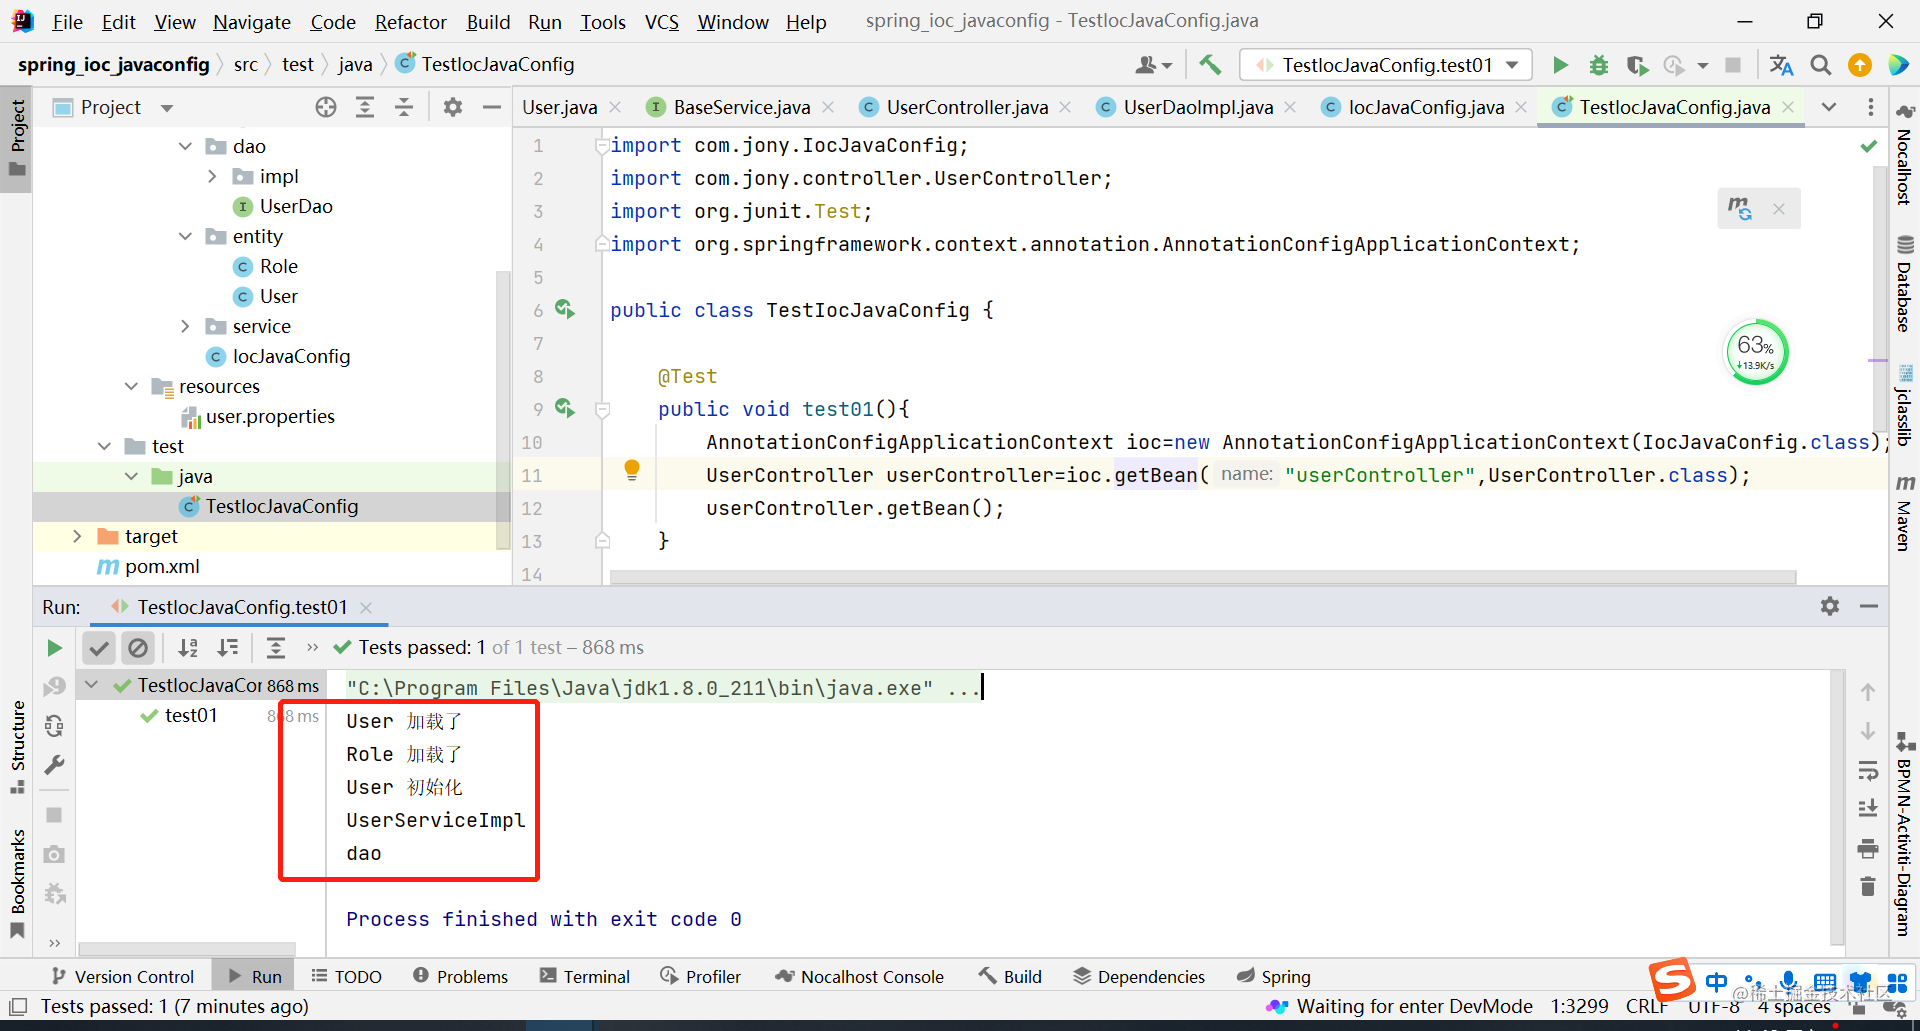
通过下图,我们可以发现,在没有spring.xml的情况下,使用JavaConfig的方式使用
@Configuration,设置一个配置类
@CompentScan配置包的扫描路径
@PropertySource设置加载外部资源文件
AnnotationConfigApplicationContext来进行容器的初始化加载
四、基于@Bean设置第三方Bean
@Bean是一个方法级别的注解,它与XML中的 元素类似。注解支持 提供的一些属性,例如 * init-method * destroy-method * autowiring * name开发者可以在@Configuration类或@Component类中使用@Bean注解。
在此处我们可以看到@Bean可以在@Configuration或者@Component中使用,实际上@Configuration也是基于@Component实现的。
4-1、使用@Bean注入外部类(数据库连接池)
    package com.jony;

    import com.alibaba.druid.pool.DruidDataSource;
    import org.springframework.context.annotation.Bean;
    import org.springframework.context.annotation.ComponentScan;
    import org.springframework.context.annotation.Configuration;
    import org.springframework.context.annotation.PropertySource;

    //@Configuration用户标记一个配置类,之前根据xml启动spring上下文
    //相当于 xml文件 <bean></bean>
    @Configuration
    @ComponentScan(basePackages = "com.jony")//可以配置包的扫描路径,相当于之前xml里面的<context:component-scan>
    @PropertySource("user.properties") //可以配置加载外部资源文件,相当于之前的<context:property-placeholder
    public class IocJavaConfig {

        @Bean
        public DruidDataSource dataSource(){
            DruidDataSource dataSource=new DruidDataSource();
            dataSource.setName("root");
            dataSource.setPassword("root");
            dataSource.setUrl("dbc:mysql://localhost:3306/jony");
            dataSource.setDriverClassName("com.mysql.jdbc.Driver");
            return dataSource;
        }
    }
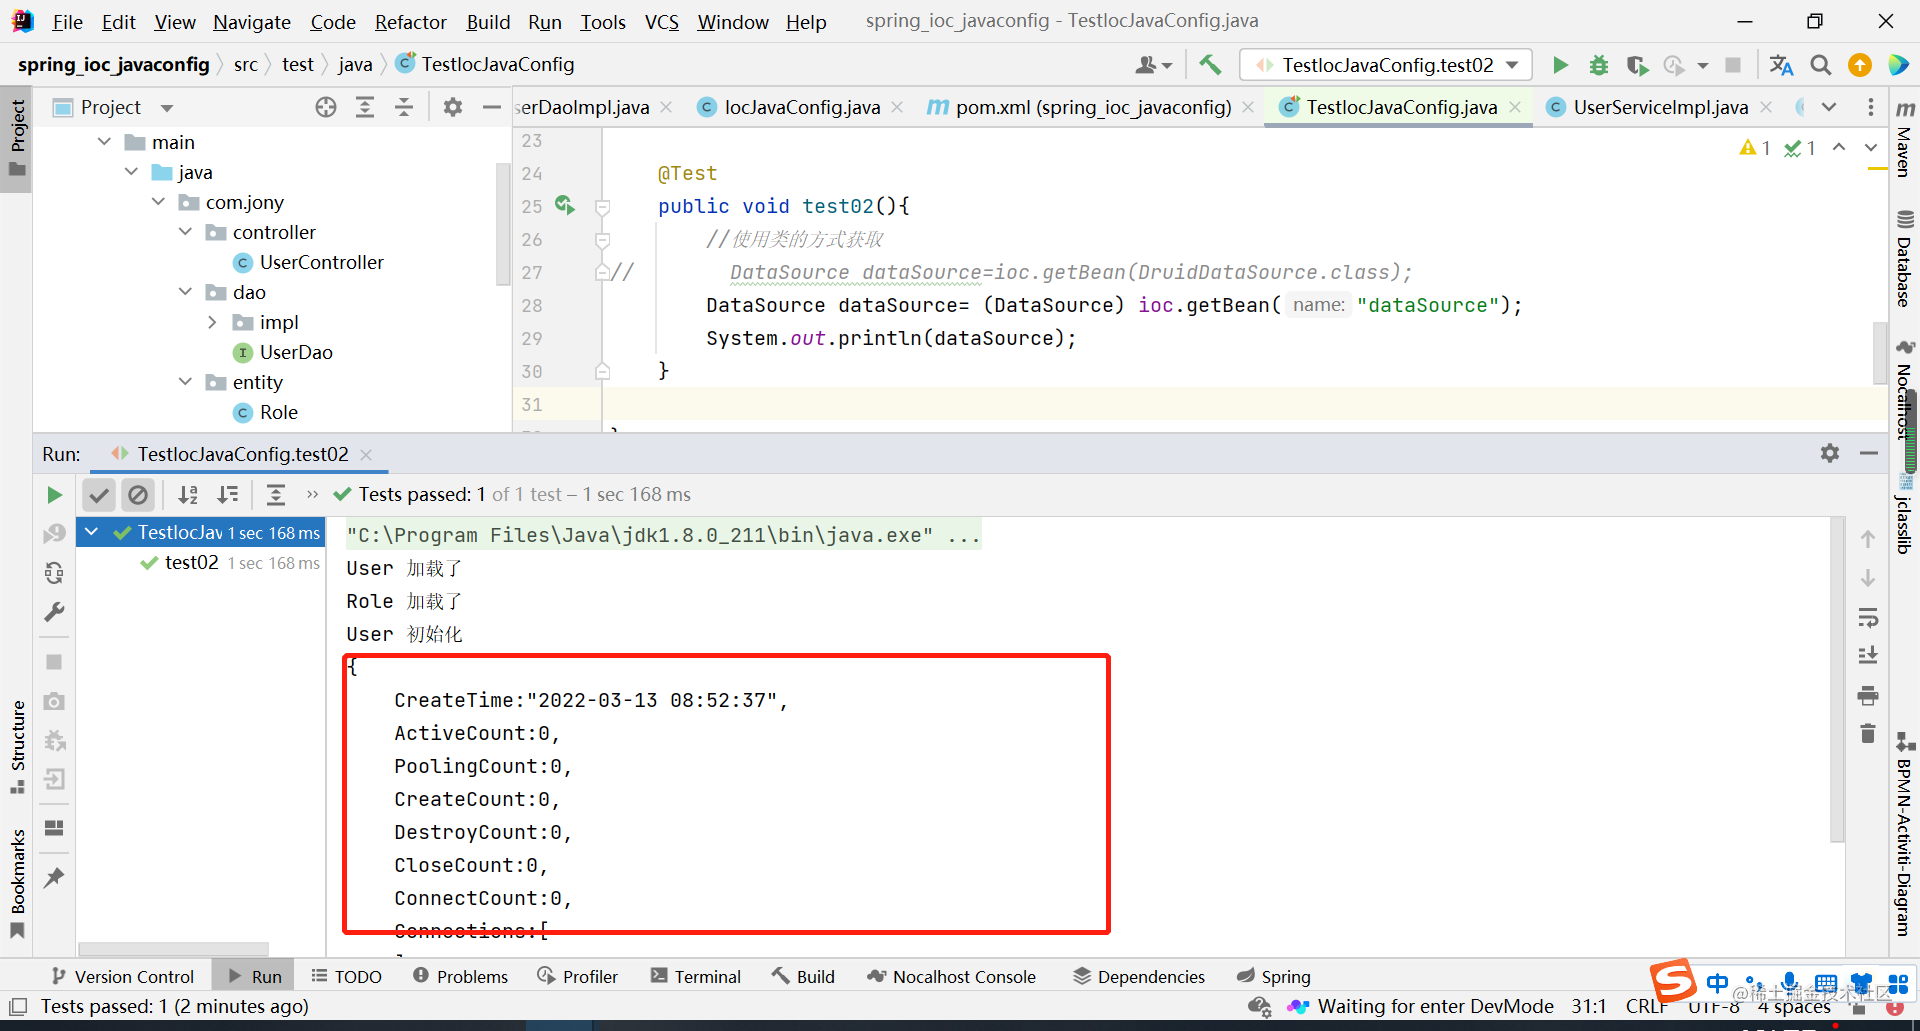
4-1-1、测试一下是否可以连接
从IOC容器获取dataSource,使用了两种方式,一个是类.class ,一个是通过方法名。
4-2、@Bean设置初始化及销毁
@Bean(initMethod = "",destroyMethod = "")
4-3、使用@Bean(name="")设置bean的Id
@Bean("db")
或者使用数组
@Bean(name={"db1","db2"})
4-4、使用Scope设置Bean的作用域
@Scope("prototype")
五、使用@Import
上面的示例中,我们创建了一个IocJavaConfig配置类,但是随着业务的发展,要是把所有的配置都放在一个配置类中,那无疑增加了代码的阅读性,因此后面我们会创建多个配置类,这样就可以使用Import引入,方便加载了。
5-1、使用@import导入其他配置类
5-1-1、创建第二个配置类
    package com.jony;

    import com.jony.entity.User;
    import org.springframework.context.annotation.Bean;
    import org.springframework.context.annotation.Configuration;

    @Configuration
    public class IocJavaConfig2 {

        @Bean
        public User user2(){
            return new User();
        }
    }
5-1-2、在主配置文件引入
@Import(IocJavaConfig2.class)
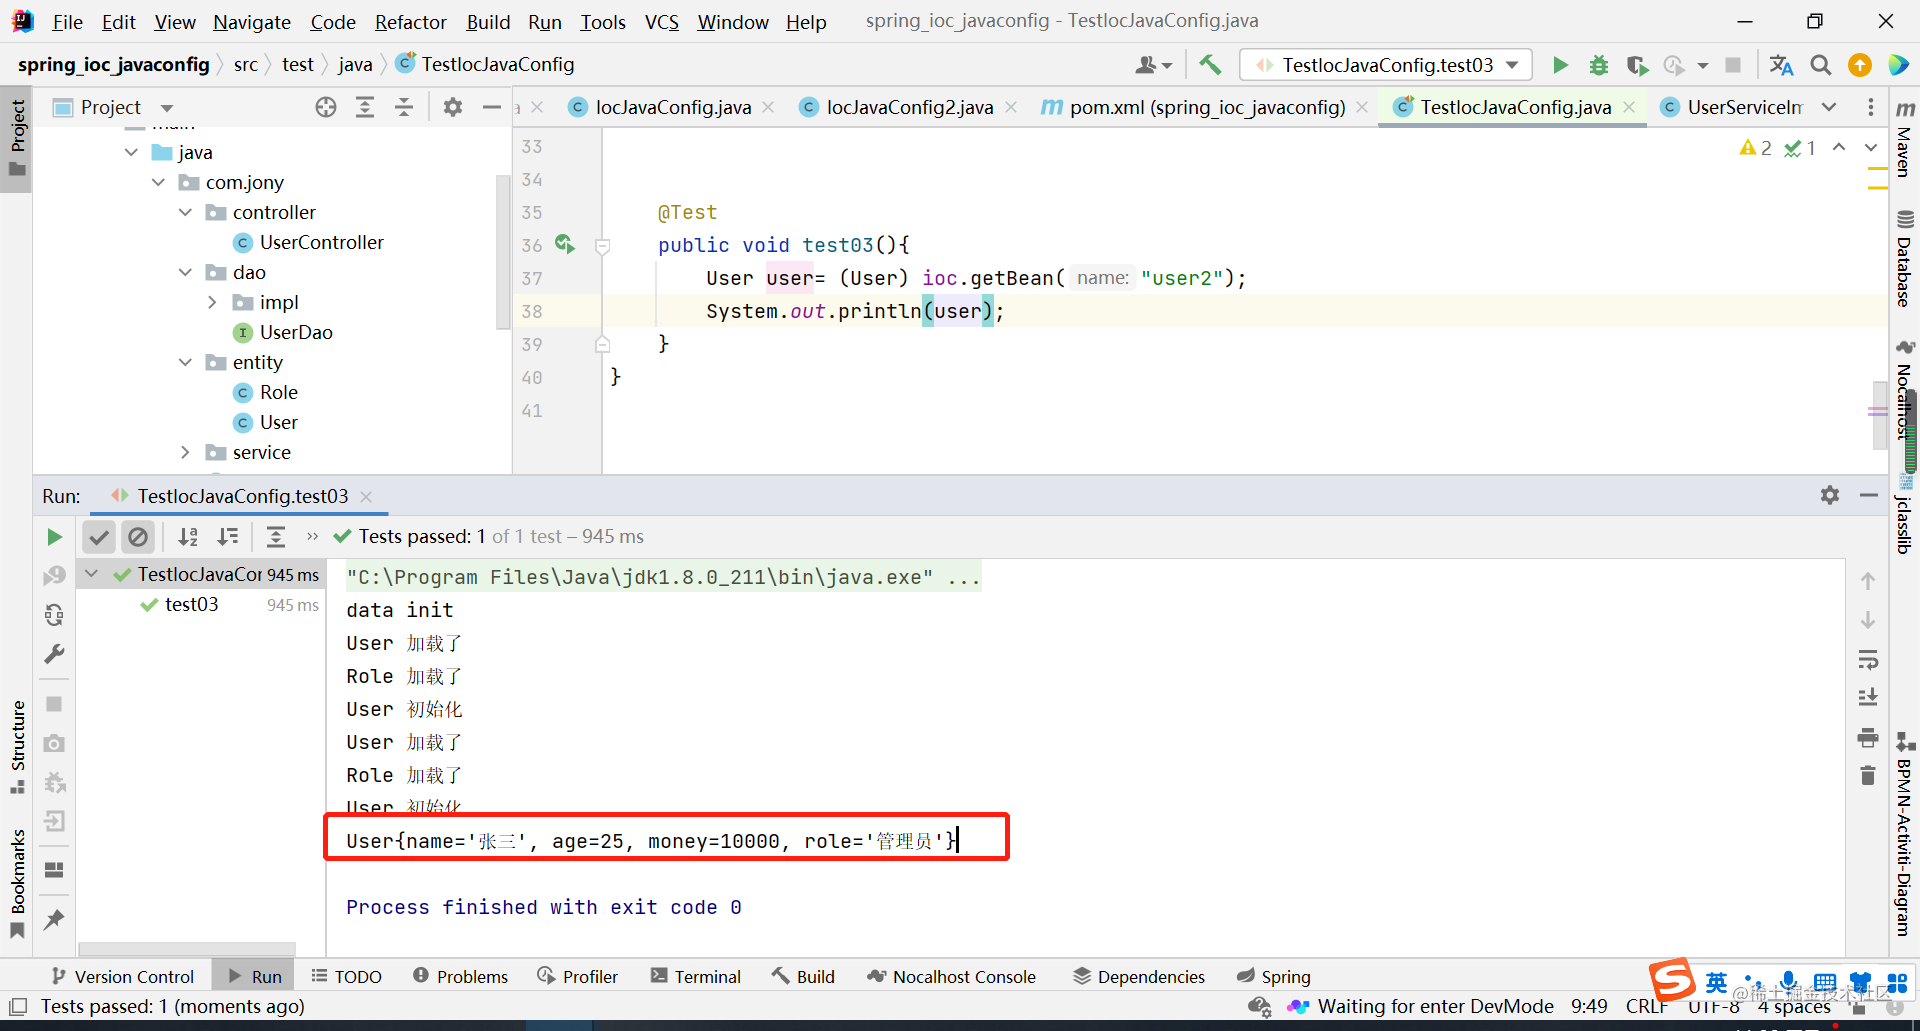
5-1-3、测试
5-2、使用@Import 导入其他Bean
@Import(User.class)
5-3、使用@Import 一次性导入多个bean
5-3-1、首先创建两个类
Cat.java
    package com.jony.entity;

    import org.springframework.beans.factory.annotation.Value;

    public class Cat {
        @Value("cat")
        private String name;

        public String getName() {
            return name;
        }

        public void setName(String name) {
            this.name = name;
        }
    }
Dog.java
    package com.jony.entity;

    import org.springframework.beans.factory.annotation.Value;

    public class Dog {
        @Value("dog")
        private String name;

        public String getName() {
            return name;
        }

        public void setName(String name) {
            this.name = name;
        }
    }
5-3-2、创建一个类并实现ImportSelector接口
实现ImportSelector,重写selectImports方法
    package com.jony.entity;

    import org.springframework.context.annotation.ImportSelector;
    import org.springframework.core.type.AnnotationMetadata;

    public class MyImportSelector implements ImportSelector {
        @Override
        //数组中必须使用类的完整限定名,在获取的时候也根据类型获取,无法根据名称获取
        //下面举例了两种方式
        public String[] selectImports(AnnotationMetadata annotationMetadata) {
            return new String[]{"com.jony.entity.Cat",Dog.class.getName()};
        }
    }
可以看到返回的是一个String数组,数组中传入类的完整限定名。
5-3-3、在加载器中导入
    package com.jony;

    import com.jony.entity.MyImportSelector;
    import com.jony.entity.User;
    import org.springframework.context.annotation.Bean;
    import org.springframework.context.annotation.Configuration;
    import org.springframework.context.annotation.Import;

    @Configuration
    @Import(MyImportSelector.class)
    public class IocJavaConfig2 {

        @Bean
        public User user2(){
            return new User();
        }
    }
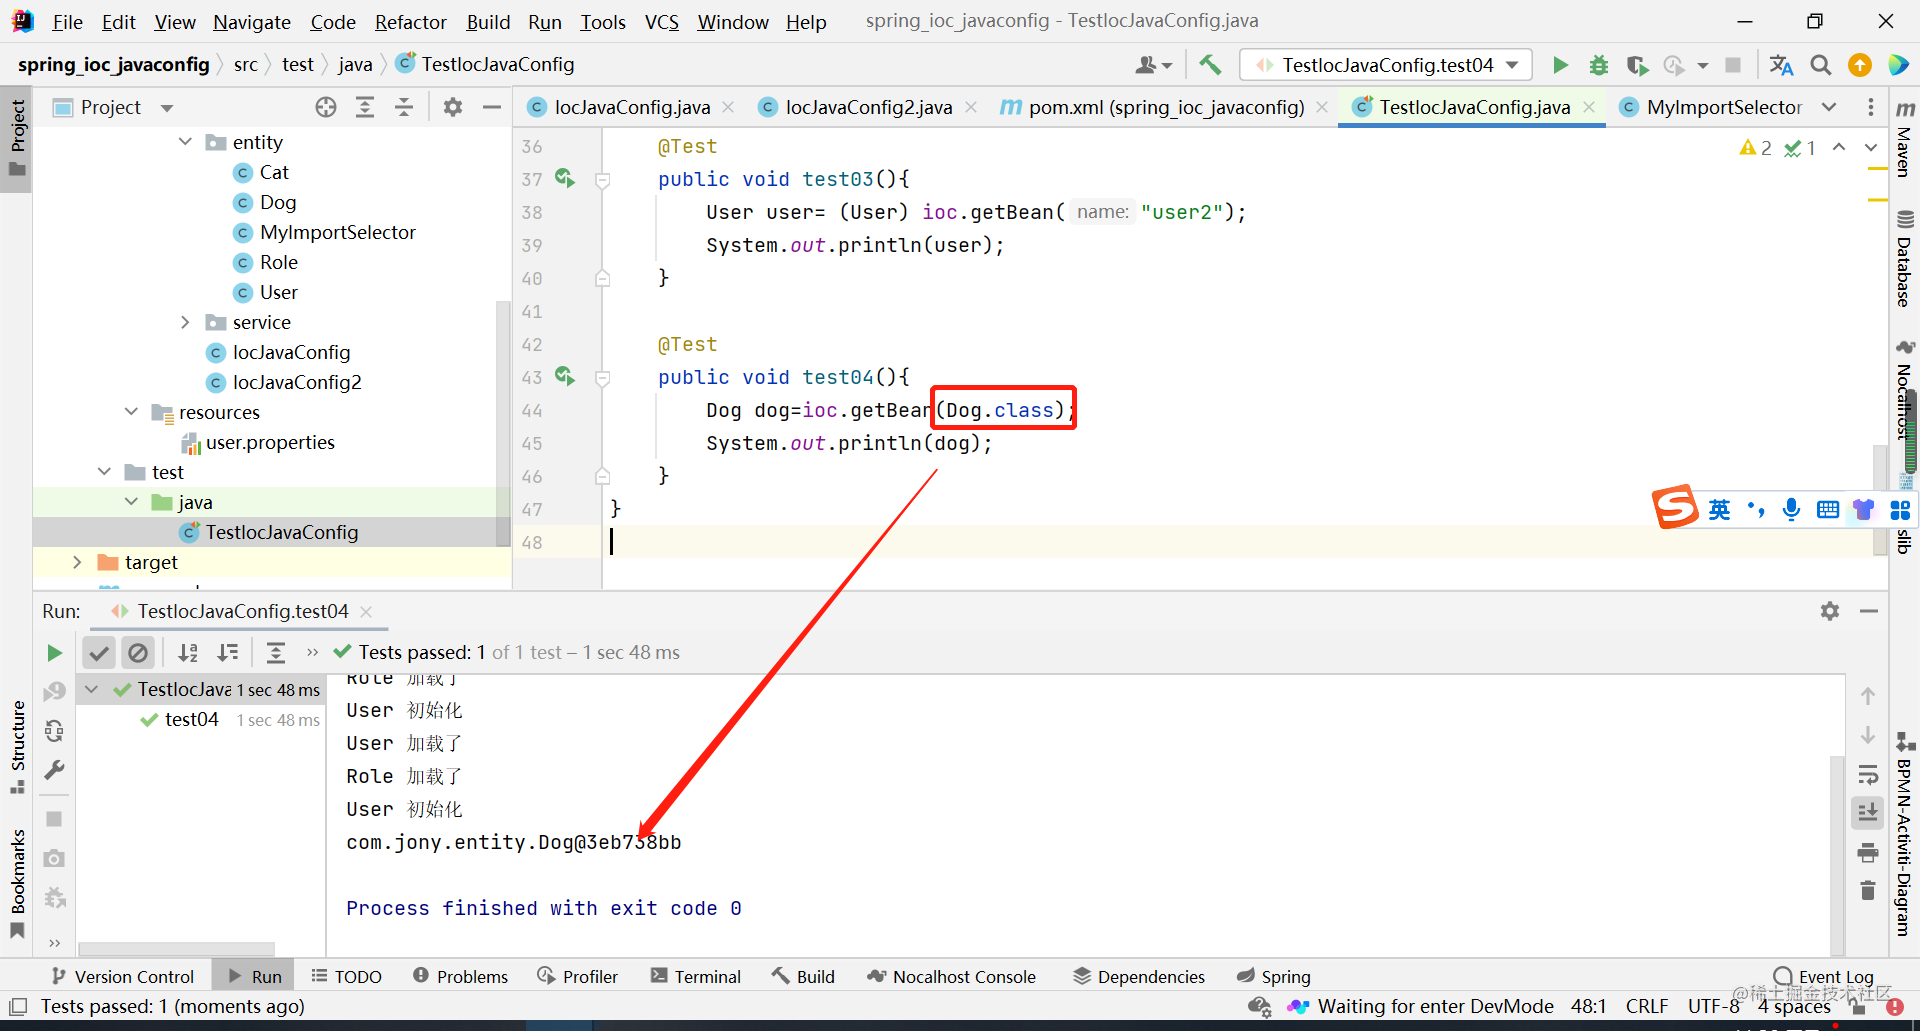
5-5-4、测试
在通过IOC容器获得bean的时候,一定要使用类.class,因为我们在使用importSelector的时候,使用的是类的完整限定名。
5-3、使用import导入ImportBeanDefinitionRegister实现bean定义
5-3-1、首先创建一个类实现ImportBeanDefinitionRegistrar
    package com.jony.entity;

    import org.springframework.beans.factory.support.BeanDefinitionRegistry;
    import org.springframework.beans.factory.support.GenericBeanDefinition;
    import org.springframework.context.annotation.ImportBeanDefinitionRegistrar;
    import org.springframework.core.type.AnnotationMetadata;

    public class MyImportBeanDefinitionRegister implements ImportBeanDefinitionRegistrar {
        @Override
        public void registerBeanDefinitions(AnnotationMetadata importingClassMetadata, BeanDefinitionRegistry registry){
            GenericBeanDefinition genericBeanDefinition=new GenericBeanDefinition();
            genericBeanDefinition.setBeanClass(Dog.class);
            registry.registerBeanDefinition("dog",genericBeanDefinition);
        }

    }
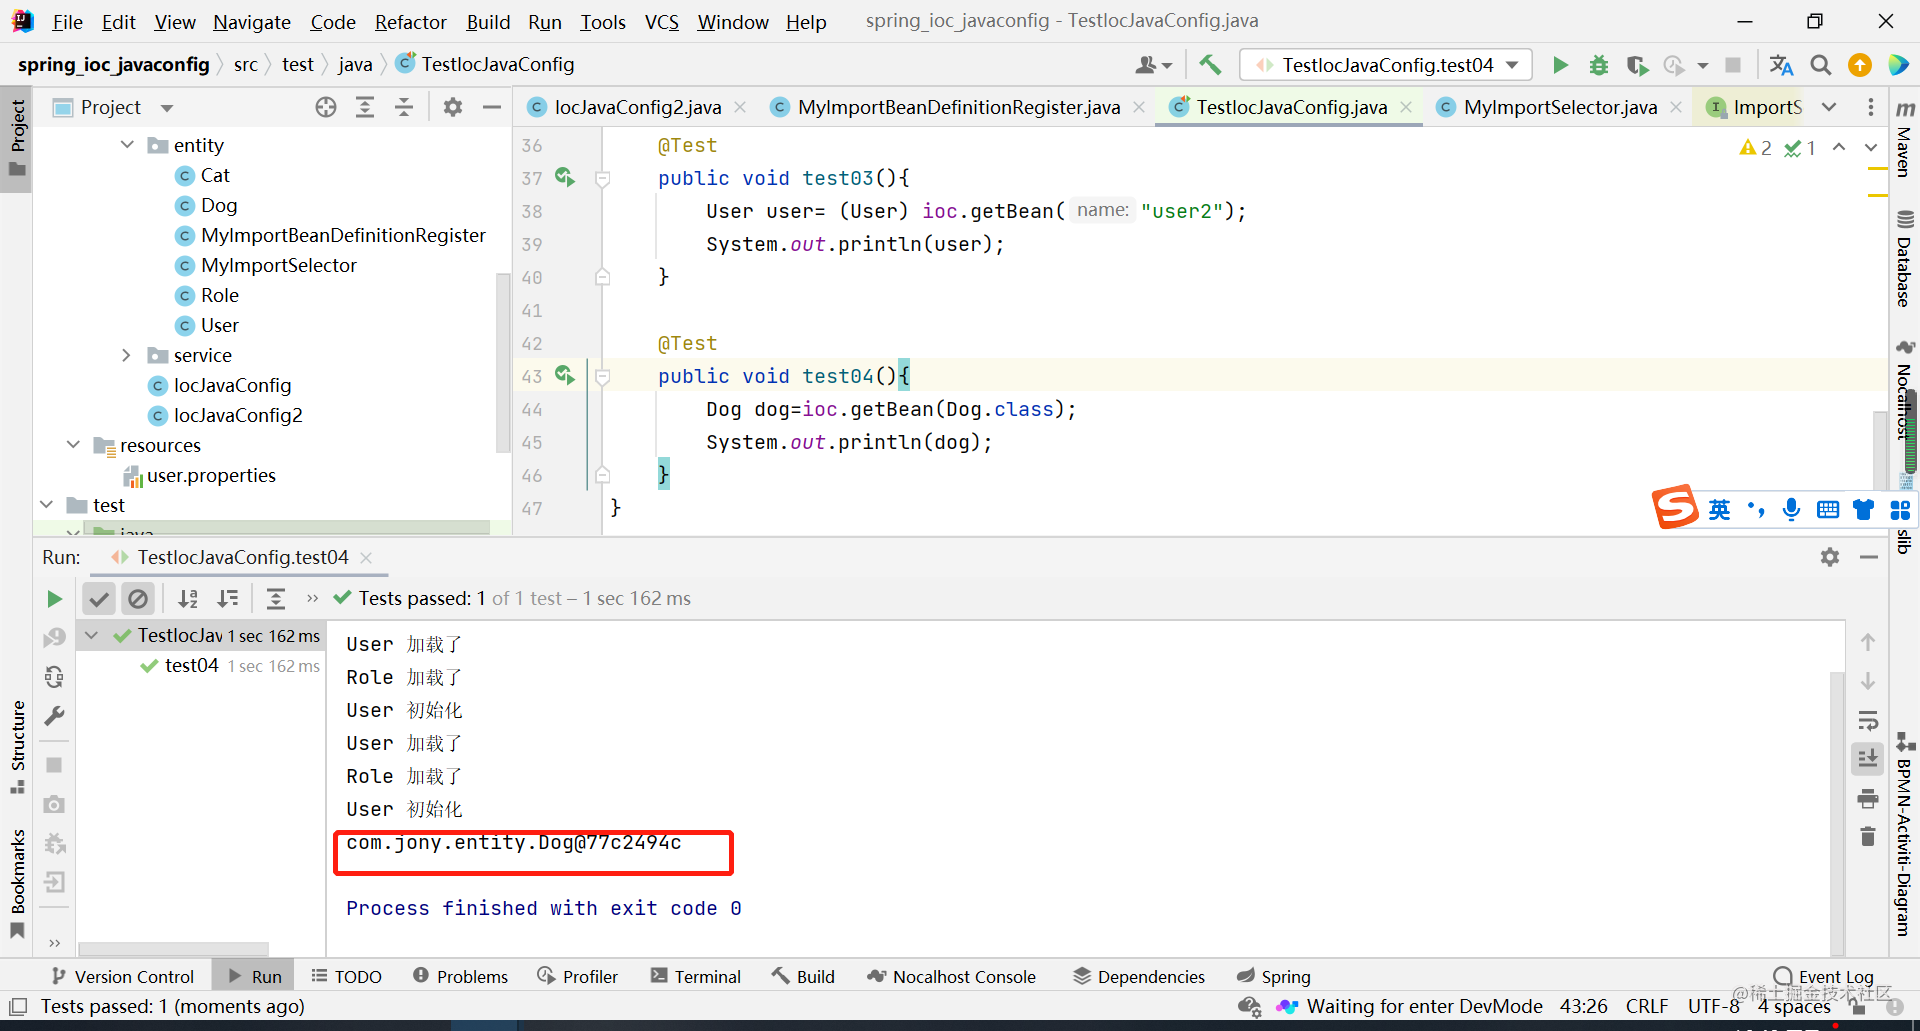
通过以上代码,我们就可以将Dog类注册为一个bean,并且不同于ImportSelector的是,ImportBeanDefinitionRegistrar可以设置注册bean的名称,这样在使用bean的时候就可以通过bean获取了。
5-3-2、修改配置类,使用Improt导入上面的类
    package com.jony;

    import com.jony.entity.MyImportBeanDefinitionRegister;
    import com.jony.entity.MyImportSelector;
    import com.jony.entity.User;
    import org.springframework.context.annotation.Bean;
    import org.springframework.context.annotation.Configuration;
    import org.springframework.context.annotation.Import;

    @Configuration
    //@Import(MyImportSelector.class)
    @Import(MyImportBeanDefinitionRegister.class)
    public class IocJavaConfig2 {

        @Bean
        public User user2(){
            return new User();
        }
    }
这样就完成了bean的注入。
5-3-3、测试结果
总结
本篇文章主要介绍了通过JavaConfig实现注册Bean的方式。
首先通过@Congruation 设置一个bean为配置。
然后通过@ComponentScan 设置扫描包的路径。
其次使用@PropertySrouce 设置引入外部资源文件。
然后使用@Bean注册一个bean
1、同时可以设置bean的名称如:@Bean(name="user")
2、使用@Bean,设置类的初始化及销毁监听。
如:@Bean(initMethod = "",destroyMethod = "",name = "db")
使用@Scope 设置Bean的作用域
单例:@Scope("singleton")--默认
多例:@Scope("prototype")
然后使用@Import导入bean,有以下几种
1、导入其他配置类@Import(MyJavaConfig.class)
2、导入类注册为Bean,如:@Import(User.class)
这样User类就不需要设注解(@Controller,@Service,@Repository,@Component),让spring主动注入IOC容器了。
3、导入ImportSlector实现类,可以一次性注册多个bean
需要注意的是,在通过ioc容器获得bean的时候,必须通过类型来获取
4、导入ImportBeanDefinitionRegistrar实现类。注册为bean
需要注意的是,在通过ioc容器获得bean的时候,必须使用name来获取
