写在前面得话
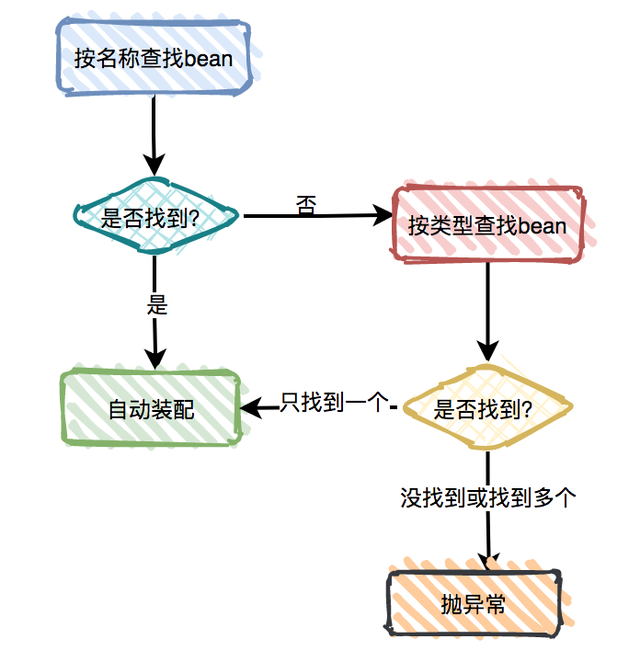
学习@Autowired之前建议先学会使用byType和byName
https://hgm.vercel.app/post/63755f3a/
@Autowired详解
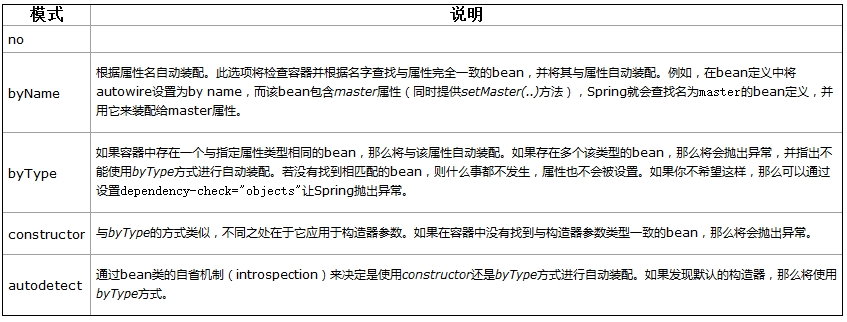
首先要知道另一个东西,default-autowire,它是在xml文件中进行配置的,可以设置为byName、byType、constructor和autodetect;比如byName,不用显式的在bean中写出依赖的对象,它会自动的匹配其它bean中id名与本bean的set**相同的,并自动装载。 @Autowired是用在JavaBean中的注解,通过byType形式,用来给指定的字段或方法注入所需的外部资源。 两者的功能是一样的,就是能减少或者消除属性或构造器参数的设置,只是配置地方不一样而已。 autowire四种模式的区别
先看一下bean实例化和@Autowired装配过程: 一切都是从bean工厂的getBean方法开始的,一旦该方法调用总会返回一个bean实例,无论当前是否存在,不存在就实例化一个并装配,否则直接返回。(Spring MVC是在什么时候开始执行bean的实例化过程的呢?其实就在组件扫描完成之后)
实例化和装配过程中会多次递归调用getBean方法来解决类之间的依赖。
Spring几乎考虑了所有可能性,所以方法特别复杂但完整有条理。
@Autowired最终是根据类型来查找和装配元素的,但是我们设置了后会影响最终的类型匹配查找。因为在前面有根据BeanDefinition的autowire类型设置PropertyValue值得一步,其中会有新实例的创建和注册。就是那个autowireByName方法。
下面通过@Autowired来说明一下用法
Setter 方法中的 @Autowired
你可以在 JavaBean中的 setter 方法中使用 @Autowired 注解。当 Spring遇到一个在 setter 方法中使用的 @Autowired 注解,它会在方法中执行 byType 自动装配。 这里是 TextEditor.java 文件的内容:
    package com.tutorialspoint;
    import org.springframework.beans.factory.annotation.Autowired;
    public class TextEditor {
        private SpellChecker spellChecker;
        @Autowired
        public void setSpellChecker( SpellChecker spellChecker ){
            this.spellChecker = spellChecker;
        }
        public SpellChecker getSpellChecker( ) {
            return spellChecker;
        }
        public void spellCheck() {
            spellChecker.checkSpelling();
        }
    }
下面是另一个依赖的类文件 SpellChecker.java 的内容:
    package com.tutorialspoint;
    public class SpellChecker {
        public SpellChecker(){
            System.out.println("Inside SpellChecker constructor." );
        }
        public void checkSpelling(){
            System.out.println("Inside checkSpelling." );
        }
    }
下面是 MainApp.java 文件的内容:
    package com.tutorialspoint;
    import org.springframework.context.ApplicationContext;
    import org.springframework.context.support.ClassPathXmlApplicationContext;
    public class MainApp {
        public static void main(String[] args) {
            ApplicationContext context = new ClassPathXmlApplicationContext("Beans.xml");
            TextEditor te = (TextEditor) context.getBean("textEditor");
            te.spellCheck();
        }
    }
下面是配置文件 Beans.xml:
    <?xml version="1.0" encoding="UTF-8"?>

    <beans xmlns="http://www.springframework.org/schema/beans"
           xmlns:xsi="http://www.w3.org/2001/XMLSchema-instance"
           xmlns:context="http://www.springframework.org/schema/context"
           xsi:schemaLocation="http://www.springframework.org/schema/beans
                               http://www.springframework.org/schema/beans/spring-beans-3.0.xsd
                               http://www.springframework.org/schema/context
                               http://www.springframework.org/schema/context/spring-context-3.0.xsd">

        <context:annotation-config/>

        <!-- Definition for textEditor bean without constructor-arg  -->
        <bean id="textEditor" class="com.tutorialspoint.TextEditor">
        </bean>

        <!-- Definition for spellChecker bean -->
        <bean id="spellChecker" class="com.tutorialspoint.SpellChecker">
        </bean>

    </beans>
一旦你已经完成的创建了源文件和 bean 配置文件,让我们运行一下应用程序。如果你的应用程序一切都正常的话,这将会输出以下消息:
Inside SpellChecker constructor. Inside checkSpelling.
属性中的 @Autowired
你可以在属性中使用 @Autowired 注解来除去 setter 方法。当时使用 为自动连接属性传递的时候,Spring 会将这些传递过来的值或者引用自动分配给那些属性。所以利用在属性中 @Autowired 的用法,你的 TextEditor.java 文件将变成如下所示:
    package com.tutorialspoint;
    import org.springframework.beans.factory.annotation.Autowired;
    public class TextEditor {
        @Autowired
        private SpellChecker spellChecker;
        public TextEditor() {
            System.out.println("Inside TextEditor constructor." );
        }
        public SpellChecker getSpellChecker( ){
            return spellChecker;
        }
        public void spellCheck(){
            spellChecker.checkSpelling();
        }
    }
下面是配置文件 Beans.xml:
    <?xml version="1.0" encoding="UTF-8"?>

    <beans xmlns="http://www.springframework.org/schema/beans"
           xmlns:xsi="http://www.w3.org/2001/XMLSchema-instance"
           xmlns:context="http://www.springframework.org/schema/context"
           xsi:schemaLocation="http://www.springframework.org/schema/beans
                               http://www.springframework.org/schema/beans/spring-beans-3.0.xsd
                               http://www.springframework.org/schema/context
                               http://www.springframework.org/schema/context/spring-context-3.0.xsd">

        <context:annotation-config/>

        <!-- Definition for textEditor bean -->
        <bean id="textEditor" class="com.tutorialspoint.TextEditor">
        </bean>

        <!-- Definition for spellChecker bean -->
        <bean id="spellChecker" class="com.tutorialspoint.SpellChecker">
        </bean>

    </beans>
一旦你在源文件和 bean 配置文件中完成了上面两处改变,让我们运行一下应用程序。如果你的应用程序一切都正常的话,这将会输出以下消息:
Inside TextEditor constructor. Inside SpellChecker constructor. Inside checkSpelling.
构造函数中的 @Autowired
你也可以在构造函数中使用 @Autowired。一个构造函数 @Autowired 说明当创建 bean 时,即使在 XML 文件中没有使用 元素配置 bean ,构造函数也会被自动连接。让我们检查一下下面的示例。 这里是 TextEditor.java 文件的内容:
    package com.tutorialspoint;
    import org.springframework.beans.factory.annotation.Autowired;
    public class TextEditor {
        private SpellChecker spellChecker;
        @Autowired
        public TextEditor(SpellChecker spellChecker){
            System.out.println("Inside TextEditor constructor." );
            this.spellChecker = spellChecker;
        }
        public void spellCheck(){
            spellChecker.checkSpelling();
        }
    }
下面是配置文件 Beans.xml:
    <?xml version="1.0" encoding="UTF-8"?>

    <beans xmlns="http://www.springframework.org/schema/beans"
           xmlns:xsi="http://www.w3.org/2001/XMLSchema-instance"
           xmlns:context="http://www.springframework.org/schema/context"
           xsi:schemaLocation="http://www.springframework.org/schema/beans
                               http://www.springframework.org/schema/beans/spring-beans-3.0.xsd
                               http://www.springframework.org/schema/context
                               http://www.springframework.org/schema/context/spring-context-3.0.xsd">

        <context:annotation-config/>

        <!-- Definition for textEditor bean without constructor-arg  -->
        <bean id="textEditor" class="com.tutorialspoint.TextEditor">
        </bean>

        <!-- Definition for spellChecker bean -->
        <bean id="spellChecker" class="com.tutorialspoint.SpellChecker">
        </bean>

    </beans>
一旦你在源文件和 bean 配置文件中完成了上面两处改变,让我们运行一下应用程序。如果你的应用程序一切都正常的话,这将会输出以下消息:
Inside TextEditor constructor. Inside SpellChecker constructor. Inside checkSpelling.
@Autowired 的(required=false)选项
默认情况下,@Autowired 注解意味着依赖是必须的,它类似于 @Required 注解,然而,你可以使用 @Autowired 的 (required=false) 选项关闭默认行为。 即使你不为 age 属性传递任何参数,下面的示例也会成功运行,但是对于 name 属性则需要一个参数。你可以自己尝试一下这个示例,因为除了只有 Student.java 文件被修改以外,它和 @Required 注解示例是相似的。
    package com.tutorialspoint;
    import org.springframework.beans.factory.annotation.Autowired;
    public class Student {
        private Integer age;
        private String name;
        @Autowired(required=false)
        public void setAge(Integer age) {
            this.age = age;
        }
        public Integer getAge() {
            return age;
        }
        @Autowired
        public void setName(String name) {
            this.name = name;
        }
        public String getName() {
            return name;
        }
    }
其他
@Autowired注释应用于具有任意名称和多个参数的方法:
    public class MovieRecommender {

        private MovieCatalog movieCatalog;

        private CustomerPreferenceDao customerPreferenceDao;

        @Autowired
        public void prepare(MovieCatalog movieCatalog,
                            CustomerPreferenceDao customerPreferenceDao) {
            this.movieCatalog = movieCatalog;
            this.customerPreferenceDao = customerPreferenceDao;
        }

        // ...
    }
您也可以将@Autowired应用于字段,或者将其与构造函数混合,如以下示例所示
    public class MovieRecommender {

        private final CustomerPreferenceDao customerPreferenceDao;

        @Autowired
        private MovieCatalog movieCatalog;

        @Autowired
        public MovieRecommender(CustomerPreferenceDao customerPreferenceDao) {
            this.customerPreferenceDao = customerPreferenceDao;
        }

        // ...
    }
将@Autowired注释添加到需要该类型数组的字段或方法,则spring会从ApplicationContext中搜寻符合指定类型的所有bean,如以下示例所示:
    public class MovieRecommender {

        @Autowired
        private MovieCatalog[] movieCatalogs;

        // ...
    }
数组可以,我们可以马上举一反三,那容器也可以吗,答案是肯定的,下面是set以及map的例子:
    public class MovieRecommender {

        private Set<MovieCatalog> movieCatalogs;

        @Autowired
        public void setMovieCatalogs(Set<MovieCatalog> movieCatalogs) {
            this.movieCatalogs = movieCatalogs;
        }

        // ...
    }
    public class MovieRecommender {

        private Map<String, MovieCatalog> movieCatalogs;

        @Autowired
        public void setMovieCatalogs(Map<String, MovieCatalog> movieCatalogs) {
            this.movieCatalogs = movieCatalogs;
        }

        // ...
    }
以上就是@Autowired注解的主要使用方式,经常使用spring的话应该对其中常用的几种不会感到陌生。
@Autowired装配不成功的几种情况?
没有加@Component注解
在类上面忘了加@Controller、@Service、@Component、@Repository等注解,spring就无法完成自动装配的功能,例如:
    public class UserService {
        @Autowired
        private IUser user;
        public void test() {
            user.say();
        }
    }
这种情况应该是最常见的错误了,不会因为你长得帅,就不会犯这种低级的错误。
注入Filter或Listener
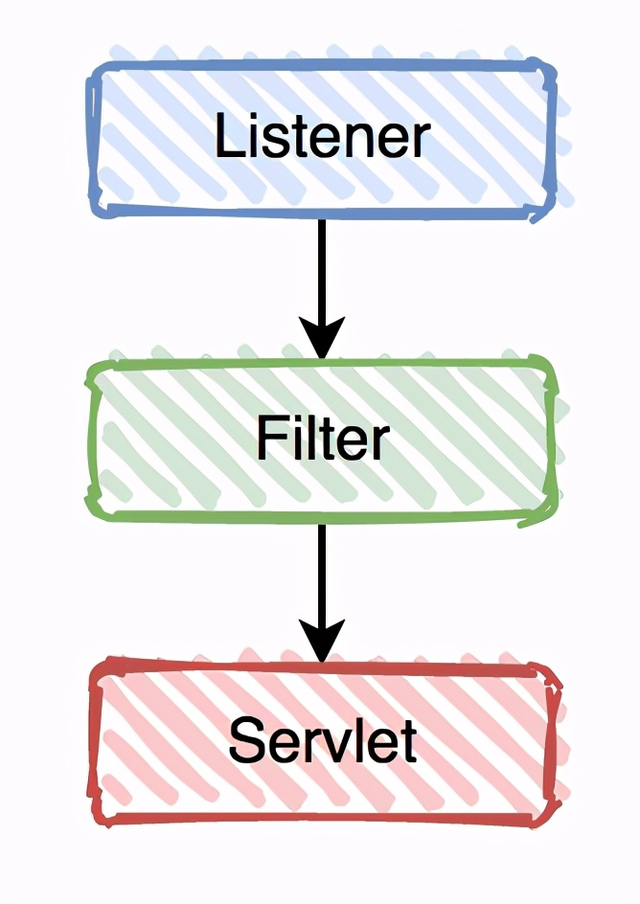
web应用启动的顺序是:listener->filter->servlet。
接下来看看这个案例:
    public class UserFilter implements Filter {
        @Autowired
        private IUser user;
        @Override
        public void init(FilterConfig filterConfig) throws ServletException {
            user.say();
        }
        @Override
        public void doFilter(ServletRequest request, ServletResponse response, FilterChain chain) throws IOException, ServletException {
        }
        @Override
        public void destroy() {
        }
    }
    public class FilterConfig {
        @Bean
        public FilterRegistrationBean filterRegistrationBean() {
            bean = new FilterRegistrationBean();
            bean.setFilter(new UserFilter());
            bean.addUrlPatterns("/*");
            return bean;
        }
    }
程序启动会报错,tomcat也无法正常启动???什么原因??
众所周知,springmvc的启动是在DisptachServlet里面做的,而它是在listener和filter之后执行。如果我们想在listener和filter里面@Autowired某个bean,肯定是不行的,因为filter初始化的时候,此时bean还没有初始化,无法自动装配。
如果工作当中真的需要这样做,我们该如何解决这个问题呢?
    public class UserFilter  implements Filter {
        private IUser user;

        @Override
        public void init(FilterConfig filterConfig) throws ServletException {
            ApplicationContext applicationContext = WebApplicationContextUtils.getWebApplicationContext(
                filterConfig.getServletContext());
            this.user = ((IUser)(applicationContext.getBean("user1")));
            user.say();
        }

        @Override
        public void doFilter(ServletRequest request, ServletResponse response, FilterChain chain) throws IOException, ServletException {

        }

        @Override
        public void destroy() {

        }
    }
答案是使用 WebApplicationContextUtils.getWebApplicationContext获取当前的ApplicationContext,再通过它获取到bean实例。
注解未被@ComponentScan扫描
通常情况下,@Controller、@Service、@Component、@Repository、@Configuration等注解,是需要通过@ComponentScan注解扫描,收集元数据的。
但是,如果没有加@ComponentScan注解,或者@ComponentScan注解扫描的路径不对,或者路径范围太小,会导致有些注解无法收集,到后面无法使用@Autowired完成自动装配的功能。
有个好消息是,在springboot项目中,如果使用了@SpringBootApplication注解,它里面内置了@ComponentScan注解的功能。
循环依赖问题
如果A依赖于B,B依赖于C,C又依赖于A,这样就形成了一个死循环。
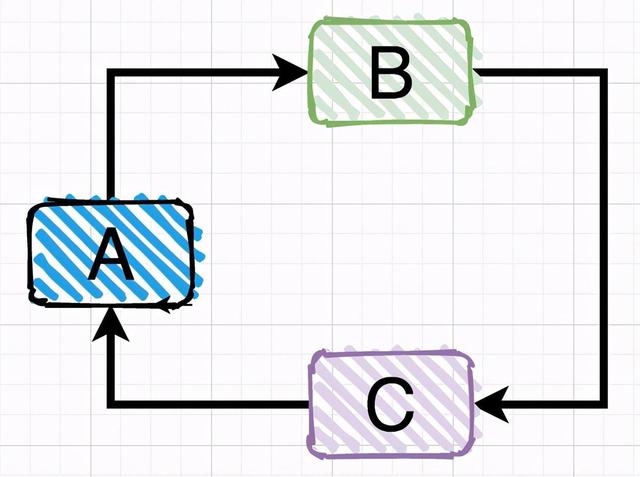
spring的bean默认是单例的,如果单例bean使用@Autowired自动装配,大多数情况,能解决循环依赖问题。
但是如果bean是多例的,会出现循环依赖问题,导致bean自动装配不了。
还有有些情况下,如果创建了代理对象,即使bean是单例的,依然会出现循环依赖问题。
@Autowired和@Resouce的区别
@Autowired功能虽说非常强大,但是也有些不足之处。比如:比如它跟spring强耦合了,如果换成了JFinal等其他框架,功能就会失效。而@Resource是JSR-250提供的,它是Java标准,绝大部分框架都支持。
除此之外,有些场景使用@Autowired无法满足的要求,改成@Resource却能解决问题。接下来,我们重点看看@Autowired和@Resource的区别。
- @Autowired默认按byType自动装配,而@Resource默认byName自动装配。
- @Autowired只包含一个参数:required,表示是否开启自动准入,默认是true。而@Resource包含七个参数,其中最重要的两个参数是:name 和 type。
- @Autowired如果要使用byName,需要使用@Qualifier一起配合。而@Resource如果指定了name,则用byName自动装配,如果指定了type,则用byType自动装配。
- @Autowired能够用在:构造器、方法、参数、成员变量和注解上,而@Resource能用在:类、成员变量和方法上。
- @Autowired是spring定义的注解,而@Resource是JSR-250定义的注解。
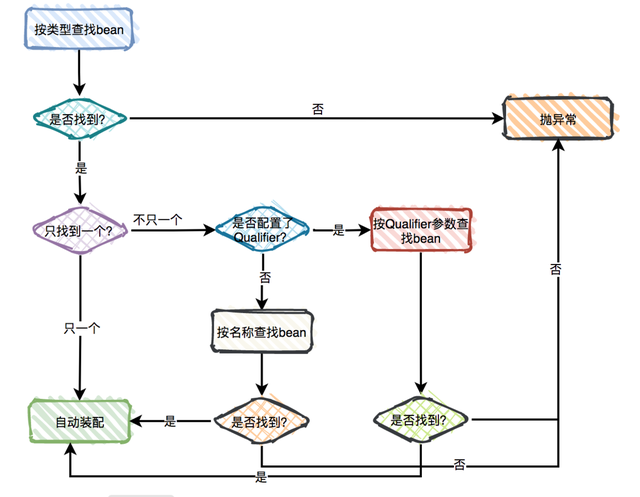
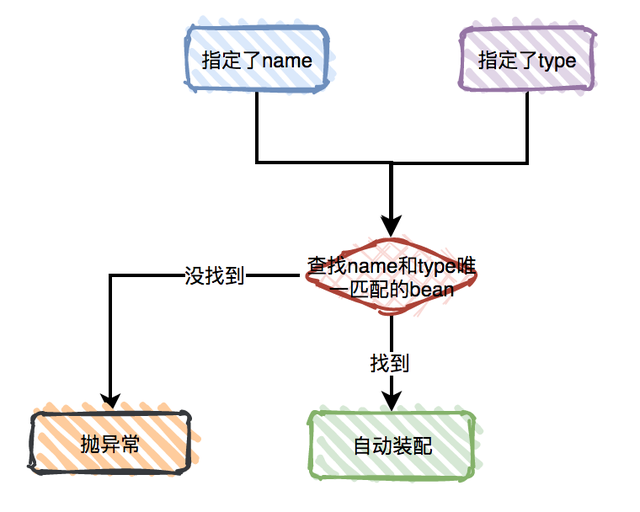
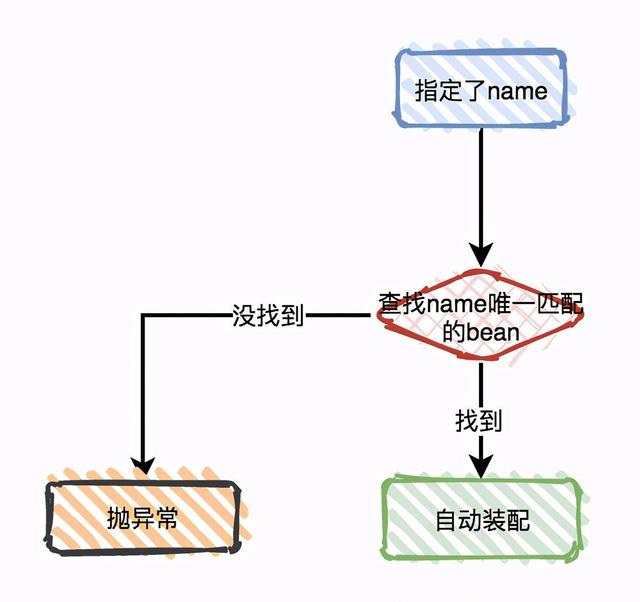
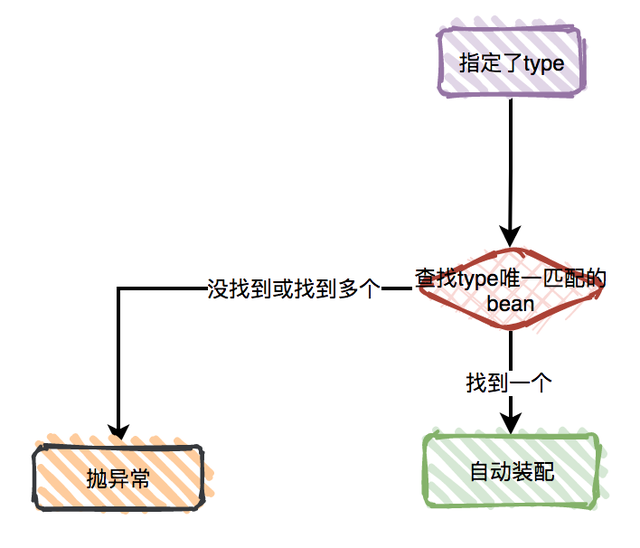
此外,它们的装配顺序不同。
@Autowired的装配顺序如下:
@Resource的装配顺序如下:
1.如果同时指定了name和type:
如果指定了name:
如果指定了type:
如果既没有指定name,也没有指定type:
