前言
由于项目中某些特殊场景需要对k8s中的单个pod进行外部的调用,但是使用http的方式是没法调用的,所以想到了直接使用tcp/ip的方式做一个长连接,然后外部与 pod内部就能直接通信了。所以就想到了netty。
什么是netty
这里就不详细介绍了,网上应该有很多的介绍。例如:什么是netty。
思路
分为两个部分,一个是服务端,一个是客户端。
服务端
想法是跟使用springmvc一样的方式标记自己本地的方法,然后在netty的handle里边反射调用被标记的方法。
客户端
跟服务端类似,也是使用注解反射调用本地写的方法。
配置类
    @Data
    @Slf4j
    @Configuration
    @EnableConfigurationProperties(value = RpcConfigProperties.class)
    public class RpcAutoConfiguration {

        @Bean
        @ConditionalOnProperty(prefix = "com.github.zy.netty.rpc.server", name = "enable", havingValue = "true")
        public RpcServerRunner serverBootstrap(RpcConfigProperties rpcConfigProperties, ServerHandler serverHandler) {
            return new RpcServerRunner(rpcConfigProperties, serverHandler);
        }

        @Bean
        @ConditionalOnProperty(prefix = "com.github.zy.netty.rpc.client", name = "enable", havingValue = "true")
        public RpcClientRunner clientBootstrap(ClientHandler clientHandler, RpcClient client, RpcConfigProperties configProperties) {
            return new RpcClientRunner(clientHandler, client, configProperties);
        }
    }
RpcServerRunner
这里的思路是实现CommandLineRunner,在springboot启动后,会去调用该接口的实现,所以,netty的初始化可以放在这里。
    @Slf4j
    public class RpcServerRunner implements CommandLineRunner {

        private final RpcConfigProperties rpcConfigProperties;
        private final ServerHandler serverHandler;

        public RpcServerRunner(RpcConfigProperties rpcConfigProperties, ServerHandler serverHandler){
            this.rpcConfigProperties = rpcConfigProperties;
            this.serverHandler = serverHandler;
        }


        public void startServer() {
            if (rpcConfigProperties.getServer().isEnable()) {
                log.info("开始启动NettyServer...");
                int port = rpcConfigProperties.getServer().getPort();
                ServerBootstrap bootstrap = new ServerBootstrap();
                EventLoopGroup bossGroup = new NioEventLoopGroup();
                EventLoopGroup workerGroup = new NioEventLoopGroup();
                try {
                    bootstrap.group(bossGroup, workerGroup)
                            .channel(NioServerSocketChannel.class)
                            .childHandler(new ChannelInitializer<SocketChannel>() {
                                @Override
                                protected void initChannel(SocketChannel ch) throws Exception {
                                    ch.pipeline().addLast(new LengthFieldBasedFrameDecoder(2048, 0, 4, 0, 4));
                                    ch.pipeline().addLast(new LengthFieldPrepender(4));
                                    ch.pipeline().addLast(new LoggingHandler(LogLevel.DEBUG));
                                    ch.pipeline().addLast(new MessagePacketDecoder());
                                    ch.pipeline().addLast(new MessagePacketEncoder(FastJsonSerializer.INSTANCE));
                                    ch.pipeline().addLast(new IdleStateHandler(0,0,rpcConfigProperties.getServer().getDisconnectInterval()));
                                    ch.pipeline().addLast(new ValidatePacketHandler());
                                    ch.pipeline().addLast(serverHandler);
                                }
                            });
                    ChannelFuture future = bootstrap.bind(port).sync();
                    log.info("启动NettyServer[{}]成功...", port);
                    future.channel().closeFuture().sync();
                } catch (Exception e) {
                    log.error("启动NettyServer[" + port + "]失败...", e);
                } finally {
                    workerGroup.shutdownGracefully();
                    bossGroup.shutdownGracefully();
                }
            }
        }


        @Override
        public void run(String... args) throws Exception {
            new Thread(this::startServer).start();
        }
    }
RpcClientRunner
客户端这里在我使用的业务中,需要手动去调用初始化,所以这里多出来了一个start方法,里边去阻塞,等到和服务端完成连接后线程才继续走下去。 如果使用场景允许异步的话,那么可以改造下,直接就像RpcServerRunner 一样放到子线程里边去启动就行了。
    @Slf4j
    public class RpcClientRunner implements CommandLineRunner {

        private final ClientHandler clientHandler;
        private final RpcClient client;
        private final RpcConfigProperties configProperties;

        public RpcClientRunner(ClientHandler clientHandler, RpcClient client, RpcConfigProperties configProperties) {
            this.clientHandler = clientHandler;
            this.client = client;
            this.configProperties = configProperties;
        }

        public void doStart() {
            client.startClient(clientHandler);
        }


        @Override
        public void run(String... args) throws Exception {
            new Thread(this::doStart).start();
        }

        /**
         * todo 手动触发, 异步监听关闭,这里在建立了连接通道后,返回future,使用者根据future.isSuccess来判断是否已经启动成功(阻塞线程)
         */
        public void start() {
            //防止多次调用该方法,去多次启动
            if (client.getChannelFuture() == null || !client.getChannelFuture().isSuccess()) {
                doStart();
                waitStart();
                //异步监听关闭
                syncClose();
            }
        }


        private void syncClose() {
            //异步监听关闭
            new Thread(() -> {
                try {
                    client.getChannelFuture().channel().closeFuture().sync();
                } catch (InterruptedException e) {
                    log.error("客户端链接发生异常", e);
                }
            });
        }

        private void waitStart() {
            //最大等待阻塞时间
            long startWaitTime = configProperties.getClient().getStartWaitTime();

            //开始计数时间
            long startTime = System.currentTimeMillis();
            for (; ; ) {
                long currentTime = System.currentTimeMillis() - startTime;

                //如果当前时间已经大于开始计数的时间,那么就跳出本次等待
                if(currentTime > startWaitTime){
                    break;
                }

                boolean startSuccess = false;
                if (client.getChannelFuture() != null) {
                    startSuccess = client.getChannelFuture().isSuccess();
                }

                if (startSuccess) {
                    log.debug("连接netty服务端成功,退出等待.");
                    break;
                } else {
                    log.debug("连接还未准备就绪,线程阻塞.");
                }
                try {
                    Thread.sleep(configProperties.getClient().getStartWaitIntervalTime());
                } catch (InterruptedException e) {
                    log.error(e.getMessage(), e);
                }
            }
        }
    }
核心点
1:服务端如何接受消息
- 定义@RpcService注解,用于标记本地的业务类,类似springmvc的@Controller.该注解主要是为了确定业务类。
    @Target({ElementType.TYPE})
    @Retention(RetentionPolicy.RUNTIME)
    @Documented
    @Component
    public @interface RpcService {

    }
- 定义@RpcMapping注解,用于标记业务类中的业务方法,类似springmvc的@RequestMapping。
    @Target({ElementType.METHOD})
    @Retention(RetentionPolicy.RUNTIME)
    @Documented
    public @interface RpcMapping {

        String url();
    }
- 在netty的handle中将接受到的消息反射调用本地被标记的方法。
    @Slf4j
    @RequiredArgsConstructor
    @ChannelHandler.Sharable
    public class ServerHandler extends SimpleChannelInboundHandler<DefaultMessagePacket> {

        private final SessionManager sessionManager;
        private final ServerMessageHandle serverMessageHandle;
        private final RpcConfigProperties configProperties;

        @Override
        protected void channelRead0(ChannelHandlerContext ctx, DefaultMessagePacket msg) throws Exception {
            serverMessageHandle.handle(ctx, msg);
        }

        @Override
        public void userEventTriggered(ChannelHandlerContext ctx, Object evt) throws Exception {
            if (evt instanceof IdleStateEvent) {
                IdleState state = ((IdleStateEvent) evt).state();
                if(IdleState.READER_IDLE == state){
                    //规定时间未收到客户端数据(如果有心跳交互的话就不会走到这来)那么就关闭客户端的channel
                    ctx.close();
                }
            }
        }

        @Override
        public void channelActive(ChannelHandlerContext ctx) {
            ChannelHandlerContextUtil contextUtil = ChannelHandlerContextUtil.INSTANCE;
            String ip = contextUtil.getIp(ctx);
            int port = contextUtil.getPort(ctx);
            log.debug("和客户端建立连接,目标 ip : {}, port : {}", ip, port);
        }

        @Override
        public void channelInactive(ChannelHandlerContext ctx) {
            //断开连接的时候可以去将session清理掉
            ChannelHandlerContextUtil contextUtil = ChannelHandlerContextUtil.INSTANCE;
            String ip = contextUtil.getIp(ctx);
            int port = contextUtil.getPort(ctx);
            //sessionManager.delete(SessionHelper.getSessionId(configProperties.getClient().getSystemId(), ip));
            ctx.close();
            log.error("和客户端断开连接,目标 ip: {} , port : {}", ip, port);
        }

        @Override
        public void exceptionCaught(ChannelHandlerContext ctx, Throwable cause) throws Exception {
            log.error("服务端的异常情况," , cause);
        }
    }
    @RequiredArgsConstructor
    public class ServerMessageHandle {

        private final List<ServerMessageResolverStrategy> strategies;

        public void handle(ChannelHandlerContext ctx, DefaultMessagePacket msg) {
            Optional<ServerMessageResolverStrategy> optional = strategies.stream().filter(strategie -> strategie.support(msg.getMessageType())).findFirst();
            if (optional.isPresent()) {
                optional.get().resolver(ctx, msg);
            }
        }
    }
这里对serviceMessageHandle做了一个策略,具体有处理客户端的请求,ping,上报消息等。具体实现可以参考github上的代码。
2:客户端如何接受消息
- 定义@RpcClient注解,用于标记客户端的处理类。
- 使用@RpcMapping标记本地方法,在netty的handle中反射调用被标记的该方法即可。
    @RequiredArgsConstructor
    @Slf4j
    @ChannelHandler.Sharable
    public class ClientHandler extends SimpleChannelInboundHandler<DefaultMessagePacket> {


        private final ClientMessageHandle clientMessageHandle;
        private final RpcConfigProperties configProperties;
        private final RpcClient client;

        @Override
        protected void channelRead0(ChannelHandlerContext ctx, DefaultMessagePacket packet) throws Exception {
            clientMessageHandle.handle(ctx, packet);
        }

        @Override
        public void channelActive(ChannelHandlerContext ctx) throws Exception {
            ClientChannelHolder.CHANNEL_REFERENCE.set(ctx.channel());
            //建立连接的时候就将自己的moduleId携带到服务端去
            DefaultMessagePacket packet = MessagePacketBuilder.buildBasicReportModuleId().systemId(configProperties.getClient()
                    .getSystemId()).targetIp(IPUtil.getAddress()).build();
            ctx.channel().writeAndFlush(packet);
            ChannelHandlerContextUtil contextUtil = ChannelHandlerContextUtil.INSTANCE;
            String ip = contextUtil.getIp(ctx);
            int port = contextUtil.getPort(ctx);
            log.info("和服务端建立连接.... ip : {}, port : {}", ip, port);
        }

        @Override
        public void userEventTriggered(ChannelHandlerContext ctx, Object evt) {
            if (evt instanceof IdleStateEvent) {
                IdleState state = ((IdleStateEvent) evt).state();

                switch (state) {
                    case READER_IDLE:
                        //规定时间没有读取操作的时候,这里可以当做没有收到服务端的回复,可能服务端挂了了啥的,这里去主动关闭连接,然后触发关闭的回调函数
                        ctx.close();
                        break;
                    case WRITER_IDLE:
                        //规定时间没有写入操作的时候
                        break;
                    case ALL_IDLE:
                        //在规定时间没有进行读写操作的话,就去向服务端发送一个心跳
                        sendHeartbeatPacket(ctx);
                        break;
                    default:
                        break;
                }
            }
        }

        @Override
        public void channelInactive(ChannelHandlerContext ctx) {
            //当连接关闭的时候会触发该方法,可以在这里进行对服务端的重连
            ctx.channel().eventLoop().schedule(() -> {
                client.startClient(this);
            }, configProperties.getClient().getDisconnectRetryInterval(), TimeUnit.SECONDS);
            log.error("与服务端断开连接。。。。");
        }

        @Override
        public void exceptionCaught(ChannelHandlerContext ctx, Throwable cause) {
            log.error("出现未知异常....", cause);
        }


        private void sendHeartbeatPacket(ChannelHandlerContext ctx) {
            DefaultMessagePacket packet = MessagePacketBuilder.buildBasicPing().build();
            ctx.writeAndFlush(packet);
        }

    }
3:服务端如何发送消息
由于服务端与客户端的关系是一对多,可能同时有多个客户端连接上了服务端,所以这里就需要一个session来讲客户端与服务端的会话连接信息记录存起来 所以定义了一个SessionManage与SessionStorage
    public interface SessionManager {

        /**
         * 根据sessionId得到一个session
         *
         * @param sessionId
         * @return
         */
        Session findOne(String sessionId);

        /**
         * 获取所有的session
         *
         * @return
         */
        List<Session> findAll();

        /**
         * 移除某一个session
         *
         * @param sessionId
         * @return
         */
        void delete(String sessionId);

        /**
         * 移除某一批session
         *
         * @param sessionIds
         * @return
         */
        void delete(List<String> sessionIds);

        /**
         * 保存单个session
         *
         * @param session
         */
        void save(Session session);

        /**
         * 保存一批session
         *
         * @param sessions
         */
        void save(Iterable<Session> sessions);

    }
    /**
     * session 存储策略
     * @version 1.0 created by zy on 2020/4/26 14:50
     */
    public interface SessionStorage {

        /**
         * 获取某个session
         * @param sessionId systemId + ip
         * @return
         */
        Session findOne(String sessionId);


        /**
         * 获取所有的session
         * @return
         */
        List<Session> findAll();
        /**
         * 移除某一个session
         * @param sessionId systemId + ip
         * @return
         */
        void delete(String sessionId);

        /**
         * 移除某一批session
         * @param sessionIds systemId + ip
         * @return
         */
        void delete(List<String> sessionIds);

        /**
         * 保存单个session
         * @param session
         */
        void save(Session session);

        /**
         * 保存一批session
         * @param sessions
         */
        void save(Iterable<Session> sessions);
    }
4:客户端如何发送消息
定义@RpcRequestClient注解标记接口,类似@FeginClient一样,只需要将url的映射与服务端的@RpcMapping映射一致就行
    /**
     * @version 1.0 created by zy on 2020/4/26 9:45
     */
    @Target({ElementType.TYPE})
    @Retention(RetentionPolicy.RUNTIME)
    @Documented
    public @interface RpcRequestClient {

        RpcRequestClientType targetType() default RpcRequestClientType.SERVER;

    }
    /**
     * @version 1.0 created by zy on 2020/5/24 17:37
     */
    @RpcRequestClient
    public interface ServerRequestClient {

        @RpcMapping(url = "/hello-server")
        ServerResponse helloServer(ClientRequest request);
    }
使用
    @RestController
    public class TestController {

        @Autowired
        private ServerSendTemplate serverSendTemplate;
        @Autowired
        private SessionManager sessionManager;
        @Autowired
        private ServerRequestClient serverRequestClient;

        @GetMapping("/hello-client")
        public ClientResponse helloClient(ServerRequest serverRequest) {
            return serverSendTemplate.sendToClient(serverRequest.getSystemId(), serverRequest.getIp(), serverRequest.getUrlMapping(), serverRequest, ClientResponse.class);
        }

        @GetMapping("/hello-server")
        public ServerResponse helloServer(ClientRequest clientRequest) {
            return serverRequestClient.helloServer(clientRequest);
        }

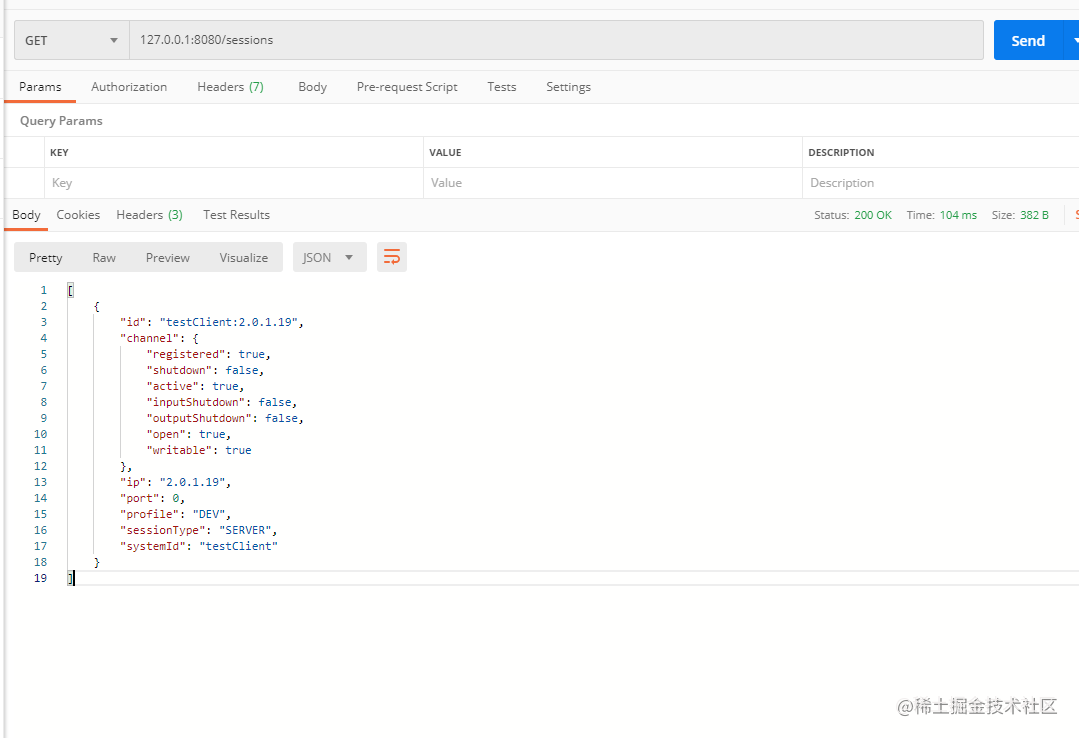
        @GetMapping("/sessions")
        public List<Session> sessions() {
            return sessionManager.findAll();
        }
    }
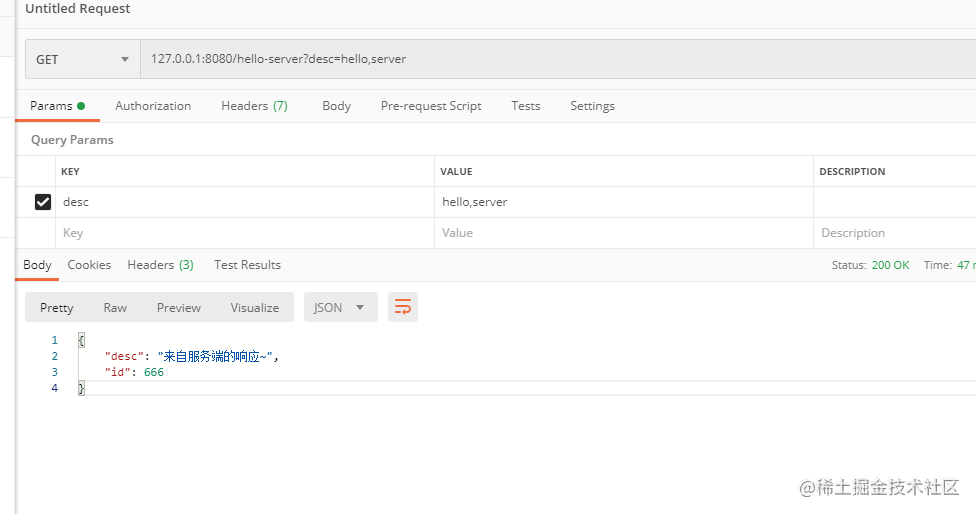
然后访问http://localhost:8080/hello-server,向服务端发送请求。
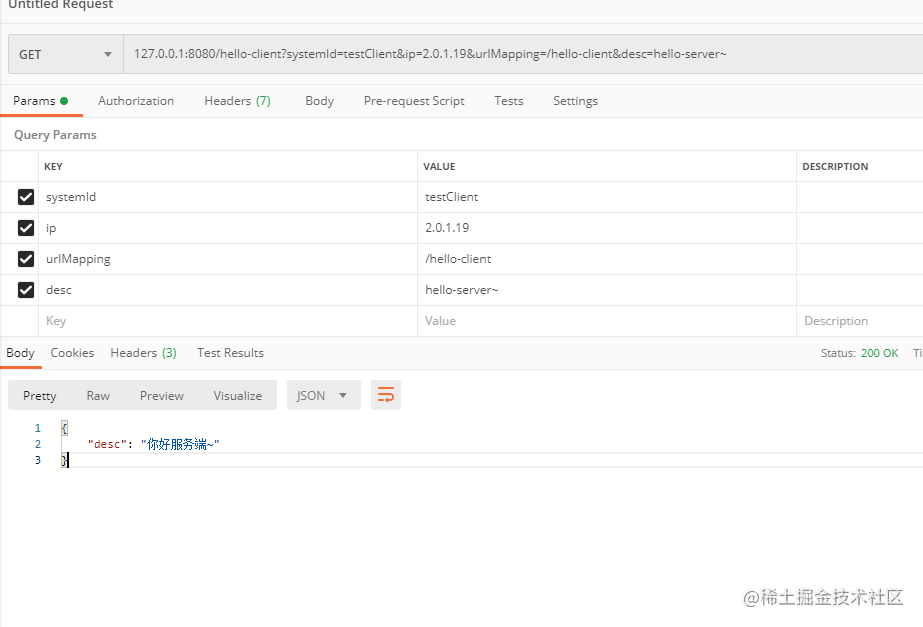
 访问http://localhost:8080/hello-client,向客户端发送请求

需要注意的是,服务端向客户端发送请求的时候,需要systemId与ip去确定是哪个客户端,这里可以使用sessionManager的findAll去找到所有的session,然后 挑一个客户端的信息去发送即可。

以上~
只是介绍了大概的实现思路以及部分代码,需要更详细的了解的,请移步github。 如果有好的建议以及写的不好的的放的话还请指教~
