NIO
新的输入/输出 (NIO) 库是在 JDK 1.4 中引入的,弥补了原来的 I/O 的不足,提供了高速的、面向块的 I/O。
NIO核心组件:
- 通道(Channels)
- 缓冲区(Buffers)
- 选择器(Selectors)
流与块
I/O 与 NIO 最重要的区别是数据打包和传输的方式,I/O 以流的方式处理数据,而 NIO 以块的方式处理数据。
面向流的 I/O 一次处理一个 字节 数据:一个输入流产生一个字节数据,一个输出流消费一个字节数据。 为流式数据创建过滤器非常容易,链接几个过滤器,以便每个过滤器只负责复杂处理机制的一部分。不利的一面是,面向流的 I/O 通常相当慢。
面向块的 I/O 一次处理一个 数据块 ,按块处理数据比按流处理数据要快得多。 但是面向块的 I/O 缺少一些面向流的 I/O 所具有的优雅性和简单性。
I/O 包和 NIO 已经很好地集成了,java.io.* 已经以 NIO 为基础重新实现了,所以现在它可以利用 NIO 的一些特性。 例如,java.io.* 包中的一些类包含以块的形式读写数据的方法,这使得即使在面向流的系统中,处理速度也会更快。
通道与缓冲区
1. 通道
通道 Channel 是对原 I/O 包中的流的模拟,可以通过它读取和写入数据。
通道与流的不同之处在于,流只能在一个方向上移动(一个流必须是 InputStream 或者 OutputStream 的子类), 而通道是 双向 的,可以用于读、写或者同时用于读写。
通道包括以下类型:
- FileChannel:从文件中读写数据;
- DatagramChannel:通过 UDP 读写网络中数据;
- SocketChannel:通过 TCP 读写网络中数据;
- ServerSocketChannel:可以监听新进来的 TCP 连接,对每一个新进来的连接都会创建一个 SocketChannel。
2. 缓冲区
发送给一个通道的所有数据都必须首先放到缓冲区中,同样地,从通道中读取的任何数据都要先读到缓冲区中。也就是说,不会直接对通道进行读写数据,而是要先经过缓冲区。
缓冲区实质上是一个数组,但它不仅仅是一个数组。缓冲区提供了对数据的结构化访问,而且还可以跟踪系统的读/写进程。
缓冲区包括以下类型:
- ByteBuffer
- CharBuffer
- ShortBuffer
- IntBuffer
- LongBuffer
- FloatBuffer
- DoubleBuffer
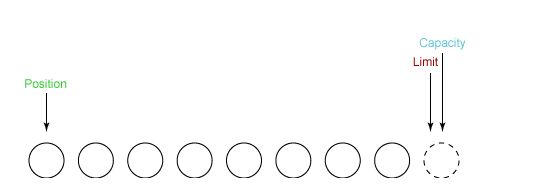
缓冲区状态变量
- capacity:最大容量;
- position:当前已经读写的字节数;
- limit:还可以读写的字节数。
状态变量的改变过程举例:
① 新建一个大小为 8 个字节的缓冲区,此时 position 为 0,而 limit = capacity = 8。capacity 变量不会改变,下面的讨论会忽略它。

② 从输入通道中读取 5 个字节数据写入缓冲区中,此时 position 为 5,limit 保持不变。

③ 在将缓冲区的数据写到输出通道之前,需要先调用 flip() 方法,这个方法将 limit 设置为当前 position,并将 position 设置为 0。

④ 从缓冲区中取 4 个字节到输出缓冲中,此时 position 设为 4。

⑤ 最后需要调用 clear() 方法来清空缓冲区,此时 position 和 limit 都被设置为最初位置。

文件 NIO 实例
FileChannel的使用
- 开启FileChannel
- 从FileChannel读取数据/写入数据
3.关闭FileChannel
    public class FileChannelDemo {
        public static void main(String[] args) throws IOException {
            //1.创建一个RandomAccessFile(随机访问文件)对象通过RandomAccessFile对象的getChannel()方法。
            RandomAccessFile raf=new RandomAccessFile("demo6.txt","rw");
            FileChannel fc=raf.getChannel();

            //使用FileChannel的read()方法读取数据:
            ByteBuffer byteBuffer=ByteBuffer.allocate(1024);
            int bys=fc.read(byteBuffer);

            //使用FileChannel的write()方法写入数据:
            ByteBuffer byteBuffer2=ByteBuffer.allocate(1024);
            byteBuffer2.put("hello".getBytes());
            fc.write(byteBuffer2);

            //3.关闭FileChannel
            fc.close();
        }
    }
- 以下展示了使用 NIO 快速复制文件的实例:
    public class CopyFile {
        public static void main(String[] args) throws IOException {
            String srcFile="国旗歌.mp4";
            String destFile="demo3.mp4";
            long start = System.currentTimeMillis();
            //copyFile(srcFile,destFile); //共耗时:75309毫秒
            //copyFile2(srcFile,destFile); //共耗时:153毫秒
            //copyFile3(srcFile,destFile);//共耗时:282毫秒
            //copyFile4(srcFile,destFile);//共耗时:44毫秒
            copyFile5(srcFile,destFile);//共耗时:共耗时:113毫秒
            long end = System.currentTimeMillis();
            System.out.println("共耗时:" + (end - start) + "毫秒");
        }

        /**
         * 基本字节流一次读写一个字节
         */
        public static void copyFile(String srcFile,String destFile) throws IOException {
            FileInputStream fis=new FileInputStream(srcFile);
            FileOutputStream fos=new FileOutputStream(destFile);

            int by=0;
            while((by=fis.read())!=-1){
                fos.write(by);
            }

            fis.close();
            fos.close();
        }

        /**
         * 基本字节流一次读写一个字节数组
         */
        public static void copyFile2(String srcFile,String destFile) throws IOException{
            FileInputStream fis=new FileInputStream(srcFile);
            FileOutputStream fos=new FileOutputStream(destFile);

            int len=0;
            byte[] bys=new byte[1024];
            while((len=fis.read(bys))!=-1){
                fos.write(bys,0,len);
            }

            fis.close();
            fos.close();
        }

        /**
         * 高效字节流一次读写一个字节
         */
        public static void copyFile3(String srcFile,String destFile) throws IOException{
            BufferedInputStream bis=new BufferedInputStream(new FileInputStream(srcFile));
            BufferedOutputStream bos=new BufferedOutputStream(new FileOutputStream(destFile));

            int by=0;
            while((by=bis.read())!=-1){
                bos.write(by);
            }

            bis.close();
            bos.close();
        }

        /**
         * 高效字节流一次读写一个字节数组
         */
        public static void copyFile4(String srcFile,String destFile) throws IOException{
            BufferedInputStream bis=new BufferedInputStream(new FileInputStream(srcFile));
            BufferedOutputStream bos=new BufferedOutputStream(new FileOutputStream(destFile));

            int len=0;
            byte[] bys=new byte[1024];
            while((len=bis.read(bys))!=-1){
                bos.write(bys,0,len);
            }

            bis.close();
            bos.close();
        }

        /**
         * 使用FileChannel复制文件
         */
        public static void copyFile5(String srcFile,String destFile) throws IOException{
            FileInputStream fis=new FileInputStream(srcFile);
            //获取输入字节流的文件通道
            FileChannel fcin=fis.getChannel();
            FileOutputStream fos=new FileOutputStream(destFile);
            //获取输出字节流的文件通道
            FileChannel fcout=fos.getChannel();

            //为缓冲区分配 1024 个字节
            ByteBuffer buffer = ByteBuffer.allocateDirect(1024);

            while(true){
                 //从输入通道中读取数据到缓冲区中
                int r = fcin.read(buffer);
                // read() 返回 -1 表示 EOF
                if(r==-1){
                    break;
                }
                //切换读写
                buffer.flip();
                //把缓冲区的内容写入输出文件中
                fcout.write(buffer);
                //清空缓冲区
                buffer.clear();
            }
        }
    }
SocketChannel和ServerSocketChannel的使用
SocketChannel用于创建基于TCP协议的客户端对象,因为SocketChannel中不存在accept()方法, 所以,它不能成为一个服务端程序。 通过 connect()方法 ,SocketChannel对象可以连接到其他TCP服务器程序。
ServerSocketChannel允许我们监听TCP协议请求,通过ServerSocketChannel的**accept()**方法创建一个SocketChannel对象用户从客户端读/写数据。
- 服务端:
- 通过ServerSocketChannel 绑定ip地址和端口号
- 通过ServerSocketChannel的accept()方法创建一个SocketChannel对象用户从客户端读/写数据
- 创建读数据/写数据缓冲区对象来读取客户端数据或向客户端发送数据
- 关闭SocketChannel和ServerSocketChannel
    public class Server {
        public static void main(String[] args) throws IOException {
            //通过ServerSocketChannel 的open()方法创建一个ServerSocketChannel对象
            ServerSocketChannel ssc=ServerSocketChannel.open();

            //1. 通过ServerSocketChannel 绑定ip地址和端口号
            ssc.socket().bind(new InetSocketAddress(InetAddress.getByName("LAPTOP-D9966H06"),8888));

            //2. 通过ServerSocketChannel的accept()方法创建一个SocketChannel对象用户从客户端读/写数据
            SocketChannel sc=ssc.accept();

            //3. 创建读数据/写数据缓冲区对象来读取客户端数据或向客户端发送数据
            //读取客户端发送的数据
            ByteBuffer buffer=ByteBuffer.allocate(1024);
            //从通道中读取数据到缓冲区
            sc.read(buffer);
            StringBuffer sb=new StringBuffer();
            buffer.flip();
            while(buffer.hasRemaining()){
                sb.append((char)buffer.get());
            }
            System.out.println(sb.toString());

            ByteBuffer buffer2=ByteBuffer.allocate(1024);
            //向客户端发送数据
            buffer2.put("data has been received.".getBytes());
            buffer2.flip();
            sc.write(buffer2);

            //4. 关闭SocketChannel和ServerSocketChannel
            sc.close();
            ssc.close();
        }
    }
- 客户端:
1.通过SocketChannel连接到远程服务器
2.创建读数据/写数据缓冲区对象来读取服务端数据或向服务端发送数据
3.关闭SocketChannel
    public class Client {
        public static void main(String[] args) throws IOException {
            //1.通过SocketChannel连接到远程服务器
            SocketChannel sc=SocketChannel.open();
            sc.connect(new InetSocketAddress(InetAddress.getByName("LAPTOP-D9966H06"),8888));

            //2.创建读数据/写数据缓冲区对象来读取服务端数据或向服务端发送数据
            //向通道中写入数据
            ByteBuffer buffer=ByteBuffer.allocate(1024);
            buffer.put("hello".getBytes());
            buffer.flip();
            sc.write(buffer);

            //读取从客户端中获取的数据
            ByteBuffer buffer2=ByteBuffer.allocate(1024);
            sc.read(buffer2);
            StringBuffer sb=new StringBuffer();
            buffer2.flip();
            while(buffer2.hasRemaining()){
                sb.append((char)buffer2.get());
            }
            System.out.println(sb.toString());

            //3.关闭SocketChannel
            sc.close();
        }
    }
DatagramChannel的使用
DataGramChannel,类似于java 网络编程的DatagramSocket类; 使用UDP进行网络传输 , UDP是无连接,面向数据报文段的协议。
- 服务端:
    public class Server {
        public static void main(String[] args) throws IOException {
            DatagramChannel dc= DatagramChannel.open();
            dc.bind(new InetSocketAddress(InetAddress.getByName("LAPTOP-D9966H06"),8888));


            //创建读数据/写数据缓冲区对象来读取客户端数据或向客户端发送数据
            //读取客户端发送的数据
            ByteBuffer buffer=ByteBuffer.allocate(1024);
            //从通道中读取数据到缓冲区
            dc.receive(buffer);
            StringBuffer sb=new StringBuffer();
            buffer.flip();
            while(buffer.hasRemaining()){
                sb.append((char)buffer.get());
            }
            System.out.println(sb.toString());

            ByteBuffer buffer2=ByteBuffer.allocate(1024);
            //向客户端发送数据
            buffer2.put("data has been received.".getBytes());
            buffer2.flip();
            dc.send(buffer2,new InetSocketAddress(InetAddress.getByName("LAPTOP-D9966H06"),9999));

            dc.close();
        }
    }
- 客户端:
    public class Client {
        public static void main(String[] args) throws IOException {
            DatagramChannel dc= DatagramChannel.open();
            dc.bind(new InetSocketAddress(InetAddress.getByName("LAPTOP-D9966H06"),9999));

            //创建读数据/写数据缓冲区对象来读取服务端数据或向服务端发送数据
            //向通道中写入数据
            ByteBuffer buffer=ByteBuffer.allocate(1024);
            buffer.put("hello".getBytes());
            buffer.flip();
            dc.send(buffer,new InetSocketAddress(InetAddress.getByName("LAPTOP-D9966H06"),8888));

            //读取从客户端中获取的数据
            ByteBuffer buffer2=ByteBuffer.allocate(1024);
            dc.receive(buffer2);
            StringBuffer sb=new StringBuffer();
            buffer2.flip();
            while(buffer2.hasRemaining()){
                sb.append((char)buffer2.get());
            }
            System.out.println(sb.toString());

            dc.close();
        }
    }
通道之间的数据传输
在Java NIO中如果一个channel是FileChannel类型的,那么他可以直接把数据传输到另一个channel。
    transferFrom() :transferFrom方法把数据从通道源传输到FileChannel
    transferTo() :transferTo方法把FileChannel数据传输到另一个FileChhannel
    public static void copyFile6(String srcFile,String destFile) throws IOException {
        FileInputStream fis = new FileInputStream(srcFile);
        //获取输入字节流的文件通道
        FileChannel fcin = fis.getChannel();
        FileOutputStream fos = new FileOutputStream(destFile);
        //获取输出字节流的文件通道
        FileChannel fcout = fos.getChannel();

        //fcin通道中读出count bytes ,并写入fcout通道中
        //fcin.transferTo(0,fcin.size(),fcout);
        //或者
        fcout.transferFrom(fcin,0,fcin.size());
    }
选择器
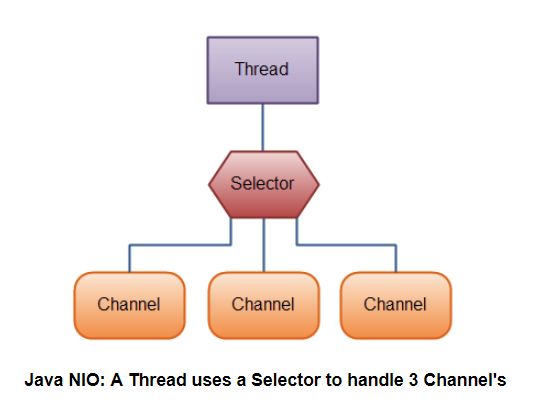
NIO 常常被叫做非阻塞 IO,主要是因为 NIO 在网络通信中的非阻塞特性被广泛使用。
NIO 实现了 IO 多路复用中的 Reactor 模型,一个线程 Thread 使用一个选择器 Selector 通过 轮询的方式 去监听多个通道 Channel 上的事件,从而让一个线程就可以处理多个事件。
通过配置监听的通道 Channel 为 非阻塞 ,那么当 Channel 上的 IO 事件还未到达时, 就不会进入阻塞状态一直等待,而是继续轮询其它 Channel,找到 IO 事件已经到达的 Channel 执行。
因为创建和切换线程的开销很大,因此使用一个线程来处理多个事件而不是一个线程处理一个事件, 对于 IO 密集型的应用具有很好地性能。
应该注意的是,只有套接字 Channel 才能配置为非阻塞,而 FileChannel 不能, 为 FileChannel 配置非阻塞也没有意义。

使用Selector的优点:
使用更少的线程来就可以来处理通道了, 相比使用多个线程, 避免了线程上下文切换带来的开销。
1. 创建选择器
Selector selector = Selector.open();
2. 将通道注册到选择器上
    ServerSocketChannel ssChannel = ServerSocketChannel.open();
    ssChannel.configureBlocking(false);//通道必须配置为非阻塞模式
    ssChannel.register(selector, SelectionKey.OP_ACCEPT);
通道必须配置为非阻塞模式,否则使用选择器就没有任何意义了,因为如果通道在某个事件上被阻塞,那么服务器就不能响应其它事件,必须等待这个事件处理完毕才能去处理其它事件,显然这和选择器的作用背道而驰。
在将通道注册到选择器上时,还需要指定要注册的具体事件,主要有以下几类:
- SelectionKey.OP_CONNECT
- SelectionKey.OP_ACCEPT
- SelectionKey.OP_READ
- SelectionKey.OP_WRITE
它们在 SelectionKey 的定义如下:
    public static final int OP_READ = 1 << 0;
    public static final int OP_WRITE = 1 << 2;
    public static final int OP_CONNECT = 1 << 3;
    public static final int OP_ACCEPT = 1 << 4;
可以看出每个事件可以被当成一个位域,从而组成事件集整数。例如:
int interestSet = SelectionKey.OP_READ | SelectionKey.OP_WRITE;
3. 监听事件
int num = selector.select();
使用 select() 来监听到达的事件,它会 一直阻塞直到有至少一个事件到达 。
4. 获取到达的事件
    Set<SelectionKey> keys = selector.selectedKeys();
    Iterator<SelectionKey> keyIterator = keys.iterator();
    while (keyIterator.hasNext()) {
        SelectionKey key = keyIterator.next();
        if (key.isAcceptable()) {
            // ...
        } else if (key.isReadable()) {
            // ...
        }
        keyIterator.remove();
    }
5. 事件循环
因为一次 select() 调用不能处理完所有的事件,并且服务器端有可能需要一直监听事件,因此服务器端处理事件的代码一般会放在一个死循环内。
    while (true) {
        int num = selector.select();
        Set<SelectionKey> keys = selector.selectedKeys();
        Iterator<SelectionKey> keyIterator = keys.iterator();
        while (keyIterator.hasNext()) {
            SelectionKey key = keyIterator.next();
            if (key.isAcceptable()) {
                // ...
            } else if (key.isReadable()) {
                // ...
            }
            keyIterator.remove();
        }
    }
套接字 NIO 实例
    public class NIOServer {
        public static void main(String[] args) throws IOException {
            //1. 创建选择器
            Selector selector = Selector.open();

            //2.将通道注册到选择器上
            ServerSocketChannel ssChannel = ServerSocketChannel.open();
            ssChannel.configureBlocking(false);
            //通道必须配置为非阻塞模式,否则使用选择器就没有任何意义了
            ssChannel.register(selector, SelectionKey.OP_ACCEPT);

            ServerSocket ss=ssChannel.socket();
            ss.bind(new InetSocketAddress("127.0.0.1",8888));

            while (true){
                //3. 监听事件
                selector.select();

                //4. 获取到达的事件
                Set<SelectionKey> keys = selector.selectedKeys();
                Iterator<SelectionKey> keyIterator = keys.iterator();
                while (keyIterator.hasNext()) {
                    SelectionKey key = keyIterator.next();
                    if (key.isAcceptable()) {
                        ServerSocketChannel ssChannel1 = (ServerSocketChannel) key.channel();

                        // 服务器会为每个新连接创建一个 SocketChannel
                        SocketChannel sChannel = ssChannel1.accept();
                        sChannel.configureBlocking(false);

                        // 这个新连接主要用于从客户端读取数据
                        sChannel.register(selector, SelectionKey.OP_READ);

                    } else if (key.isReadable()) {
                        SocketChannel sChannel = (SocketChannel) key.channel();
                        System.out.println(readDataFromSocketChannel(sChannel));
                        sChannel.close();
                    }
                    keyIterator.remove();
                }
            }
        }

        private static String readDataFromSocketChannel(SocketChannel sChannel) throws IOException {
            ByteBuffer buffer = ByteBuffer.allocate(1024);
            StringBuilder data = new StringBuilder();

            while (true) {
                buffer.clear();
                int r = sChannel.read(buffer);
                if (r == -1) {
                    break;
                }
                buffer.flip();
                int limit = buffer.limit();
                char[] dst = new char[limit];
                for (int i = 0; i < limit; i++) {
                    dst[i] = (char) buffer.get(i);
                }
                data.append(dst);
                buffer.clear();
            }
            return data.toString();
        }
    }
    public class NIOClient {

        public static void main(String[] args) throws IOException {
            Socket socket = new Socket("127.0.0.1", 8888);
            OutputStream out = socket.getOutputStream();
            String s = "hello world";
            out.write(s.getBytes());
            out.close();
        }
    }
内存映射文件
内存映射文件 I/O 是一种读和写文件数据的方法,它可以比常规的基于流或者基于通道的 I/O 快得多。
向内存映射文件写入可能是危险的,只是改变数组的单个元素这样的简单操作,就可能会直接修改磁盘上的文件。修改数据与将数据保存到磁盘是没有分开的。
下面代码行将文件的前 1024 个字节映射到内存中,map() 方法返回一个 MappedByteBuffer,它是 ByteBuffer 的子类。因此,可以像使用其他任何 ByteBuffer 一样使用新映射的缓冲区,操作系统会在需要时负责执行映射。
MappedByteBuffer mbb = fc.map(FileChannel.MapMode.READ_WRITE, 0, 1024);
NIO与IO对比
NIO 与普通 I/O 的区别主要有以下三点:
- NIO 是非阻塞的;
- NIO 面向块,I/O 面向流。
- NIO有选择器,而I/O没有。
Path
Java7中文件IO发生了很大的变化,专门引入了很多新的类来取代原来的 基于java.io.File的文件IO操作方式。
创建一个Path
使用Paths工具类的get()方法创建Path对象
    public class PathDemo {
        public static void main(String[] args) {
            //方式一
            Path path=Paths.get("demo5.txt");
            System.out.println(path);

            //方式二
            Path path2 = FileSystems.getDefault().getPath("demo5.txt");
            System.out.println(path2);
        }
    }
File和Path之间的转换,File和URI之间的转换
    public class PathDemo2 {
        public static void main(String[] args) {
            Path path=Paths.get("demo5.txt");
            File file=path.toFile();
            URI uri=path.toUri();
            System.out.println(path);
            System.out.println(file);
            System.out.println(uri);
        }
    }
    demo5.txt
    demo5.txt
    file:///F:/Java_Review/05Java/JavaIO/demo5.txt
获取Path的相关信息
    public class PathDemo3 {
        public static void main(String[] args) {
            Path path= Paths.get("demo3\\test3.txt");
            System.out.println("文件名:"+ path.getFileName());
            System.out.println("名称元素的数量:"+path.getNameCount());
            System.out.println("父路径:"+ path.getParent());
            System.out.println("根路径:"+ path.getRoot());
            System.out.println("是否是绝对路径:"+path.isAbsolute());

            //startWith() 参数既可以是字符串,也可以是Path
            System.out.println("是否是以路径demo3开头:"+path.startsWith(Paths.get("demo3")));
            System.out.println("该路径的字符串形式:"+path.toString());
        }
    }
    文件名:test3.txt
    名称元素的数量:2
    父路径:demo3
    根路径:null
    是否是绝对路径:false
    是否是以路径demo3开头:true
    该路径的字符串形式:demo3\test3.txt
移除Path中的冗余项
\ .表示的是当前目录
\ ..表示父目录或者说是上一级目录
normalize() : 返回一个路径,该路径是取出冗余项的路径。
toRealPath() : 可以看成,先进行toAbsolutePath()操作,然后进行normalize()操作
    public class PathDemo4 {
        public static void main(String[] args) throws IOException {
            Path path= Paths.get("./demo3");

            System.out.println("original :"+ path.toAbsolutePath());
            System.out.println("after normalize:"+ path.toAbsolutePath().normalize());
            System.out.println("after toRealPath:"+ path.toRealPath());
        }
    }
    original :F:\Java_Review\05Java\JavaIO\.\demo3
    after normalize:F:\Java_Review\05Java\JavaIO\demo3
    after toRealPath:F:\Java_Review\05Java\JavaIO\demo3
    public class PathDemo5 {
        public static void main(String[] args) throws IOException {
            Path path= Paths.get("../JavaIO");

            System.out.println("original :"+ path.toAbsolutePath());
            System.out.println("after normalize:"+ path.toAbsolutePath().normalize());
            System.out.println("after toRealPath:"+ path.toRealPath());
        }
    }
    original :F:\Java_Review\05Java\JavaIO\..\JavaIO
    after normalize:F:\Java_Review\05Java\JavaIO
    after toRealPath:F:\Java_Review\05Java\JavaIO
Files
java.nio.file.Files类是和java.nio.file.Path相结合使用的
检查给定的Path在文件系统中是否存在
Files.exists():检测文件路径是否存在
    public class FilesDemo {
        public static void main(String[] args) {
            Path path = Paths.get("demo5.txt");
            //LinkOptions.NOFOLLOW_LINKS:表示检测时不包含符号链接文件。
            boolean isExist= Files.exists(path,new LinkOption[]{LinkOption.NOFOLLOW_LINKS});
            System.out.println(isExist);
        }
    }
创建文件/文件夹
Files.createFile():创建文件
Files.createDirectory(): 创建文件夹
Files.createDirectories(): 创建文件夹
    public class FilesDemo2 {
        public static void main(String[] args) throws IOException {
            Path path= Paths.get("demo7.txt");
            if(!Files.exists(path)){
                Files.createFile(path);
            }

            Path path2=Paths.get("demo4");
            if(!Files.exists(path2)){
                Files.createDirectory(path2);
            }

            Path path3=Paths.get("demo5\\test");
            if(!Files.exists(path3)){
                Files.createDirectories(path3);
            }
        }
    }
删除文件或目录
Files.delete():删除一个文件或目录
    public class FilesDemo3 {
        public static void main(String[] args) throws IOException {
            Path path= Paths.get("demo7.txt");
            Files.delete(path);
        }
    }
把一个文件从一个地址复制到另一个位置
Files.copy():把一个文件从一个地址复制到另一个位置
    public class FilesDemo4 {
        public static void main(String[] args) throws IOException {
            Path srcPath= Paths.get("demo6.txt");
            Path destPath=Paths.get("demo7.txt");

            //Files.copy(srcPath,destPath);

            //强制覆盖已经存在的目标文件
            Files.copy(srcPath,destPath, StandardCopyOption.REPLACE_EXISTING);
        }
    }
获取文件属性
    public class FilesDemo5 {
        public static void main(String[] args) throws IOException {
            Path path= Paths.get("demo7.txt");

            System.out.println(Files.getLastModifiedTime(path));
            System.out.println(Files.size(path));
            System.out.println(Files.isSymbolicLink(path));
            System.out.println(Files.isDirectory(path));
            System.out.println(Files.readAttributes(path,"*"));
        }
    }
遍历一个文件夹
    public class FilesDemo6 {
        public static void main(String[] args) throws IOException {
            Path path= Paths.get("demo3\\demo2");

            DirectoryStream<Path> paths=Files.newDirectoryStream(path);
            for(Path p:paths){
                System.out.println(p.getFileName());
            }
        }
    }
遍历整个文件目录
FileVisitor需要调用方自行实现,然后作为参数传入walkFileTree(); FileVisitor的每个方法会在遍历过程中被调用多次。
    public class FilesDemo7 {
        public static void main(String[] args) throws IOException {
            Path path= Paths.get("demo3\\demo2");

            List<Path> paths=new ArrayList<>();
            Files.walkFileTree(path,new FileVisitor(paths));
            System.out.println("paths:"+paths);
        }

        private static class FileVisitor extends SimpleFileVisitor<Path> {
            private List<Path> paths;

            public FileVisitor(List<Path> paths){
                this.paths=paths;
            }

            @Override
            public FileVisitResult visitFile(Path file, BasicFileAttributes attrs) throws IOException {
                if(file.toString().endsWith(".txt")){
                    paths.add(file.getFileName());
                }
                return super.visitFile(file, attrs);
            }
        }
    }
输出结果:
paths:[a.txt, test2.txt, test.txt, test3.txt]
