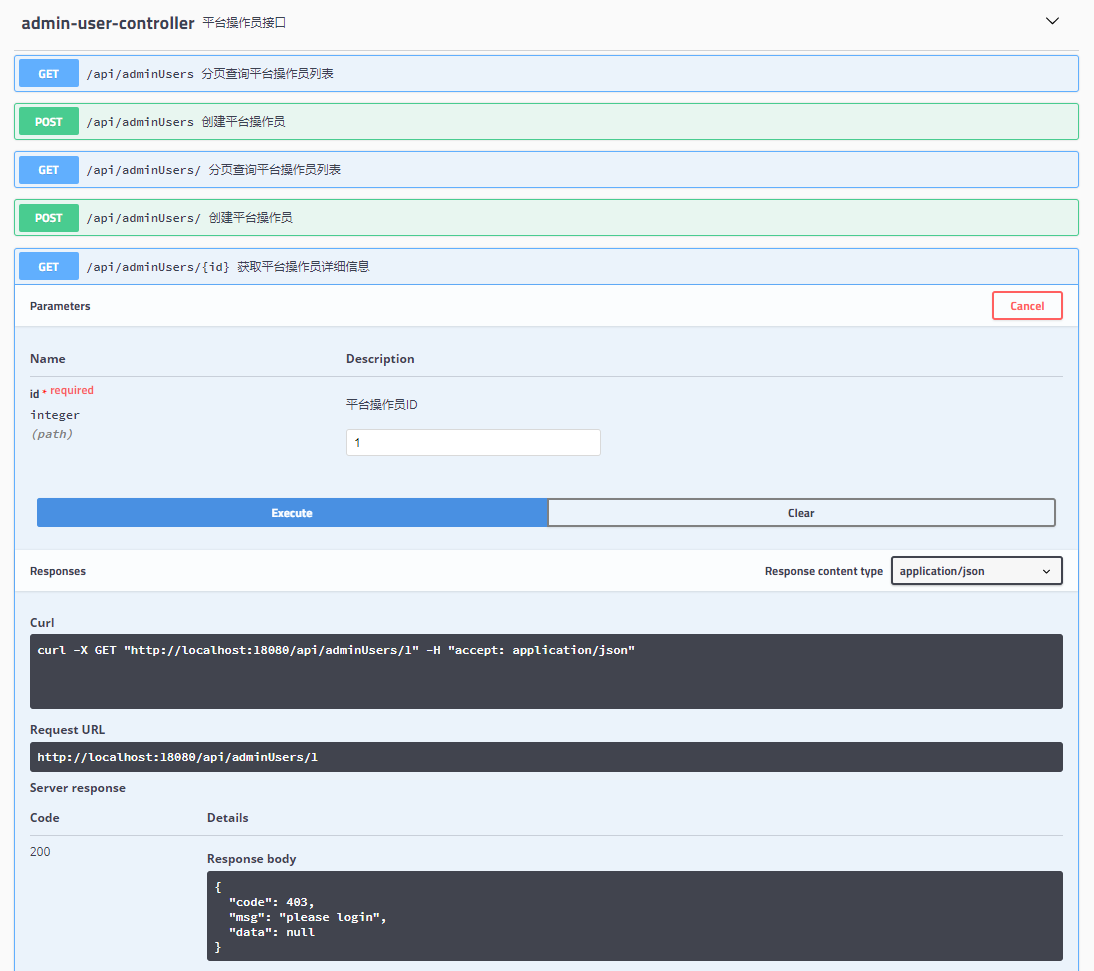
效果如下图

1526906083_67_w1094_h971.png
接入Springfox的过程如下
引入Jar包
    <dependency>
        <groupId>io.springfox</groupId>
        <artifactId>springfox-swagger2</artifactId>
        <version>2.8.0</version>
    </dependency>
    <dependency>
        <groupId>io.springfox</groupId>
        <artifactId>springfox-swagger-ui</artifactId>
        <version>2.8.0</version>
    </dependency>
    <dependency>
        <groupId>com.fasterxml.jackson.core</groupId>
        <artifactId>jackson-databind</artifactId>
        <version>2.8.11</version>
    </dependency>
配置Swagger静态资源
    <!-- SwaggerUI静态资源配置-->
        <mvc:default-servlet-handler/>
        <mvc:resources location="classpath:/META-INF/resources/" mapping="swagger-ui.html"/>
        <mvc:resources location="classpath:/META-INF/resources/webjars/springfox-swagger-ui/"
                       mapping="webjars/springfox-swagger-ui/**"/>
Swagger配置信息
配置信息是一个Spring Bean
    @Configuration
    @EnableSwagger2
    @EnableWebMvc  //这个注解spring4.0+用
    //@ConditionalOnProperty(name = "swagger.open", havingValue = "true")这个配置主要为了生产环境不生成swagger文档
    public class SwaggerConfiguration {
        @Bean
        public Docket createRestApi() {
            Set<String> producesList = new HashSet<>();
            producesList.add("application/json");
            return new Docket(DocumentationType.SWAGGER_2)
                    .apiInfo(apiInfo())
                    .produces(producesList)
                    .select()
                    .apis(RequestHandlerSelectors.withMethodAnnotation(ApiOperation.class))
                    .paths(PathSelectors.any())
                    .build();
        }

        //文档信息说明和个人信息配置
        private ApiInfo apiInfo() {
            return new ApiInfoBuilder()
                    .title("智能客服")
                    .description("智能客服API")
                    .contact(new Contact("timxia", "", "timxia@tencent.com"))
                    .version("1.0")
                    .build();
        }
    }
接口标注
    @Api(description = "平台操作员接口")
    @RequestMapping("api/adminUsers")
    @RestController
    public class AdminUserController {
        @Resource
        private AdminUserService adminUserService;

        @ApiOperation(value = "创建平台操作员", produces = "application/json")
        @RequestMapping(value = {"", "/"}, method = RequestMethod.POST)
        public WebResult createAdminUser(@ApiIgnore @ModelAttribute Session session,
                                         @ApiParam("平台操作员") @RequestBody AdminUser adminUser) {
             return WebResult.SUCCESS;
        }
    }
完成
完成以上步骤后,启动项目后可以在浏览器中打开连接http://localhost:18080/swagger-ui.html,则可以看到接口文档,并且可以直接测试接口(参考第一幅图)
常见问题
- 使用Spring MVC实现Restful时,我们经常使用
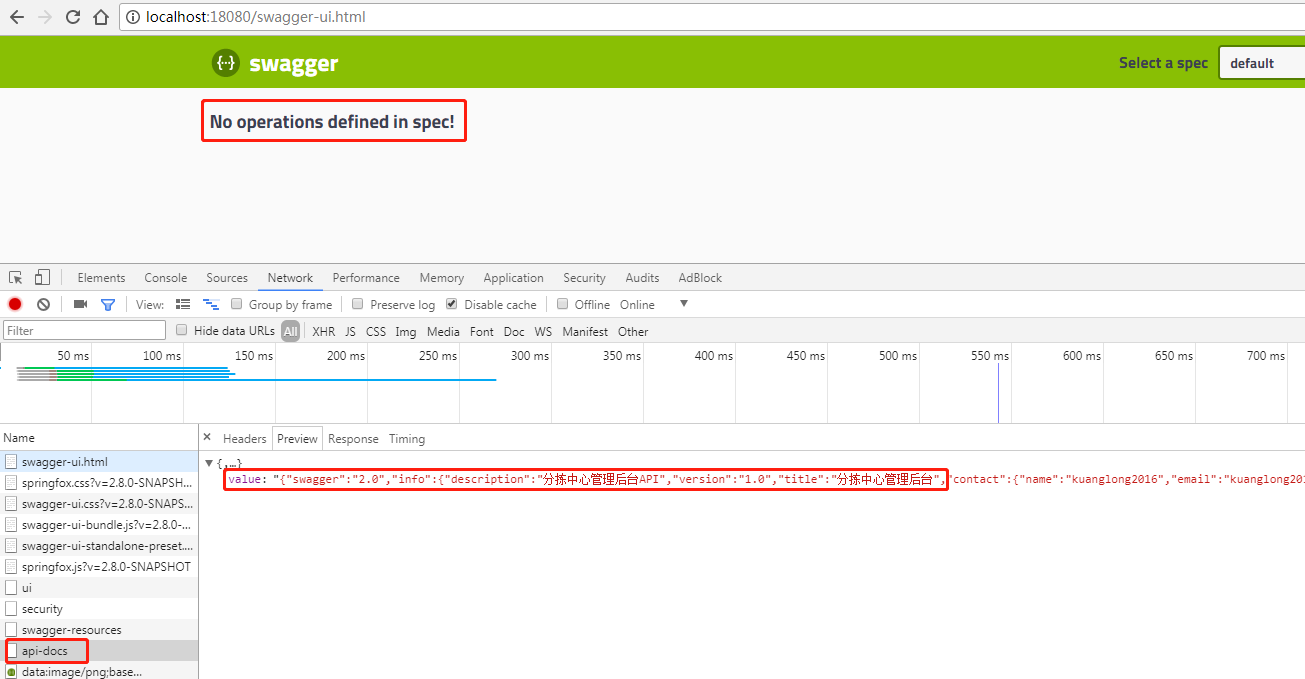
GsonHttpMessageConverter来把对象转换为Json字符串作为API返回值,如果使用GsonHttpMessageConverter,则会出现下面这种没有数据的情况:


出现上述错误的原因是Gson把springfox.documentation.spring.web.json.Json转换为Json时,会多出一个Value层(如上图),解决办法就是定制对该类型的转换规则。 自定义转换规则如下:
    import com.google.gson.*;
    import org.springframework.context.annotation.Bean;
    import org.springframework.context.annotation.Configuration;
    import org.springframework.http.converter.json.GsonHttpMessageConverter;
    import springfox.documentation.spring.web.json.Json;

    @Configuration
    public class HttpMessageConverterConfig {

        @Bean
        public GsonHttpMessageConverter gsonHttpMessageConverter() {
            GsonHttpMessageConverter converter = new GsonHttpMessageConverter();
            converter.setGson(new GsonBuilder().registerTypeAdapter(Json.class, new SpringfoxJsonToGsonAdapter()).create());
            return converter;
        }
    }
    import com.google.gson.JsonElement;
    import com.google.gson.JsonParser;
    import com.google.gson.JsonSerializationContext;
    import com.google.gson.JsonSerializer;
    import springfox.documentation.spring.web.json.Json;

    import java.lang.reflect.Type;

    public class SpringfoxJsonToGsonAdapter implements JsonSerializer<Json> {

        @Override
        public JsonElement serialize(Json json, Type type, JsonSerializationContext context) {
            final JsonParser parser = new JsonParser();
            return parser.parse(json.value());
        }
    }
按照上述配置后api-docs接口就可以正常返回数据了
参考文献
如果对你有一点帮助,麻烦为我点一个赞,如果没有帮助,也非常期待你的反馈
