前言
NIO是理解netty的基础,netty系列的首篇文章就从NIO讲起,不能说是最全面的NIO知识点讲解,但绝对是走心的文章,跟我一起开启NIO之旅吧。
一、NIO是什么?
NIO(New IO),它是一种同步非阻塞I/O模型,也是I/O多路复用的基础,在高并发,大量连接等场景有着比较明显的优势。
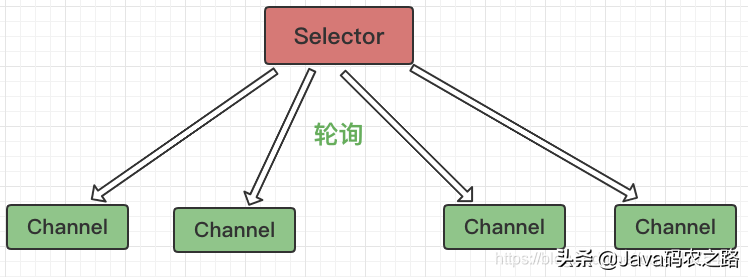
NIO是一种基于通道和缓冲区的I/O方式,主要有三大核心组件:Channel(通道),Buffer(缓冲区), Selector(选择器)。当线程对数据进行操作时,先从Channel将数据读取到Buffer,或者从缓冲区将数据写入到Channel。Selector用于监听多个通道的事件,来通知连接打开,数据到达等操作,一个线程可以监听多个数据通道。
它和传统IO有啥不同呢?
传统IO是面向流的,NIO是面向缓冲区的。
- Java IO面向流意味着每次从流中读一个或多个字节,直至读取所有字节,它们没有被缓存在任何地方。此外,它不能前后移动流中的数据。如果需要前后移动从流中读取的数据,需要先将它缓存到一个缓冲区。
- NIO是直接将数据从通道读到缓冲中,因此可在缓冲区中前后移动。
- IO的各种流是被阻塞的,在进行read和write时,该线程被阻塞,或数据完全写入,NIO不会。
先来解释一下同步、异步,阻塞和非阻塞
1. 同步与异步
同步和异步关注的是消息通信的机制。
同步,就是发出一个调用,在没有得到结果之前,这个调用就不会返回。也就是调用者主动等待这个返回结果。
异步就相反,在这个调用发出之后,调用就立即返回了,没有调用结果。这个调用结果不会被立即得到,而是被调用者通过状态来通知调用者,或者通过回调函数来处理这个调用。
举个生活的例子来帮助大家理解:
当你情人节想约女朋友去她喜欢的饭店吃饭,但是饭店可能需要预定,于是你给老板打电话,如果是同步机制,老板会说,你稍等下,我查下,然后查呀查,等查好(可能是几秒钟,也可能是一个世纪,哈哈)告诉你结果,这个过程你就是在等待着老板给你答复。
而异步通信机制,老板会告诉你我查下,等查好了打电话通知你,然后就直接挂电话了(没有返回结果)。等查好,会打电话给你。在这个场景老板通过"回电"这种方式去回调。
2. 阻塞与非阻塞
阻塞和非阻塞关注的是程序在等待调用结果时的一种状态。
阻塞调用,当一个线程进行read()或者write()时,该线程会被阻塞,在结果返回之前,这个线程都不能进行其他操作。
非阻塞调用就是当线程进行读写数据时,不需要等待结果,它还可以进行其他任务。线程通常将非阻塞 IO 的空闲时间用于在其他通道上执行 IO 操作,所以单独的线程可以管理多个输入和输出通道。因此,NIO 可以让服务器端使用一个或有限几个线程来同时处理连接到服务器端的所有客户端。
二、Channel(通道)
Channel可以理解为一条马路,你想把水果运到一个地方,就要通过马路去运输,而数据就相当于你要运输的东西,马路就是通道,那么装水果的车就是缓冲区。
Channel和传统IO中的Stream很相似。主要区别在于:通道它是双向的,它既可以进行读,也可以进行写。但Stream只能进行单向操作,例如InputStream只能进行读取操作,OutputStream只能进行写操作。
主要的通道实现类
- FileChannel:用于读取、写入、映射和操作文件的通道
    //第一种创建方式
    RandomAccessFile randomAccessFile=new RandomAccessFile("/Users/channel/Logs/2021-06-19.log","rw");
           FileChannel fileChannel=randomAccessFile.getChannel();
    //第二种创建方式
            FileChannel fileChannel = FileChannel.open(Paths.get("/Users/channel/Logs/2021-08-06.log"),
            StandardOpenOption.READ,StandardOpenOption.WRITE);
- DatagramChannel: 通过UDP读写网络中的数据通道
     //1.通过DatagramChannel的open()方法创建一个DatagramChannel对象
            DatagramChannel datagramChannel = DatagramChannel.open();
            //绑定一个port(端口)
            datagramChannel.bind(new InetSocketAddress(1234));
- SocketChannel: 通过tcp读写网络中的数据
      SocketChannel socketChannel=SocketChannel.open();
            socketChannel.connect(new InetSocketAddress("127.0.0.1",8080));
- ServerSocketChannel: 可以监听新进来的tcp连接,对每一个连接都创建一个SocketChannel
       ServerSocketChannel serverSocketChannel= ServerSocketChannel.open();
            serverSocketChannel.socket().bind(new InetSocketAddress("127.0.0.1",3333));
               //通过accept方法创建一个socketChannel方法用于读取和写入操作
           SocketChannel socketChannel= serverSocketChannel.accept();
Channel主要方法
- FileChannel.open(文件路径, 操作权限):获取channel
- read(buffer): 将channel中的数据写入到buffer
- read(buffers):把数据按顺序写入到buffer数组内,一个buffer写满后接着写到下一个buffer
- write(buffer):将buffer中的内容写入到文件中
- write(buffers):把buffer数组数据按顺序写入到channel中
- transferFrom(inChannel, 0, inChannel.size()):将数据从一个源inChannel传输到本通道中
- transferTo():将本通道的数据传输到目标通道中
- socketChannel.connect(new InetSocketAddress(hostname,port)):远程通道连接
- serverSocketChannel.socket().bind(new InetSocketAddress(hostname,port)):监听连接
- serverSocketChannel.accept():创建socketChannel
- close():关闭通道
代码实例
     public static void fileChannelTest() throws IOException {
            /**
             * 两种获取FileChannel方式
             * 1. 通过RandomAccessFile
             * 2. 通过FileChannel
             */
            //rw代表指支持读和写
    //        RandomAccessFile randomAccessFile=new RandomAccessFile("/Users/channel/Logs/2021-08-19.log","rw");
    //        FileChannel fileChannel=randomAccessFile.getChannel();

            FileChannel fileChannel = FileChannel
            .open(Paths.get("/Users/channel/Logs/2021-08-19.log"),
                    StandardOpenOption.READ,StandardOpenOption.WRITE);

            //读取文件内容:
            ByteBuffer buffer=ByteBuffer.allocate(1024);
            //将channel中的数据写入buffer
            int num=fileChannel.read(buffer);
            System.out.println("读取的数据量:"+num+".内容为:\r\n"+new String(buffer.array()));
            buffer.clear();
            //写入完还可以继续向文件内追加内容
            buffer.put("\r\n".getBytes());
            buffer.put("你好,我好,大家都好".getBytes());
            //buffer由写入模式转换为读取模式需要调用flip方法
            buffer.flip();
            while (buffer.hasRemaining()){
                //将Buffer中的内容写入文件
                fileChannel.write(buffer);
            }
            //关闭通道
            fileChannel.close();
        }
N个Buffer的处理
    /**
         * Scatter: 从一个Channel读取的信息分散到N个缓冲区中(Buufer).
         *
         * Gather: 将N个Buffer里面内容按照顺序发送到一个Channel.
         *
         */
        public static void scatterGatherTest() throws IOException {
            FileChannel fileChannel = FileChannel.open(Paths.get("/Users/channel/Logs/2021-08-19.log"), StandardOpenOption.READ,StandardOpenOption.WRITE);
            ByteBuffer oneBuffer=  ByteBuffer.allocate(1024);
            ByteBuffer twoBuffer=  ByteBuffer.allocate(1024);
            ByteBuffer[] byteBuffers={oneBuffer,twoBuffer};
            //read方法会负责把数据按顺序写入到buffer数组内,一个buffer写满后接着写到下一个buffer
            fileChannel.read(byteBuffers);
            oneBuffer.flip();
            twoBuffer.flip();
            //write()方法内部会负责把数据按顺序写入到channel中。
            fileChannel.write(byteBuffers);
        }
通道之间的直接传输
        public static void transfer() throws IOException {
            FileChannel fileOneChannel = FileChannel.open(Paths.get("/Users/channel/Logs/2021-08-19.log"), StandardOpenOption.READ,StandardOpenOption.WRITE);
            FileChannel fileTwoChannel = FileChannel.open(Paths.get("/Users/channel/Logs/2021-08-20.log"), StandardOpenOption.READ,StandardOpenOption.WRITE);
            //transfer方法   内部是直接缓冲区的方式实现
            //将fileTwoChannel数据传输到fileOneChannel
            fileOneChannel.transferFrom(fileTwoChannel, 0, fileTwoChannel.size());
            //将fileOneChannel数据传输到fileTwoChannel
            fileOneChannel.transferTo(0,fileTwoChannel.size(),fileTwoChannel);
            fileTwoChannel.close();
            fileOneChannel.close();
        }
三、缓冲区(Buffer)
概念
Buffer实际上就是一个容器,是一个连续的数组。Channel提供从文件或者网络读取数据的通道,但读取或者写入的数据都必须经过Buffer,例如下面这张图所示:

客户端发送数据时,必须将数据存入Buffer中,然后通过Channe进行运输。而服务端想接收到数据,必须通过Channel将数据读入Buffer,再从Buffer中取出数据来处理。
Buffer的三个属性
Buffer有三个属性,capacity(固定大小值),position(指向下一个位置),limit(限制数量)。
除了这三个属性,还有一个标记属性:mark,可以临时保存一个特定的position,需要的时候,可以恢复到这个位置。

capacity
作为一个内存块,Buffer有一个固定的大小值,就叫“capacity”。你只能往里写capacity个数据,一旦Buffer满了,就不能再写入。
capacity一旦初始化,就不能改变。Buffer对象在初始化时,会按照capacity分配内部的内存。内存分配好后,大小就不能变了。分配内存一般是用Buffer的抽象子类ByteBuffer.allocate()方法。
position
position表示当前的位置,position在Buffer的两种模式下值是不同的。
读模式
当读取数据时,也就是从position位置开始读。将Buffer从写模式切换到读模式,position会被重置为0。从Buffer的position处读取数据时,position向前移动到下一个可读的位置。
写模式
当写数据到Buffer,position表示当前的写入位置。初始的position值为0,position最大可为capacity-1。
每当一个数据写到buffer,position都会向后移动到下一个可写位置。
这个向后移动到下一个位置,可能有点疑惑,我举个例子:
假定写入了5个数据,因为是从0的位置开始,所以当5个数据写入完,第5个数据的位置是4,有的读者可能以为position的值是4,但position总是会移动到下一个可写位置,那么下一个可写位置是5,所以此时position真正的值是5而不是4.
limit
limit表示最大的限制,跟position一样,在读和写模式值是不同的。
读模式
读模式下,Buffer的limit值表示最多能从Buffer读取多少数据。当Buffer从写模式切换到读模式,limit的值,设置成写模式的position值。
写模式
limit表示可以写入的数据最大限制。从读模式切换到写模式时,limit的值会被改变,设置成Buffer的capicity。
Buffer类型
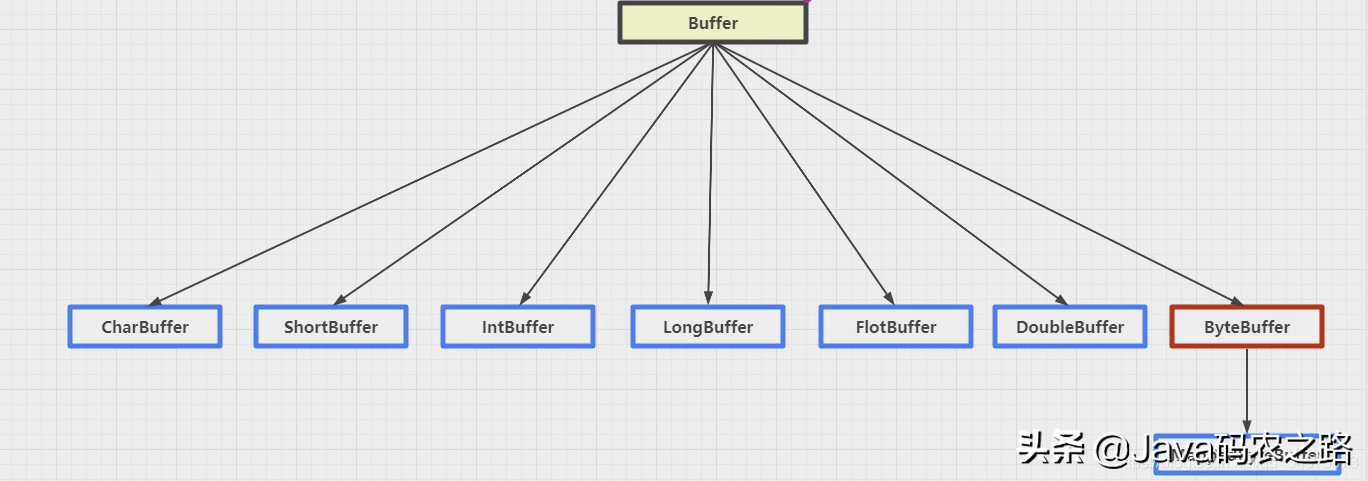
用一张图概括

这些Buffer基本覆盖了能从IO中传输的所有的Java基本类型,这里就不再一一展开去讲。
Buffer中的方法
1. allocate()方法
申请缓冲区,创建缓冲区大小。
     //每个buffer对象都提供了一个静态方法allocate,用来创建缓冲区大小
            //帮助我们实现一个Buffer
            ByteBuffer byteBuffer=ByteBuffer.allocate(9);

3. flip()方法:转换为读模式
byteBuffer.flip();

4. get()方法:读取数据
           // 1. 按照position顺序读取,每get一次,postion+1
            byte val1=byteBuffer.get();

            //2. 获取指定位置数据
            byte val2=byteBuffer.get(3);

            // 将buffer中的数据,拷贝到一个指定的数组中
            byte[] bytes=new byte[3];

            //3. 将buffer数据拷贝到指定数组中
            byteBuffer.get(bytes);
             // 4. 直接返回Buffer内部的byte[]数组
            String str=new String(byteBuffer.array());
有四种读取方式,下面的图我以第三种方式展现,帮助大家理解

5. compact()方法
compact方法会先处理还没有读取的数据,也就是position到limit之间的数据(还没有读的数据)先将这些数据移到左边,然后在接着往后写数据。
      public static void compactBuffer(){
            ByteBuffer byteBuffer=ByteBuffer.allocate(9);
            byte[] bytes=new byte[]{0,1,2,3,4,5};
            byteBuffer.put(bytes);

            //读之前,需要先调用flip方法
            byteBuffer.flip();

            for (int i=0;i<4;i++){
                System.out.println(byteBuffer.get());
            }

            System.out.println("compact操作之前position的位置"+byteBuffer.position());
            //读取了一部分,又想继续往里写入数据,未来提升可写空间,将已读过的数据的空间释放掉
            byteBuffer.compact();
            byte b=9;
            byteBuffer.put(b);
            System.out.println("compact操作之后填充数据后position位置"+byteBuffer.position());
        }
        ****结果值****
         compact操作之前position的位置4   limit的位置6
    compact操作之后填充数据后position位置2   limit的位置9
    compact操作之后填充数据后position位置3   limit的位置9
6. clear()方法 :相当于将Buffer清空,position会被设置为0,limit值被设置为capacity的值
7. rewind方法 :会将position设置为0,limit保持不变,并且读过的数据因为position位置重置可以重新进行读取
            ByteBuffer byteBuffer=ByteBuffer.allocate(9);
            byte[] bytes=new byte[]{0,1,2,3,4,5};
            byteBuffer.put(bytes);

            //读之前,需要先调用flip方法
            byteBuffer.flip();
            byte[] readbyte=new byte[3];

            //4. 将buffer数据拷贝到指定数组中
            byteBuffer.get(readbyte);
            System.out.println("byte数组rewind操作之前position的位置"+byteBuffer.position()+"    limit的位置"+byteBuffer.limit());
            byteBuffer.rewind();
            System.out.println("byte数组rewind操作之后position的位置"+byteBuffer.position()+"    limit的位置"+byteBuffer.limit());
            System.out.println(byteBuffer.get());
       /*
       *控制台打印值
       /
    //        byte数组rewind操作之前position的位置4    limit的位置6
    //        byte数组rewind操作之后position的位置0    limit的位置6
    //        0
代码实例
通过allocate()方法分配缓冲区,将缓冲区建立在JVM的内存中
非直接缓存区在读取数据时是先将在物理硬盘当中的数据读取到物理内存当中,然后再将内容复制到JVM内存当中,程序最后从JVM中读取到最终数据。
代码如下(示例):
    data = pd.read_csv(
        'https://labfile.oss.aliyuncs.com/courses/1283/adult.data.csv')
    print(data.head())
四、选择器(Selector)
Selector 可以称为选择器,也可以叫做多路复用器。主要Selector selector = Selector.open();检查一个或多个NIO Channel(通道) 的状态是否处于可读、可写。如此可以实现单线程管理多个channels,也就是可以管理多个网络连接。selectoe底层在windows默认是select函数,在linux默认是epoll。

为什么要使用Selector?
使用Selector可以只需要更少的线程来处理多个通道,相比使用多个线程,可以大大减少线程上下文切换带来的开销。
Selector使用方法
1. Selector的创建
通过调用open方法来创建一个Selector对象:
Selector selector = Selector.open();
2. 将Channel注册到Selector
       //设置为非阻塞
            socketChannel.configureBlocking(false);
            //只读
            socketChannel.register(selector, SelectionKey.OP_READ);
Channel默认是阻塞的,因此在这里必须将Channel设置为非阻塞。
FileChannel不是非阻塞的,因此FileChannel不能切换为非阻塞模式。
registor() 方法的第二个参数是一个集合。意思是通过Selector监听时对什么事件感兴趣。可以监听四种不同类型的事件:
    SelectionKey.OP_CONNECT  //连接就绪
    SelectionKey.OP_ACCEPT   //接收就绪
    SelectionKey.OP_READ    // 读就绪
    SelectionKey.OP_WRITE    //写就绪
通道触发一个事件就代表该事件已经就绪。当某个Channel成功连接到另一个服务器称为连接就绪。
一个Server Socket Channel准备好接收新进入的连接就是接收就绪。
一个有数据可读的通道代表着读就绪。
等待写数据的通道代表写就绪。
3. SelectionKey介绍
一个SelectionKey表示来一个特定通道对象和特定选择器对象之间的注册关系。
       key.attachment();
       key.channel();
       key.selector();
       key.interestOps();
       key.readyOps();
key.interestOps()
可以通过以下方法判断Selector是否对Channel的某种事件感兴趣
    int interestSet = selectionKey.interestOps();
    boolean isInterestedInAccept = (interestSet & SelectionKey.OP_ACCEPT) == SelectionKey.OP_ACCEPT;
    boolean isInterestedInConnect = interestSet & SelectionKey.OP_CONNECT;
    boolean isInterestedInRead = interestSet & SelectionKey.OP_READ;
    boolean isInterestedInWrite = interestSet & SelectionKey.OP_WRITE;
key.readyOps()
ready集合是通道已经准备就绪的操作集合,JAVA中定义以下方法来检查这些操作是否就绪。
    //创建ready集合的方法
    int readySet = selectionKey.readyOps();
    //检查这些操作是否就绪的方法
    key.isAcceptable();//是否可读,是返回 true
    boolean isWritable()://是否可写,是返回 true
    boolean isConnectable()://是否可连接,是返回 true
    boolean isAcceptable()://是否可接收,是返回 true
4. select()方法
        //1.select():会阻塞当前线程,直到selector管理的channel,有某个就绪之后,才会唤醒主线程。
            int readyChannels=  selector.select();
            //2. select(long timeout)这个接口会带超时时间去阻塞调用线程,
            // 在超时时间内有就绪的channel,则提前返回。否则一直等到超时时间为止。
            int readyChannel=  selector.select(2000);
            //selectNow()非阻塞select接口,调用之后立马返回,如果底层有Channel就绪则返回就绪channel数量
            int readyChannelNow=selector.selectNow();
代码实例
说了那么多概念和方法,下面就用一个简单的代码实例来实战一下:
            //获取一个selector多路复用器
            Selector selector = Selector.open();
            //创建ServerSocketChannel并且监听8866端口。。
            ServerSocketChannel serverSocketChannel = ServerSocketChannel.open();
            serverSocketChannel.socket().bind(new InetSocketAddress(8866));
            serverSocketChannel.configureBlocking(false);
            //将serverSocketChannel注册到selector,并且设置感兴趣事件为:accept
            serverSocketChannel.register(selector, SelectionKey.OP_ACCEPT);
            while (true) {
                //使用阻塞select方法,这个方法只有在selector上注册的channel有就绪的才返回。
                selector.select();
                //获取就绪列表
                Set<SelectionKey> keys = selector.selectedKeys();
                //获取迭代器
                Iterator<SelectionKey> it = keys.iterator();

                while (it.hasNext()) {
                    SelectionKey key = it.next();
                    key.attachment();
                    key.channel();
                    key.selector();
                    key.interestOps();
                    key.readyOps();
                    key.isAcceptable();
                    try {
                        key.cancel();
                    } catch (Exception e) {
                        e.printStackTrace();
                    }
                    //条件成立:当前就绪key,代表有ACCEPT事件就绪,有客户端要连接当前server
                    if ((key.readyOps() & SelectionKey.OP_ACCEPT) == SelectionKey.OP_ACCEPT) {
                        ServerSocketChannel serverChannel = (ServerSocketChannel) key.channel();
                        //当前ServerSocketChannel已经处于ACCEPT就绪状态,所以当前accept方法会返回SocketChannel实例
                        SocketChannel socketChannel = serverChannel.accept();
                        //客户端socket设置为非阻塞模式
                        socketChannel.configureBlocking(false);
                        //客户端通道注册到当前selector
                        socketChannel.register(selector, SelectionKey.OP_READ);
                        it.remove();
                    } else if ((key.readyOps() & SelectionKey.OP_READ) == SelectionKey.OP_READ) {
                        ByteBuffer byteBuffer = ByteBuffer.allocate(1024);
                        SocketChannel socketChannel = (SocketChannel) key.channel();
                        try {
                            //客户端socket读缓冲区内已经有数据等待读取了,所以read方法直接就会拿到数据,将数据写入到byteBuffer内
                            while (true) {
                                byteBuffer.clear();
                                int reads = socketChannel.read(byteBuffer);
                                if (reads == -1) break;
                                byteBuffer.flip();
                                socketChannel.write(byteBuffer);
                            }
                        } catch (IOException e) {
                            e.printStackTrace();
                            //对端关闭后,服务端一定要关闭,否则selector内会一直检查这个socketchannel
                            socketChannel.close();
                        } finally {
                            it.remove();
                        }

                    }
                }
            }
总结
整篇文章我们首先讲了NIO的概念,它是同步非阻塞I/O模型,接着说到了它和传统IO的不同点,传统IO是阻塞的,且是面向流的,而NIO是面向缓冲区。又解释了一下同步、异步,非阻塞、阻塞。最后我们重点讲解了NIO的三大核心组件,通道、缓冲区和选择器。知识点很多,需要慢慢消化哦。 有什么不懂不理解的欢迎大家关注我,评论或者给我留言,一起讨论,一起进步。
